Implex plugin import
The plugin Import allows the simple assignment of source fields to target fields within the CortexEngine. The plugin supports a guided import with interfaces that simplify configuration. The configurations created in the plugin can be exported for a regular automated import.
The following actions are possible:
Requirements
New records of a record type are created during data import. The contents are written to assigned fields.
Important
A record type with suitable fields is required for the data import. If required, create new fields and/or a new record type.
User permissions
-
a permission set accordingly in the user administration of the Remote admin
Tip: Set up a separate user account with which data imports can be carried out.
-
The user name and password for this account are required in the exported configuration files and when using the plugin.
Import from CSV file
When importing data into CortexEngine for the first time, it is recommended to import the data from a CSV file.
Note
When importing CSV files that contain several sheets with tables, only the table of the first sheet is imported.
Records can be created in several data types from one data source.
Procedure of the CSV import
-
click the button Import on the quick launch bar
The following window opens:
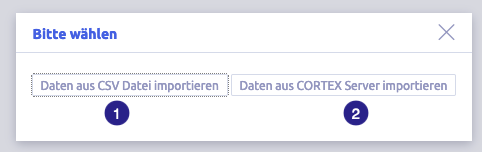
-
select Import data from CSV file
The following window opens:

The image shows the CSV import basic settings: (1) select CSV file or button Upload new
 or button Reset previous selection
  , (2) selection Import mode, (3) selection Column mode, (4) selection Character set, (5) selection Field separator, (6) selection Field delimiter, (7) selection Repeating field separator, (8) checkbox Ignore 0 characters, (9) button Read CSV file
As soon as a file has been selected or uploaded, the system attempts to determine the default settings of the file and adjust the selection in the basic settings accordingly.
Table with all elements of the basic settings
Name Meaning Note CSV file selection between
select an existing file from the dropdown
upload a new file
reset previous selectionupload file: please note the information in the next step of the import process Import mode options:
updating or creating
creating
updatingUpdating or creating requires Reference values
The fields with reference values are defined in the next step.Column mode options:
header
ABC
numericalCSV files usually contain header information in the first row, such as surname, first name and location. This information is important as it enables the import data to be assigned to the target fields.
If a CSV file does not contain any header information, a virtual header can be used for the import. Instead of field names, letters (A, B, C...) or numerical values (1, 2, 3, ...) can be selected.Character set options:
ISO-8859-1
windows-1252
UTF-8In order to display special characters correctly, the system must recognize the character set (encoding) used. In order for the characters of a source file to be imported correctly, the character set must be known and defined for the import Field separator options:
; (semicolon)
, (comma)
(TAB)
otherField separators are required so that the contents of CSV files can be clearly separated from each other. A separator separates two values from each other. Field delimiter options:
" (double quote)
' (single quote)A delimiter is placed directly before and after a value to limit it. Repeating field separator options:
, (comma)
; (semicolon)
| (pipe)Defined fields in a CortexEngine can be used multiple times in a record. Within the source data, several values can belong to one field, separated by a repeating field separator. Each value between the separators is imported into the new record as a separate field value. Ignore 0 characters there are two options for importing numerical values:
The zero represents a real value and should be evaluated: please leave the checkbox empty
Zero value without further use, can be ignored: please activate checkboxPlease ensure that you use different characters for field separators and repeating field separators.
-
select the CSV file that you want to import
Upload a new file if required
Please note that the maximum size of the CSV file is administratively limited by the web server to 64MB.
If you wish to adjust the size, please contact our customer support (cortex-info@cortex-ag.com).
-
check the basic settings and, if necessary, adjust them to the settings of the file to be imported
-
click the button Read CSV file (9)
The following window opens:
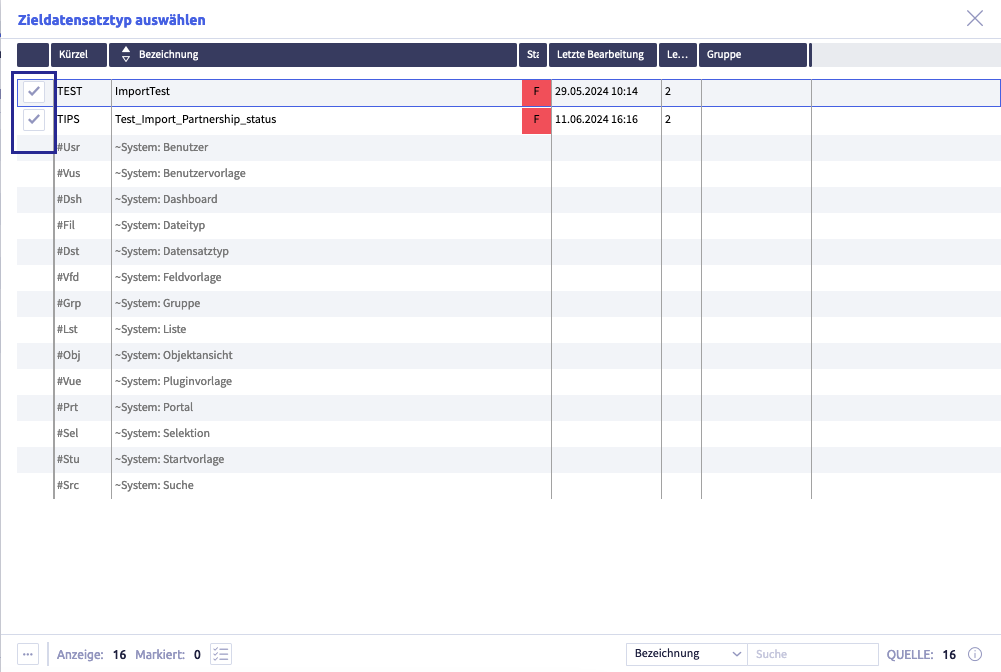
The image shows a list of record types. Available record types can be recognized by the button with a tick (framed).
-
click the button of the record type into which you want to import the data
The following window opens:
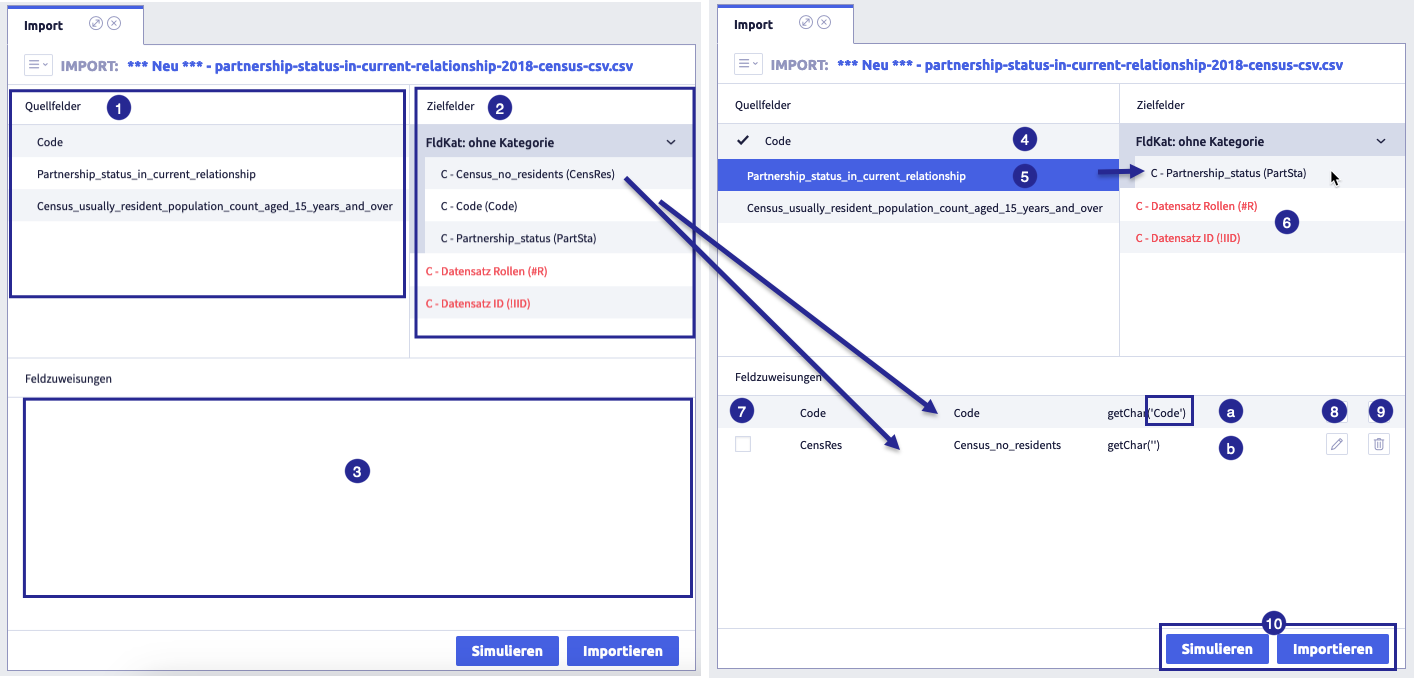
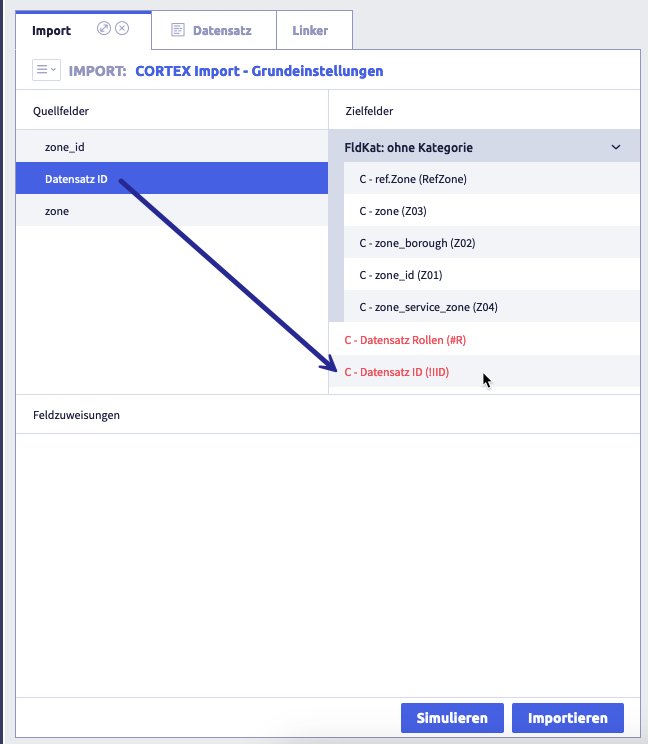
The image shows the assignment of source and target fields, on the left before the assignment, on the right during the assignment: (1) list Source fields, (2) list Target fields, (3) list Field assignments, (4) already assigned source field, recognizable by the check mark, (5) source field that is currently being assigned, (6) record roles / record IID, (7) checkbox Set field as reference, (8) button Edit
 to adjust the import function if required, (9) button Delete
  , (10) buttons Simulate and Import, (a) source and target field are linked, recognizable by the framed field name, (b) unlinked target field without source field
Table with elements of the source-target-assignment
Name Meaning Note list Source fields fields contained in the import file list Target fields fields in which the contents of the import file are written The list contains the letter of the field type, the field name and the field synonym in brackets. field assignments shows in each row which import function imports which content into a target field The columns show the following content from left to right: synonym of the target field, name of the target field, import function incl. column header of the source field. target field Record roles possibility to assign role(s) to all records of a record type target field Record IID possibility to to assign content to all records of a record type via the IID, e.g. to a new field checkbox Set the field as reference possibility to to avoid duplicate records by checking the reference field of the records before the import edit field assignment possibility to select a different import function and/or to edit the source field (text in single quotes) delete field assignment button Simulate simulates the import button Import Record roles
Within the CortexEngine, roles can be assigned to users and records to restrict read and write permissions as soon as the role check is active.
Note
It is possible to add the target field Record roles several times, e.g. to assign several roles to the records. Record roles is a repetition field.
Record ID
Each record has its own ID. This means that if a change is made to all records of a record type, all data records can be edited safely. Safe means that there is no inaccuracy that can occur when using a reference field.
Example: a new field in the record type into which the content from one or more other fields of the data record type is written.
This new field can be filled automatically in one step using the record ID.
Reference fields
Reference fields are used to uniquely identify records. For unique identification, it is possible to use several fields as a common reference, e.g. first name + surname + date of birth.
The reference fields are used to search for unique CortexEngine content:
- If the Implex finds exactly one single record using the reference fields, this record can be updated.
- If the Implex finds several records, no update is possible.
- If no record is found using the reference fields, the Implex creates a new record depending on the import mode.
- If no reference field is set, the Implex creates a new record depending on the import mode.
Use the checkbox on the left-hand side to select the corresponding fields as reference.
Note: The import process will be slower if a combination of the selected reference fields has to be searched for within the CortexEngine.
Overview of import functions
String
Function Description Note getChar(``)takes over the characters of a string concat(String s1, String s2)concatenate two input strings to a result string length(String str)returns the length of a string lower(String val)converts a string to lower case letters normHnr(String in)for normalizing a house number pad_left(String in, Integer len)returns a string in which the characters of the input string are right-aligned by padding the left-hand side with spaces pad_right(String in, Integer len)returns a string in which the characters of the input string are left-aligned by padding the right-hand side with spaces pad_left(String in, String char, Integer len)returns a string in which the characters of the input string are right-aligned by padding the left-hand side with the specified character pad_right(String in, String char, Integer len)returns a string in which the characters of the input string are left-aligned by padding the right-hand side with the specified character replace(String sIn, String sSeek, String sRepl)replaces a search string in the input string with a replacement string rsubstring(String in, Integer start)returns all characters from the input string, starting from the desired start character startsplit(String src, String splitStr, Integer n)returns the nth element from the split input string substring(String in, Integer start, Integer len)returns a substring of the input string with the specified length from the transferred start position trim(String in)performs a trim on a string upper(String val)converts a string to upper case letters findFirst(in, match)findFirst(in, match, startPos)finds the first position of a character (optionally from a certain position) and returns the position as Int only available in console-based Implex application findLast(in, match)findLast(in, match, startPos)finds the last position of a character (optionally from a certain position) and returns the position as Int only available in console-based Implex application Numerical
Function Description PLUS(v1, v2)adds the two numerical values MINUS(v1, v2)subtracts two numerical values from each other MUL(v1, v2)returns the product of the two numerical values DIV(v1, v2)returns the quotient of two numerical values Date
Function Description Note date(String format, String in)convert any date format to the CortexEngine format time()The call without parameters returns the current timestamp to the minute.
FConversion with the date function is necessary for use as history information.only available in console-based Implex application Konversion
Function Description Note cdouble(String in)convert string to double konvertieren; double (floating point number (64 bit) with at least 10 decimal places) cfloat(String in)convert string to float; float (floating point number (32 bit) with at least 6 decimal places) cint(String in)convert string to integer; Int (at least 16 bit = 65536 possible values) clong(Object in)long integer value = integer with double value range of Int cstring(Object in)convert any other data type to string date(String format, String in)convert any date format to the CortexEngine format time(String date)converts a string in Cortex date format into a Cortex-internal long timestamp only available in console-based Implex application Files
Function Description file_extension(String file)returns the extension of a transferred file name file_woext(String file)returns the file name without extension, free of path information file(String sFileName)imports a file filename(String file)returns the file name, free of path information filepath(String file)returns the absolute path of a file sourceFileName()returns the file name including extension of the called import file Check
Function Description empty(String in)returns whether the transferred string has the length 0 endsWith(String str1, String end)checks whether the input string (str1) ends with the check string (end) equals(String str1, String str2)checks whether two strings are equal notequals(String str1, String str2)checks whether two strings are not equal Boolean
Function Description AND(Boolean v1, Boolean v2)performs the AND operation on two Boolean values NOT(Boolean in)returns the transferred Boolean value negated OR(Boolean v1, Boolean v2)performs the OR operation on two Boolean values iif(Boolean ifclause, then, elsedo)returns then, ififclause== true, elseelsedoVariables
It is particularly helpful for extensive import configurations if values that have already been defined can be reused via variables.
Function Description Note getVar(StringName)text value; variables can be set and read using two functions setVar(StringName, StringValue)text value; variables can be set and read using two functions getVarDouble(String Name)numerical values; variables can be set and read using two functions only available in console-based Implex application setVarDouble(String Name, String Value)numerical values; variables can be set and read using two functions only available in console-based Implex application Variables can only be used to the right of the equals sign of the value assignment. They cannot be used to the left of the equals sign (e.g. to determine a transaction date).
only available in console-based Implex application
Function Description findFirst(in, match)findFirst(in, match, startPos)finds the first position of a character (optionally from a certain position) and returns the position as Int findLast(in, match)findLast(in, match, startPos)finds the last position of a character (optionally from a certain position) and returns the position as Int time(String date)converts a string in Cortex date format into a Cortex-internal long timestamp time()The call without parameters returns the current timestamp to the minute.
FConversion with the date function is necessary for use as history information.getVarDouble(String Name)numerical values; variables can be set and read using two functions setVarDouble(String Name, String Value)numerical values; variables can be set and read using two functions -
click on a source field to assign it
The column headings of the source are displayed (or numerically/alphabetically if this option is activated).
The row turns blue (5).
-
click on the corresponding target field of the selected record type
- A row appears in the area Field assignments.
- The source field is given a check mark (4).
- The target field is no longer in the list Target fields.
-
assign the required fields one after the other
Remove assignment
To remove a field assignment, click the button Delete
of the corresponding row. -
click on the target field Record roles if required
-
click the button Edit
and edit the text field with the import functionAssign role(s)
If you want to assign multiple roles, add the target field Record roles several times and edit the field each time using the import function.
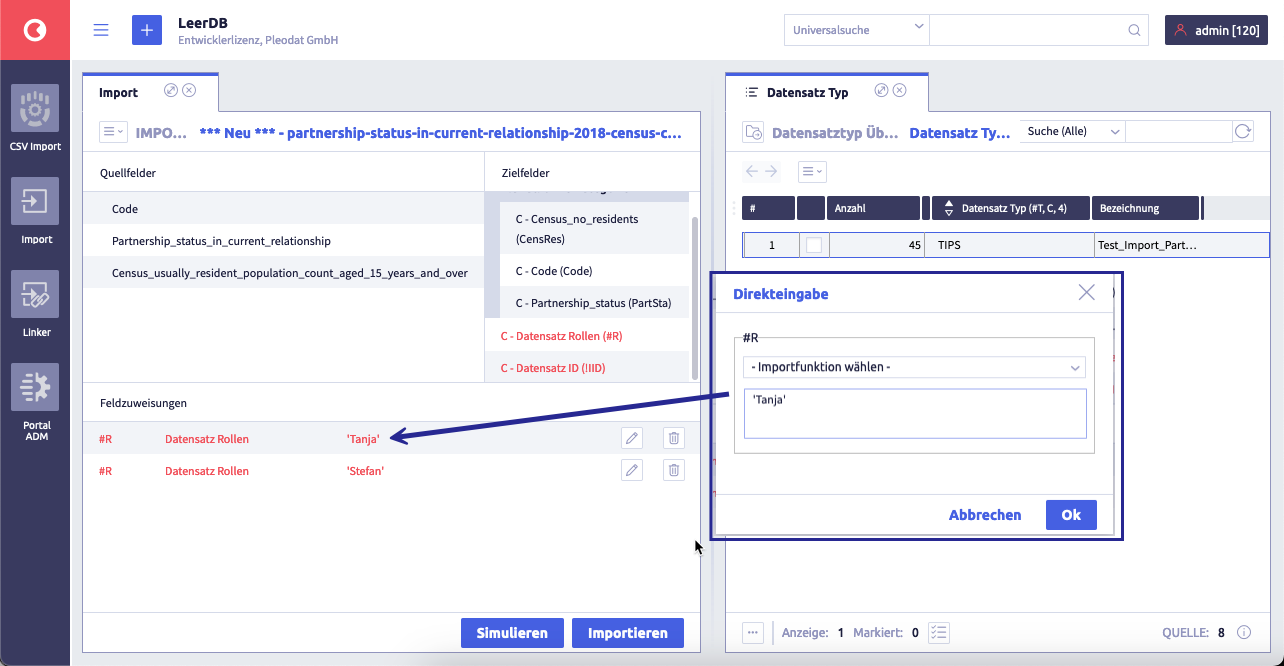
The image shows the editing of the text field: Delete the actual function and write the role in single quotes.
-
-
assign source and target field Record ID if required
Assign record ID and edit additional target field
The image shows the assignment of source and target fields with the source field Record ID
-
click on a target field that is to be overwritten
-
click the button Edit
of the target field and edit the text field with the import functionThe following window opens:
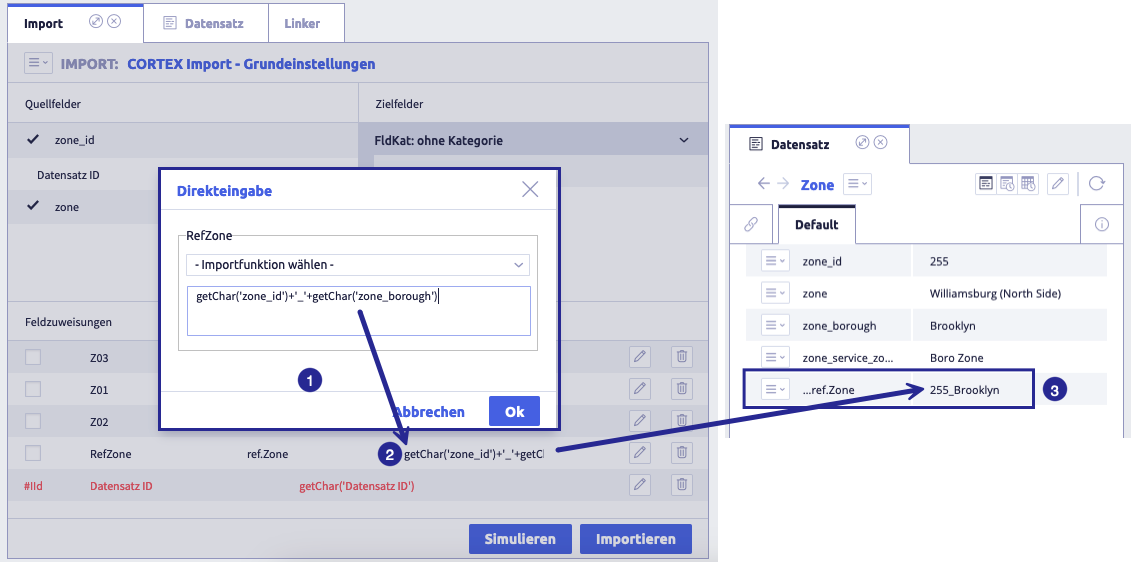
The image shows the processing via record ID on the left and on the right the result in a record of the record type Zone using the example of the new text field _ref_Zone: (1) edit import function and merge two field contents into one field, (2) import function that writes the contents of a field into the new field, (3) result in the record itself: the fields zone_id and zone_borough are used as reference fields for this record type.
The combination of several fields is realized using a + (plus) between the import functions, e.g. getChar('LocationID')+getChar('Borough')
Tip: if several field contents are written in one field, a separator between the contents is recommended, in the example _ (underscore): getChar('LocationID')+'_'+getChar('Borough').
-
-
activate the checkbox (7) Set field as reference for the corresponding row(s) if required
Note: The import process will be slower if a combination of the selected reference fields has to be searched for within the CortexEngine.
-
edit the field assignment of a row (8) if required
If you want to combine several fields into one target field, edit the field assignment, e.g. the fields Strasse and Hausnummer are written to the (new) field Adresse.
Edit field assigment - options
- select another import function
-
edit the source field (text in Single Quotes)
-
To import fixed text, delete the import function and write the text in Single Quotes, e.g. 'Tanja' as the content of the target field Datensatz Rollen.
-
The combination of several fields is realized using a + (plus) between the import functions, e.g. getChar('Strasse')+getChar('Hausnummer').
Tip: if several field contents are written in one field, a separator between the contents is recommended, in the example _ (underscore): getChar('Strasse')+'_'+getChar('Hausnummer').
-
-
save or export the configuration for future import processes via the selection menu in the header if required
-
click the button Import (or Simulate for a preview) and confirm your login data
The following window opens:
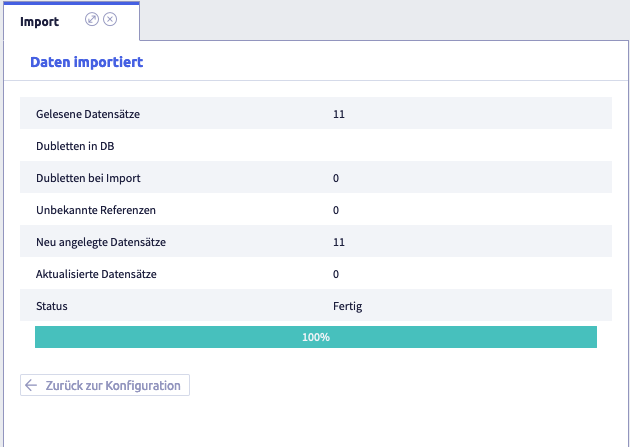
The image shows the status of the import: The progress bar is updated during the import.
Notes on simulation and import
- The simulation only checks syntactically whether errors can occur during the import. A logical check of the data cannot be carried out. All records to be imported are read and run through. The status of the simulation is then output.
- The data import takes longer than the simulation because the records are written to the CortexEngine.
- A progress bar is displayed during the simulation and import.
- The progress is displayed via a set counter, which is permanently displayed.
-
In the status display of the results, you can click on the number in the rows Newly created records and Updated records to display a list view of the records concerned. After the import, you can click on a record and open the record view.
Please note that the record view is not available after the simulation.
-
if you have carried out a simulation: return to the configuration and click the button Import
-
close the tab
As a success control, the record type overview indicates the updated number of records of a record type. Data has been imported into this record type. Depending on the import type, the number of imported records may differ from the number in the source.
Cortex to Cortex import
The Cortex module of the Implex offers you the possibility to make any changes within your CortexEngine:
- correct certain content
- add certain content
- change the complete data model
Changes from one CortexEngine to another CortexEngine can only be transferred via the console-based Implex application.
Requirements
During the import, a list definition is assigned. If required, please add a new list definition.
If you perform the import via a record type, please add a new record type if required.
If you perform the import via a selection, please add a new selection if required.
Procedure of the import
-
click the button Import on the quick launch bar
The following window opens:
-
select Import data from CORTEX Server
The following window opens:
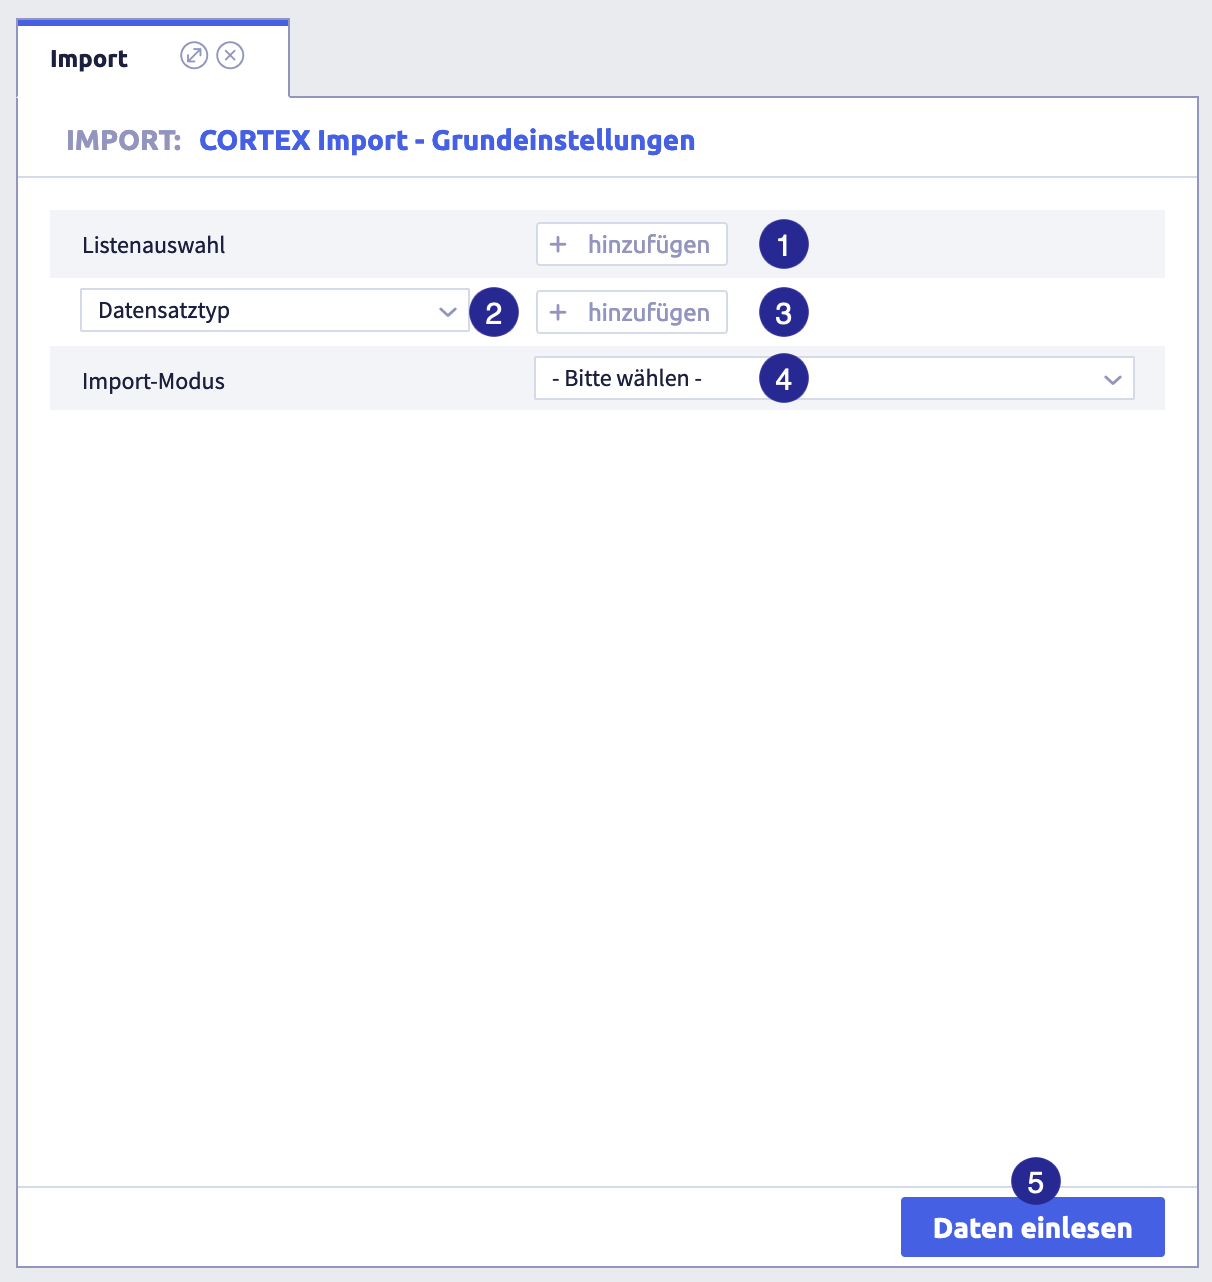
The image shows the CORTEX import basic settings: (1) button Add list selection, (2) selection Record type / selection, (3) button Add, (4) selection Import mode, (5) button Read Data
Table with all elements of the basic settings
Name Meaning list selection record type selection Import mode options:
updating or creating
creating
updatingbutton Read Data Importing requires an added list, an added record type or selection and an import mode.
-
add a list definition
-
add either a record type or a selection
-
select the import mode
-
click the button Read Data
The following window opens:
The image shows a list of record types. Available record types can be recognized by the button with a tick (framed).
-
click the button of the record type into which you want to import the data and confirm your login data
The following window opens:
The image shows the assignment of source and target fields, on the left before the assignment, on the right during the assignment: (1) list Source fields, (2) list Target fields, (3) list Field assignments, (4) already assigned source field, recognizable by the check mark, (5) source field that is currently being assigned, (6) record roles / record IID, (7) checkbox Set field as reference, (8) button Edit
to adjust the import function if required, (9) button Delete , (10) buttons Simulate and Import, (a) source and target field are linked, recognizable by the framed field name, (b) unlinked target field without source fieldTable with elements of the source-target-assignment
Name Meaning Note list Source fields fields contained in the import file list Target fields fields in which the contents of the import file are written The list contains the letter of the field type, the field name and the field synonym in brackets. field assignments shows in each row which import function imports which content into a target field The columns show the following content from left to right: synonym of the target field, name of the target field, import function incl. column header of the source field. target field Record roles possibility to assign role(s) to all records of a record type target field Record IID possibility to to assign content to all records of a record type via the IID, e.g. to a new field checkbox Set the field as reference possibility to to avoid duplicate records by checking the reference field of the records before the import edit field assignment possibility to select a different import function and/or to edit the source field (text in single quotes) delete field assignment button Simulate simulates the import button Import Record roles
Within the CortexEngine, roles can be assigned to users and records to restrict read and write permissions as soon as the role check is active.
Note
It is possible to add the target field Record roles several times, e.g. to assign several roles to the records. Record roles is a repetition field.
Record ID
Each record has its own ID. This means that if a change is made to all records of a record type, all data records can be edited safely. Safe means that there is no inaccuracy that can occur when using a reference field.
Example: a new field in the record type into which the content from one or more other fields of the data record type is written.
This new field can be filled automatically in one step using the record ID.
Reference fields
Reference fields are used to uniquely identify records. For unique identification, it is possible to use several fields as a common reference, e.g. first name + surname + date of birth.
The reference fields are used to search for unique CortexEngine content:
- If the Implex finds exactly one single record using the reference fields, this record can be updated.
- If the Implex finds several records, no update is possible.
- If no record is found using the reference fields, the Implex creates a new record depending on the import mode.
- If no reference field is set, the Implex creates a new record depending on the import mode.
Use the checkbox on the left-hand side to select the corresponding fields as reference.
Note: The import process will be slower if a combination of the selected reference fields has to be searched for within the CortexEngine.
Overview of import functions
String
Function Description Note getChar(``)takes over the characters of a string concat(String s1, String s2)concatenate two input strings to a result string length(String str)returns the length of a string lower(String val)converts a string to lower case letters normHnr(String in)for normalizing a house number pad_left(String in, Integer len)returns a string in which the characters of the input string are right-aligned by padding the left-hand side with spaces pad_right(String in, Integer len)returns a string in which the characters of the input string are left-aligned by padding the right-hand side with spaces pad_left(String in, String char, Integer len)returns a string in which the characters of the input string are right-aligned by padding the left-hand side with the specified character pad_right(String in, String char, Integer len)returns a string in which the characters of the input string are left-aligned by padding the right-hand side with the specified character replace(String sIn, String sSeek, String sRepl)replaces a search string in the input string with a replacement string rsubstring(String in, Integer start)returns all characters from the input string, starting from the desired start character startsplit(String src, String splitStr, Integer n)returns the nth element from the split input string substring(String in, Integer start, Integer len)returns a substring of the input string with the specified length from the transferred start position trim(String in)performs a trim on a string upper(String val)converts a string to upper case letters findFirst(in, match)findFirst(in, match, startPos)finds the first position of a character (optionally from a certain position) and returns the position as Int only available in console-based Implex application findLast(in, match)findLast(in, match, startPos)finds the last position of a character (optionally from a certain position) and returns the position as Int only available in console-based Implex application Numerical
Function Description PLUS(v1, v2)adds the two numerical values MINUS(v1, v2)subtracts two numerical values from each other MUL(v1, v2)returns the product of the two numerical values DIV(v1, v2)returns the quotient of two numerical values Date
Function Description Note date(String format, String in)convert any date format to the CortexEngine format time()The call without parameters returns the current timestamp to the minute.
FConversion with the date function is necessary for use as history information.only available in console-based Implex application Konversion
Function Description Note cdouble(String in)convert string to double konvertieren; double (floating point number (64 bit) with at least 10 decimal places) cfloat(String in)convert string to float; float (floating point number (32 bit) with at least 6 decimal places) cint(String in)convert string to integer; Int (at least 16 bit = 65536 possible values) clong(Object in)long integer value = integer with double value range of Int cstring(Object in)convert any other data type to string date(String format, String in)convert any date format to the CortexEngine format time(String date)converts a string in Cortex date format into a Cortex-internal long timestamp only available in console-based Implex application Files
Function Description file_extension(String file)returns the extension of a transferred file name file_woext(String file)returns the file name without extension, free of path information file(String sFileName)imports a file filename(String file)returns the file name, free of path information filepath(String file)returns the absolute path of a file sourceFileName()returns the file name including extension of the called import file Check
Function Description empty(String in)returns whether the transferred string has the length 0 endsWith(String str1, String end)checks whether the input string (str1) ends with the check string (end) equals(String str1, String str2)checks whether two strings are equal notequals(String str1, String str2)checks whether two strings are not equal Boolean
Function Description AND(Boolean v1, Boolean v2)performs the AND operation on two Boolean values NOT(Boolean in)returns the transferred Boolean value negated OR(Boolean v1, Boolean v2)performs the OR operation on two Boolean values iif(Boolean ifclause, then, elsedo)returns then, ififclause== true, elseelsedoVariables
It is particularly helpful for extensive import configurations if values that have already been defined can be reused via variables.
Function Description Note getVar(StringName)text value; variables can be set and read using two functions setVar(StringName, StringValue)text value; variables can be set and read using two functions getVarDouble(String Name)numerical values; variables can be set and read using two functions only available in console-based Implex application setVarDouble(String Name, String Value)numerical values; variables can be set and read using two functions only available in console-based Implex application Variables can only be used to the right of the equals sign of the value assignment. They cannot be used to the left of the equals sign (e.g. to determine a transaction date).
only available in console-based Implex application
Function Description findFirst(in, match)findFirst(in, match, startPos)finds the first position of a character (optionally from a certain position) and returns the position as Int findLast(in, match)findLast(in, match, startPos)finds the last position of a character (optionally from a certain position) and returns the position as Int time(String date)converts a string in Cortex date format into a Cortex-internal long timestamp time()The call without parameters returns the current timestamp to the minute.
FConversion with the date function is necessary for use as history information.getVarDouble(String Name)numerical values; variables can be set and read using two functions setVarDouble(String Name, String Value)numerical values; variables can be set and read using two functions -
click on a source field to assign it
The column headings of the source are displayed (or numerically/alphabetically if this option is activated).
The row turns blue (5).
-
click on the corresponding target field of the selected record type
- A row appears in the area Field assignments.
- The source field is given a check mark (4).
- The target field is no longer in the list Target fields.
-
assign the required fields one after the other
Remove assignment
To remove a field assignment, click the button Delete
of the corresponding row. -
click on the target field Record roles if required
-
click the button Edit
and edit the text field with the import functionAssign role(s)
If you want to assign multiple roles, add the target field Record roles several times and edit the field each time using the import function.
The image shows the editing of the text field: Delete the actual function and write the role in single quotes.
-
-
assign source and target field Record ID if required
Assign record ID and edit additional target field
The image shows the assignment of source and target fields with the source field Record ID
The source field Record ID can be generated via an auxiliary list.
Auxiliary list for Cortex to Cortex import
-
create a new list definition that contains at least the record ID as a column
This is how it works: create a list definition
-
select this auxiliary list in the basic settings for the list selection
-
click on a target field that is to be overwritten
-
click the button Edit
of the target field and edit the text field with the import functionThe following window opens:
The image shows the processing via record ID on the left and on the right the result in a record of the record type Zone using the example of the new text field _ref_Zone: (1) edit import function and merge two field contents into one field, (2) import function that writes the contents of a field into the new field, (3) result in the record itself: the fields zone_id and zone_borough are used as reference fields for this record type.
The combination of several fields is realized using a + (plus) between the import functions, e.g. getChar('LocationID')+getChar('Borough')
Tip: if several field contents are written in one field, a separator between the contents is recommended, in the example _ (underscore): getChar('LocationID')+'_'+getChar('Borough').
-
-
activate the checkbox (7) Set field as reference for the corresponding row(s) if required
Note: The import process will be slower if a combination of the selected reference fields has to be searched for within the CortexEngine.
-
edit the field assignment of a row (8) if required
If you want to combine several fields into one target field, edit the field assignment, e.g. the fields Strasse and Hausnummer are written to the (new) field Adresse.
Edit field assigment - options
- select another import function
-
edit the source field (text in Single Quotes)
-
To import fixed text, delete the import function and write the text in Single Quotes, e.g. 'Tanja' as the content of the target field Datensatz Rollen.
-
The combination of several fields is realized using a + (plus) between the import functions, e.g. getChar('Strasse')+getChar('Hausnummer').
Tip: if several field contents are written in one field, a separator between the contents is recommended, in the example _ (underscore): getChar('Strasse')+'_'+getChar('Hausnummer').
-
-
save or export the configuration for future import processes via the selection menu in the header if required
-
click the button Import (or Simulate for a preview) and confirm your login data
The following window opens:
The image shows the status of the import: The progress bar is updated during the import.
Notes on simulation and import
- The simulation only checks syntactically whether errors can occur during the import. A logical check of the data cannot be carried out. All records to be imported are read and run through. The status of the simulation is then output.
- The data import takes longer than the simulation because the records are written to the CortexEngine.
- A progress bar is displayed during the simulation and import.
- The progress is displayed via a set counter, which is permanently displayed.
-
In the status display of the results, you can click on the number in the rows Newly created records and Updated records to display a list view of the records concerned. After the import, you can click on a record and open the record view.
Please note that the record view is not available after the simulation.
-
if you have carried out a simulation: return to the configuration and click the button Import
-
close the tab
As a success control, the record type overview indicates the updated number of records of a record type. Data has been imported into this record type. Depending on the import type, the number of imported records may differ from the number in the source.
Import configuration
Data imports can be supported by import configurations. A configuration includes the assignment of source and target fields incl. import function, roles, IID and the status of the Reference fields checkbox. The selection menu for configuration is displayed after the data to be imported and the target record type have been defined.
The selection menu for import configurations is available from the import step in which the target assignment is made.
The following actions are possible for import configurations:
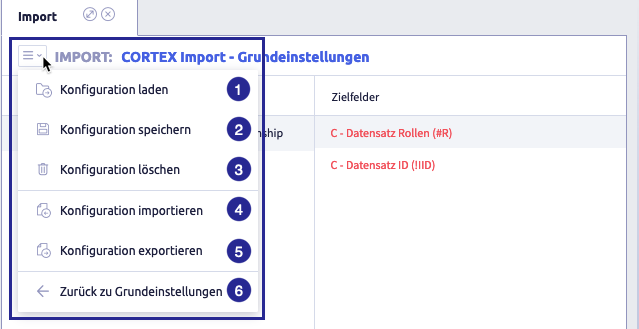
The image shows the selection that is displayed in the import step "Source-destination assignment": (1) load configuration, (2) save configuration, (3) delete configuration, (4) import configuration, (5) export configuration, (6) back to the basic settings
Load a configuration
Configurations that have already been saved are loaded.
-
open the selection menu in the header and select Load configuration
A window opens with a list of available configurations.
-
select the appropriate configuration and click the button Ok
The defined assignments from the configuration have been carried out.
The name of the loaded configuration is now displayed in the header.
For an import without a loaded configuration, the header shows
- for CSV import: * New * and the title of the CSV file
- for Cortex-to-Cortex import: CORTEX Import - basic settings
-
edit the configuration if required
Edit import configuration
- CSV import: follow the instructions from step 6 onwards
- Cortex to Cortex import: follow the instructions from step 7 onwards
-
continue with the import
Save the configuration
It is possible to save the configuration at any time when assigning source and target fields.
-
open the selection menu in the header and select Save configuration as soon as you have reached an assignment status that you want to use again
A window with saving dialog opens.
-
enter a name into the field to save a new configuration
The maximum length is 220 characters.
-
if you select an existing name from the list, you overwrite the previous configuration
-
click the button Ok (or Cancel)
The configuration has been saved.
-
continue with the import you have started if required
Delete a configuration
-
open the selection menu in the header and select Delete configuration
A window with the list of available configurations opens.
You can only delete configurations that are available for the current import process (CSV or Cortex-to-Cortex).
-
select the configuration to be deleted and click the button Delete
A window with the confirmation dialog opens.
-
click the button Yes (or No)
The configuration will be deleted and removed from the list.
-
delete another configuration if required
-
click the button Cancel to close the window
-
continue with the import you have started or close the tab Import
Import a configuration
-
open the selection menu in the header and select Import configuration
A window with the import dialog opens.
-
select an XML file and click the button Import
-
select the appropriate configuration and click the button Ok
The defined assignments from the configuration have been carried out.
The header now reads imported.
-
edit the configuration if required
Edit import configuration
- CSV import: follow the instructions from step 6 onwards
- Cortex to Cortex import: follow the instructions from step 7 onwards
-
continue with the import
Export the configuration
It is possible to export the configuration at any time during the assignment of source and target fields.
-
open the selection menu in the header and select Export configuration, as soon as you have reached an assignment status that you want to use again
- The export starts automatically.
- An XML file is saved in the download folder of your browser.
- The file name consists of importconfiguration_, the current date and, if applicable, a numbering if more than one export is carried out on the day, e.g. importconfiguration_2024-06-20(1).xml.
-
edit the file name after the export and assign a meaningful name
It is recommended that you also use CSV or Cortex in the file name if you use both import variants.
Adjust a configuration
Import automations require import configurations in the form of XML files. The plugin offers the option of conveniently defining the basic configuration and exporting it as an XML file. This XML file is then adapted in an external program.
Avoiding basic errors when customizing the import configuration
- First carry out the general configuration using the plugin before customizing the configuration.
- Export the configuration file in order to edit it.