User templates
User templates are used to define which function permissions a user receives. These include the options for creating and changing lists, exporting data, certain selections, etc.
Certain functions can be made available or denied to the user. For many functions, it is possible to restrict full availability or limit it to partial functions. Each template can be used by several user accounts. A change to a template therefore has a direct impact on all user accounts involved.
The following actions are possible for user templates:

The image show the user templates: (1) navigation, (2) button Groups, (3) button Edit
, (4) a list with all user templates, (5) button Add
, (6) buttons with options for export and import
The buttons Edit ![]() and Add
and Add ![]() will open the editor, used to modify the user template.
will open the editor, used to modify the user template.
If the function *Groups is active, the user templates can be organized into groups.
Warning
- Changes in system settings often only take effect when a restart is carried out after closing the system settings (menu item under the button with the user name at the top right, see also introduction).
- If another user with admin rights is currently editing this system setting, the red icon lock
 appears in the header and a warning message appears with the name of the currently active user.
Add user templates
To add a user template, click the button Add ![]() .
.
Enter a template name and edit the default settings on the four tabs Template, Records, Lists and search, and Portals, object views and dashboards, if necessary.
Table with all elements of the tab Template
| Name | Meaning | Note |
|---|---|---|
| button Create template | add new template | |
| button Load template | load existing template | |
| field Template name | name to identify the user template | |
| checkbox Use field dictionary | ||
| selection Selections | define access permissions to selections | possible options 0=no access permissions to selections 1=loading selections 2=edit own selections 3=edit all selections |
| checkbox Hide quick launch bar at startup | show elements in the left column of the Uniplex | elements of the quick launch bar are defined in plugin templates |
| selection Automatic end of session (in minutes) | possible options: - deactivated - 15 / 30 / 60 / 120 |
|
| button Set to default settings | sets the current template to the default of an available user, e.g. User or Admin | a newly created template uses User as default |
| button Delete template | ||
| button Create copy | use the currently open user template as a template for a new user template | |
| button Save template |
Table with all elements of the tab Records
| Name | Meaning | Note |
|---|---|---|
| button Choose record type for layout settings | if a layout has been selected here, the records of the record type are displayed with the customized layout. | |
| checkbox Show link overview | shows in which records this field content has also been linked (link icon tab in standard view) | Y(es) or N(o) |
| checkbox View record information | e.g. information on roles, creation and editing (i-icon tab in standard view) | Y(es) or N(o) |
| checkbox Show advanced field options | selection button on the left of the field name | Y(es) oder N(o) |
| selection Representation of select boxes | possible options: - field content - select box text - field content (select box text) |
|
| checkbox Show history information | standard view of the record can display history information. A field with history information is marked with a clock icon. | Y(es) or N(o) |
| selection Standard view | scope and way in which fields with history information are displayed | possible options: - standard view (note current field content only) - history information - history overview (matrix) |
| selection Standard display | the view of the record contains (grouped) fields, link overview and record information. In the simple record view, all information is available at a glance. The tab view contains tabs for each category with grouped fields, link overview and record information. | possible options: - tab view - plain record view (flat) |
| checkbox Show empty fields | Y(es) or N(o) | |
| selection Edit/add history information | possible options: - manual editing (default, any change to the history information) - automatic processing (change receives current day) - deactivated (record without history) |
|
| checkbox Select key to display all link targets in list for link fields | Hamburger button for data editing to the right of a field with a link. Recommendation: set to active. The list cannot be displayed without this button. In this case, you may need to know the exact spelling of the field content in order to select in Y(es) or N(o) | |
| selection Delete records | possible options: 0=no deleting right 1=deleting right for own records 2=general deleting right |
|
| checkbox Bulk deletion of records | Y(es) or N(o) | |
| checkbox Delete records that are still linked | Y(es) or N(o) | |
| checkbox Edit record roles | individual data sets can be limited to a few users by selecting a record role | Y(es) or N(o) |
| checkbox Multiple linking of a record | Y(es) or N(o) | |
| checkbox Creation of all record types | which record types may the user create? | Y(es) or N(o) with N(o) restriction possible to one or more record type groups and/or one or more record types |
| checkbox Edit all record types | which record types may the user edit? | Y(es) or N(o) with N(o) restriction possible to one or more record type groups and/or one or more record types |
| button Set to default settings | sets the current template to the default settings of an available user, e.g. User or Admin | a newly created template uses User as default |
| button Delete template | ||
| button Create copy | use the currently open user template as a template for a new user template | |
| button Save template |
Table with all elements of the tab Lists and search
| Name | Meaning | Note |
|---|---|---|
| selection Edit lists | possible options: 0=no access permissions to list definitions (representation of default lists only) 1=loading list definitions (no list editing) 2=creating and editing restricted (private and user groups) list definitions 3=creating and editing public and restricted (private and user groups) list definitions |
|
| checkbox List is always in edit mode | with Y(es) the list definition can be edited directly if it has been opened | Y(es) or N(o) |
| checkbox Print data | Y(es) or N(o) | |
| checkbox Export data | export for defined users under list view in record type | Y(es) or N(o) |
| checkbox Export list definitions | export for defined users under Manage list definitions under list view in record type | Y(es) or N(o) |
| checkbox Import list definitions | Y(es) or N(o) | |
| checkbox Global search across all fields | Y(es) or N(o) | |
| checkbox Wildcard global search across all fields | Y(es) or N(o) | |
| checkbox Search in multiline text fields | Y(es) or N(o) | |
| checkbox Flat display of the available searches in the selection menu | defines the selection for the search field | |
| checkbox All defined search configurations | Y(es) or N(o) with N(o) restriction possible to one or more search groups and/or one or more search configurations |
|
| button Search starting automatically through a list definition | ||
| buttons Set to default settings | sets the current template to the default setting of an available user, e.g. User or Admin | a newly created template uses User as default |
| button Delete template | ||
| button Create copy | use the currently open user template as a template for a new user template | |
| button Save template |
Table with all elements of the tab Portals, object view and dashboards
| Name | Meaning | Note |
|---|---|---|
| checkbox All defined portal configurations | Y(es) or N(o), with N(o) the buttons Add group and Add configuration appear | |
| checkbox All defined object views | Y(es) or N(o), with N(o) the buttons Add group and Add configuration appear | |
| checkbox All defined dashboards | Y(es) or N(o), with N(o) the buttons Add group and Add dashboard appear | |
| button Add group (as an example for N(o) for all checkboxes) | select and assign group with dashboards; all dashboards from the assigned dashboard group are selected | several groups possible |
| button Add dashboard (as an example for N(o) for all checkboxes) | select and assign dashboard | several dashboards possible |
| buttons Set to default settings | sets the current template to the default settings of an available user, e.g. User or Admin | a newly created template uses User as the default setting |
| button Delete template | ||
| button Create copy | use the currently open user template as a template for a new user template | |
| button Save template |
Edit user templates
The editor for user templates consists of four tabs:
Edit all tabs as required.
Settings for tab Template
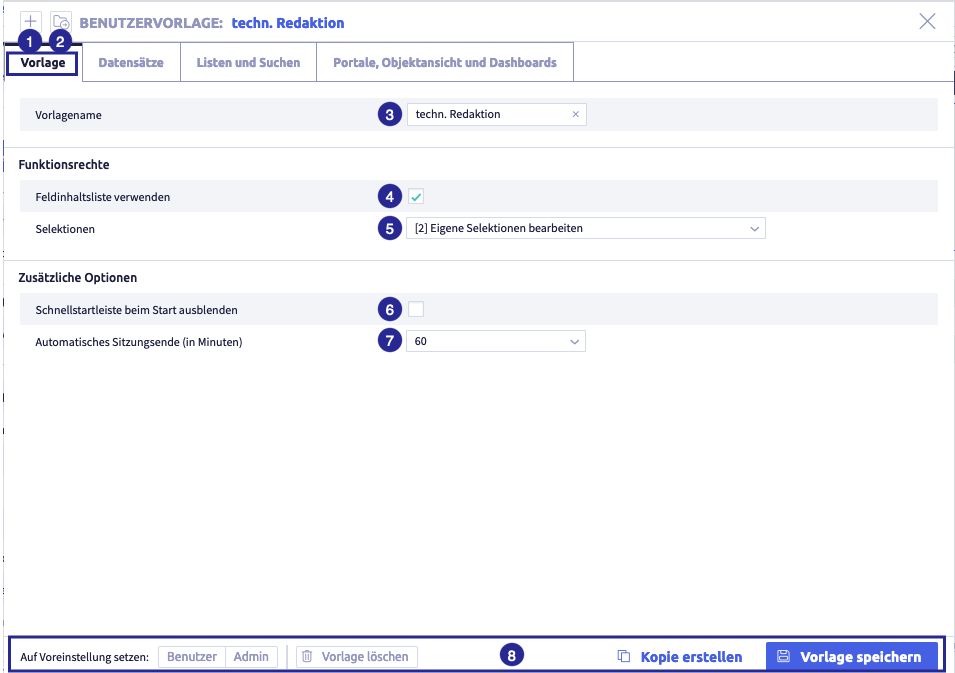
The image shows the tab Template of the editor: (1) button Add template
, (3) field Template name, (4) checkbox Use field dictionary, (5) selection Selections, (6) checkbox Hide quick launch bar at startup (left bar in the Uniplex), (7) selection Automatic end of session (in minutes), (8) footer with buttons Set to default settings, Delete template
, Create copy
, Save template
Table with all elements of the tab Template
| Name | Meaning | Note |
|---|---|---|
| button Create template | add new template | |
| button Load template | load existing template | |
| field Template name | name to identify the user template | |
| checkbox Use field dictionary | ||
| selection Selections | define access permissions to selections | possible options 0=no access permissions to selections 1=loading selections 2=edit own selections 3=edit all selections |
| checkbox Hide quick launch bar at startup | show elements in the left column of the Uniplex | elements of the quick launch bar are defined in plugin templates |
| selection Automatic end of session (in minutes) | possible options: - deactivated - 15 / 30 / 60 / 120 |
|
| button Set to default settings | sets the current template to the default of an available user, e.g. User or Admin | a newly created template uses User as default |
| button Delete template | ||
| button Create copy | use the currently open user template as a template for a new user template | |
| button Save template |
Settings for tab Records
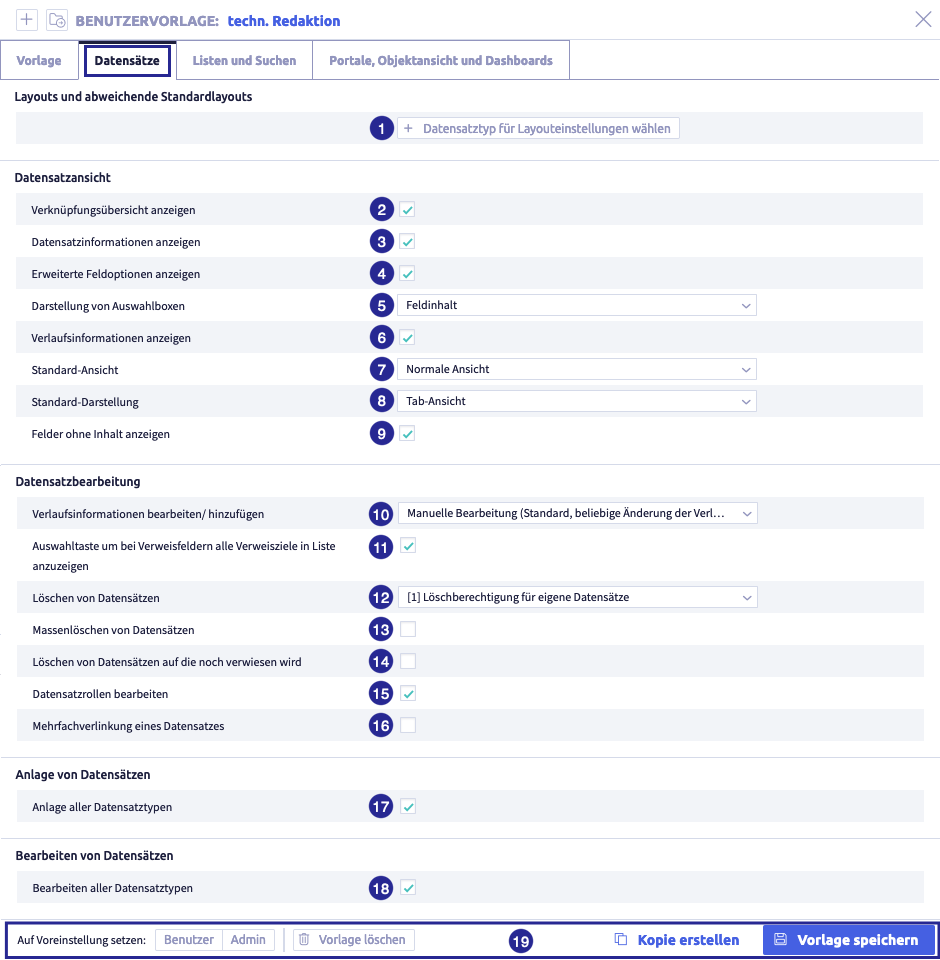
The image shows the tab Records of the editor: (1) button Select record type for layout settings
Table with all elements of the tab Records
| Name | Meaning | Note |
|---|---|---|
| button Choose record type for layout settings | if a layout has been selected here, the records of the record type are displayed with the customized layout. | |
| checkbox Show link overview | shows in which records this field content has also been linked (link icon tab in standard view) | Y(es) or N(o) |
| checkbox View record information | e.g. information on roles, creation and editing (i-icon tab in standard view) | Y(es) or N(o) |
| checkbox Show advanced field options | selection button on the left of the field name | Y(es) oder N(o) |
| selection Representation of select boxes | possible options: - field content - select box text - field content (select box text) |
|
| checkbox Show history information | standard view of the record can display history information. A field with history information is marked with a clock icon. | Y(es) or N(o) |
| selection Standard view | scope and way in which fields with history information are displayed | possible options: - standard view (note current field content only) - history information - history overview (matrix) |
| selection Standard display | the view of the record contains (grouped) fields, link overview and record information. In the simple record view, all information is available at a glance. The tab view contains tabs for each category with grouped fields, link overview and record information. | possible options: - tab view - plain record view (flat) |
| checkbox Show empty fields | Y(es) or N(o) | |
| selection Edit/add history information | possible options: - manual editing (default, any change to the history information) - automatic processing (change receives current day) - deactivated (record without history) |
|
| checkbox Select key to display all link targets in list for link fields | Hamburger button for data editing to the right of a field with a link. Recommendation: set to active. The list cannot be displayed without this button. In this case, you may need to know the exact spelling of the field content in order to select in Y(es) or N(o) | |
| selection Delete records | possible options: 0=no deleting right 1=deleting right for own records 2=general deleting right |
|
| checkbox Bulk deletion of records | Y(es) or N(o) | |
| checkbox Delete records that are still linked | Y(es) or N(o) | |
| checkbox Edit record roles | individual data sets can be limited to a few users by selecting a record role | Y(es) or N(o) |
| checkbox Multiple linking of a record | Y(es) or N(o) | |
| checkbox Creation of all record types | which record types may the user create? | Y(es) or N(o) with N(o) restriction possible to one or more record type groups and/or one or more record types |
| checkbox Edit all record types | which record types may the user edit? | Y(es) or N(o) with N(o) restriction possible to one or more record type groups and/or one or more record types |
| button Set to default settings | sets the current template to the default settings of an available user, e.g. User or Admin | a newly created template uses User as default |
| button Delete template | ||
| button Create copy | use the currently open user template as a template for a new user template | |
| button Save template |
Settings for tab Lists and search
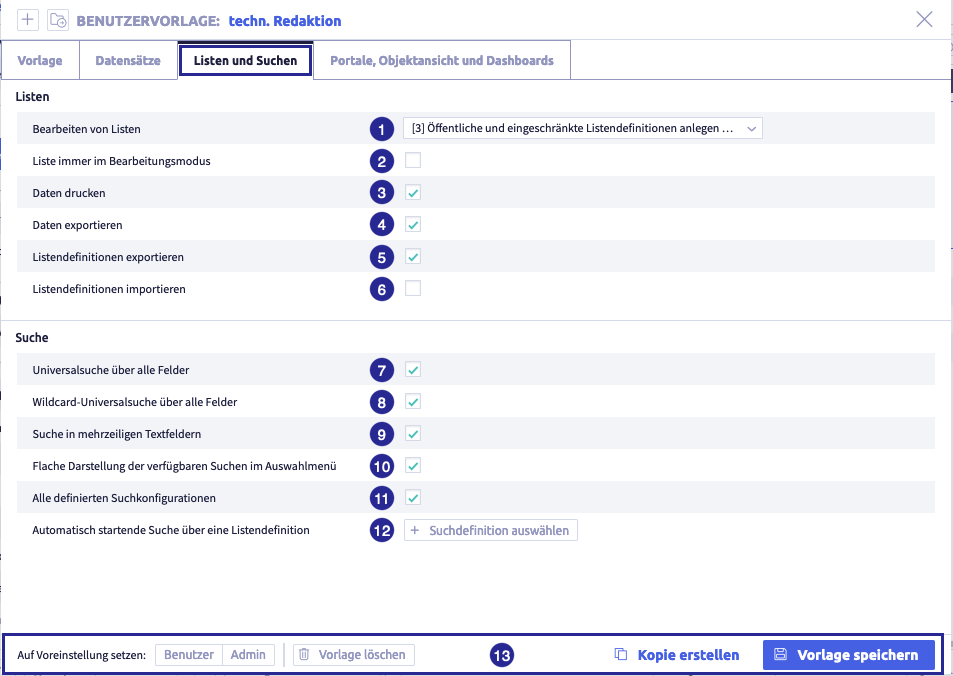
The image shows the tab Lists and Search of the editor: (1) selection Edit lists, (2) checkbox List is always in edit mode, (3) checkbox Print data, (4) checkbox Export data, (5) checkbox Export list definitions, (6) checkbox Import list definitions, (7) checkbox Global search in all fields, (8) checkbox Wildcard global search in all fields, (9) checkbox Search in multiline text fields, (10) checkbox Flat display of the available searches in the selection menu, (11) checkbox All defined search configurations, (12) button Search starting automatically through a list definition, (13) footer with buttons Set to default settings, Delete template
Table with all elements of the tab Lists and search
| Name | Meaning | Note |
|---|---|---|
| selection Edit lists | possible options: 0=no access permissions to list definitions (representation of default lists only) 1=loading list definitions (no list editing) 2=creating and editing restricted (private and user groups) list definitions 3=creating and editing public and restricted (private and user groups) list definitions |
|
| checkbox List is always in edit mode | with Y(es) the list definition can be edited directly if it has been opened | Y(es) or N(o) |
| checkbox Print data | Y(es) or N(o) | |
| checkbox Export data | export for defined users under list view in record type | Y(es) or N(o) |
| checkbox Export list definitions | export for defined users under Manage list definitions under list view in record type | Y(es) or N(o) |
| checkbox Import list definitions | Y(es) or N(o) | |
| checkbox Global search across all fields | Y(es) or N(o) | |
| checkbox Wildcard global search across all fields | Y(es) or N(o) | |
| checkbox Search in multiline text fields | Y(es) or N(o) | |
| checkbox Flat display of the available searches in the selection menu | defines the selection for the search field | |
| checkbox All defined search configurations | Y(es) or N(o) with N(o) restriction possible to one or more search groups and/or one or more search configurations |
|
| button Search starting automatically through a list definition | ||
| buttons Set to default settings | sets the current template to the default setting of an available user, e.g. User or Admin | a newly created template uses User as default |
| button Delete template | ||
| button Create copy | use the currently open user template as a template for a new user template | |
| button Save template |
Settings for tab Portals, object views and dashboards

The image shows the tab Tab Portals, object views and dashboards of the editor: (1) checkbox All defined portal configurations, (2) checkbox All defined object views, (3) checkbox All defined dashboards, (4) button Add group, (5) button Add dashboard, (6) footer with buttons Set to default settings, Delete template
Table with all elements of the tab Portals, object view and dashboards
| Name | Meaning | Note |
|---|---|---|
| checkbox All defined portal configurations | Y(es) or N(o), with N(o) the buttons Add group and Add configuration appear | |
| checkbox All defined object views | Y(es) or N(o), with N(o) the buttons Add group and Add configuration appear | |
| checkbox All defined dashboards | Y(es) or N(o), with N(o) the buttons Add group and Add dashboard appear | |
| button Add group (as an example for N(o) for all checkboxes) | select and assign group with dashboards; all dashboards from the assigned dashboard group are selected | several groups possible |
| button Add dashboard (as an example for N(o) for all checkboxes) | select and assign dashboard | several dashboards possible |
| buttons Set to default settings | sets the current template to the default settings of an available user, e.g. User or Admin | a newly created template uses User as the default setting |
| button Delete template | ||
| button Create copy | use the currently open user template as a template for a new user template | |
| button Save template |
Duplicate user templates
A user template can be used as a template for another user template. To do this, click the button Create copy in the editor and edit the template as required.
If the template name is not changed, the new user template will be saved as Copy of X.
Table with all elements of the tab Template
| Name | Meaning | Note |
|---|---|---|
| button Create template | add new template | |
| button Load template | load existing template | |
| field Template name | name to identify the user template | |
| checkbox Use field dictionary | ||
| selection Selections | define access permissions to selections | possible options 0=no access permissions to selections 1=loading selections 2=edit own selections 3=edit all selections |
| checkbox Hide quick launch bar at startup | show elements in the left column of the Uniplex | elements of the quick launch bar are defined in plugin templates |
| selection Automatic end of session (in minutes) | possible options: - deactivated - 15 / 30 / 60 / 120 |
|
| button Set to default settings | sets the current template to the default of an available user, e.g. User or Admin | a newly created template uses User as default |
| button Delete template | ||
| button Create copy | use the currently open user template as a template for a new user template | |
| button Save template |
Table with all elements of the tab Records
| Name | Meaning | Note |
|---|---|---|
| button Choose record type for layout settings | if a layout has been selected here, the records of the record type are displayed with the customized layout. | |
| checkbox Show link overview | shows in which records this field content has also been linked (link icon tab in standard view) | Y(es) or N(o) |
| checkbox View record information | e.g. information on roles, creation and editing (i-icon tab in standard view) | Y(es) or N(o) |
| checkbox Show advanced field options | selection button on the left of the field name | Y(es) oder N(o) |
| selection Representation of select boxes | possible options: - field content - select box text - field content (select box text) |
|
| checkbox Show history information | standard view of the record can display history information. A field with history information is marked with a clock icon. | Y(es) or N(o) |
| selection Standard view | scope and way in which fields with history information are displayed | possible options: - standard view (note current field content only) - history information - history overview (matrix) |
| selection Standard display | the view of the record contains (grouped) fields, link overview and record information. In the simple record view, all information is available at a glance. The tab view contains tabs for each category with grouped fields, link overview and record information. | possible options: - tab view - plain record view (flat) |
| checkbox Show empty fields | Y(es) or N(o) | |
| selection Edit/add history information | possible options: - manual editing (default, any change to the history information) - automatic processing (change receives current day) - deactivated (record without history) |
|
| checkbox Select key to display all link targets in list for link fields | Hamburger button for data editing to the right of a field with a link. Recommendation: set to active. The list cannot be displayed without this button. In this case, you may need to know the exact spelling of the field content in order to select in Y(es) or N(o) | |
| selection Delete records | possible options: 0=no deleting right 1=deleting right for own records 2=general deleting right |
|
| checkbox Bulk deletion of records | Y(es) or N(o) | |
| checkbox Delete records that are still linked | Y(es) or N(o) | |
| checkbox Edit record roles | individual data sets can be limited to a few users by selecting a record role | Y(es) or N(o) |
| checkbox Multiple linking of a record | Y(es) or N(o) | |
| checkbox Creation of all record types | which record types may the user create? | Y(es) or N(o) with N(o) restriction possible to one or more record type groups and/or one or more record types |
| checkbox Edit all record types | which record types may the user edit? | Y(es) or N(o) with N(o) restriction possible to one or more record type groups and/or one or more record types |
| button Set to default settings | sets the current template to the default settings of an available user, e.g. User or Admin | a newly created template uses User as default |
| button Delete template | ||
| button Create copy | use the currently open user template as a template for a new user template | |
| button Save template |
Table with all elements of the tab Lists and search
| Name | Meaning | Note |
|---|---|---|
| selection Edit lists | possible options: 0=no access permissions to list definitions (representation of default lists only) 1=loading list definitions (no list editing) 2=creating and editing restricted (private and user groups) list definitions 3=creating and editing public and restricted (private and user groups) list definitions |
|
| checkbox List is always in edit mode | with Y(es) the list definition can be edited directly if it has been opened | Y(es) or N(o) |
| checkbox Print data | Y(es) or N(o) | |
| checkbox Export data | export for defined users under list view in record type | Y(es) or N(o) |
| checkbox Export list definitions | export for defined users under Manage list definitions under list view in record type | Y(es) or N(o) |
| checkbox Import list definitions | Y(es) or N(o) | |
| checkbox Global search across all fields | Y(es) or N(o) | |
| checkbox Wildcard global search across all fields | Y(es) or N(o) | |
| checkbox Search in multiline text fields | Y(es) or N(o) | |
| checkbox Flat display of the available searches in the selection menu | defines the selection for the search field | |
| checkbox All defined search configurations | Y(es) or N(o) with N(o) restriction possible to one or more search groups and/or one or more search configurations |
|
| button Search starting automatically through a list definition | ||
| buttons Set to default settings | sets the current template to the default setting of an available user, e.g. User or Admin | a newly created template uses User as default |
| button Delete template | ||
| button Create copy | use the currently open user template as a template for a new user template | |
| button Save template |
Table with all elements of the tab Portals, object view and dashboards
| Name | Meaning | Note |
|---|---|---|
| checkbox All defined portal configurations | Y(es) or N(o), with N(o) the buttons Add group and Add configuration appear | |
| checkbox All defined object views | Y(es) or N(o), with N(o) the buttons Add group and Add configuration appear | |
| checkbox All defined dashboards | Y(es) or N(o), with N(o) the buttons Add group and Add dashboard appear | |
| button Add group (as an example for N(o) for all checkboxes) | select and assign group with dashboards; all dashboards from the assigned dashboard group are selected | several groups possible |
| button Add dashboard (as an example for N(o) for all checkboxes) | select and assign dashboard | several dashboards possible |
| buttons Set to default settings | sets the current template to the default settings of an available user, e.g. User or Admin | a newly created template uses User as the default setting |
| button Delete template | ||
| button Create copy | use the currently open user template as a template for a new user template | |
| button Save template |
Delete user templates
A user template is deleted in the editor. For this purpose, click the button Delete template in the footer.
Organize user templates into groups
If the function Groups is active, the record types can be organized into groups for simplified management.
The following actions are possible:
- create groups
- rename groups
- delete groups
- add elements to a group
- remove elements from a group
Note
The actions are shown using the example Field management.
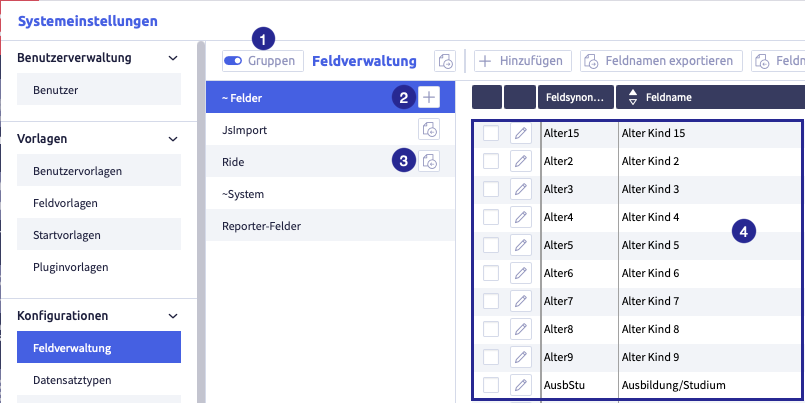
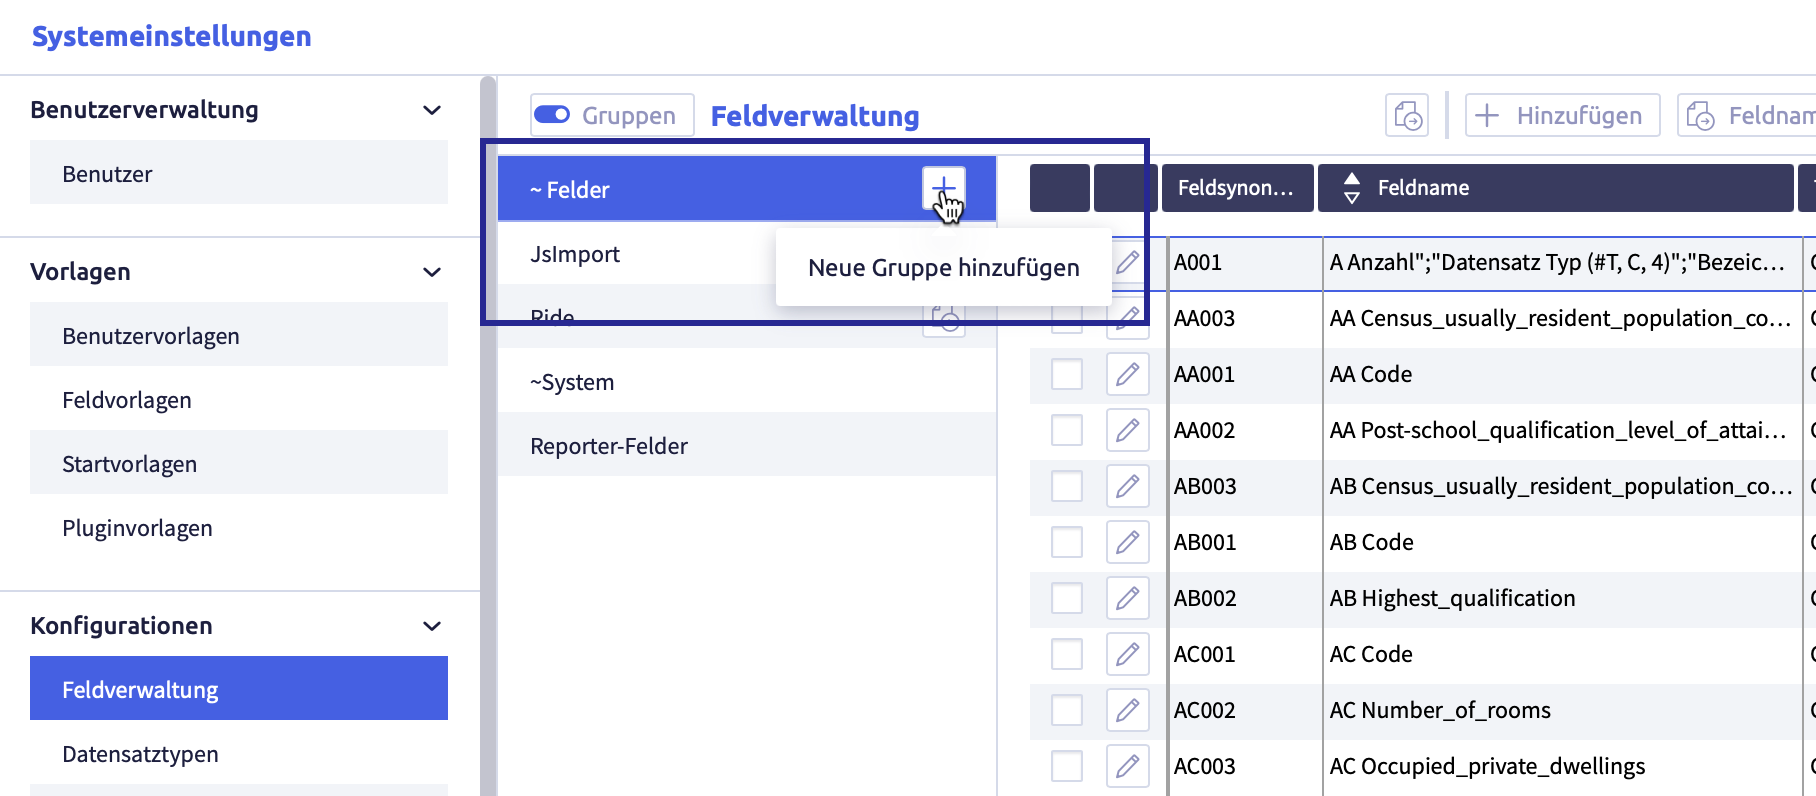
The image shows the field administration with active groups: (1) button Activate groups, (2) button Add group
, (4) fields from the currently active group
Create a group
The image shows the field administration with active groups
Create user-defined groups
-
click the button Add group
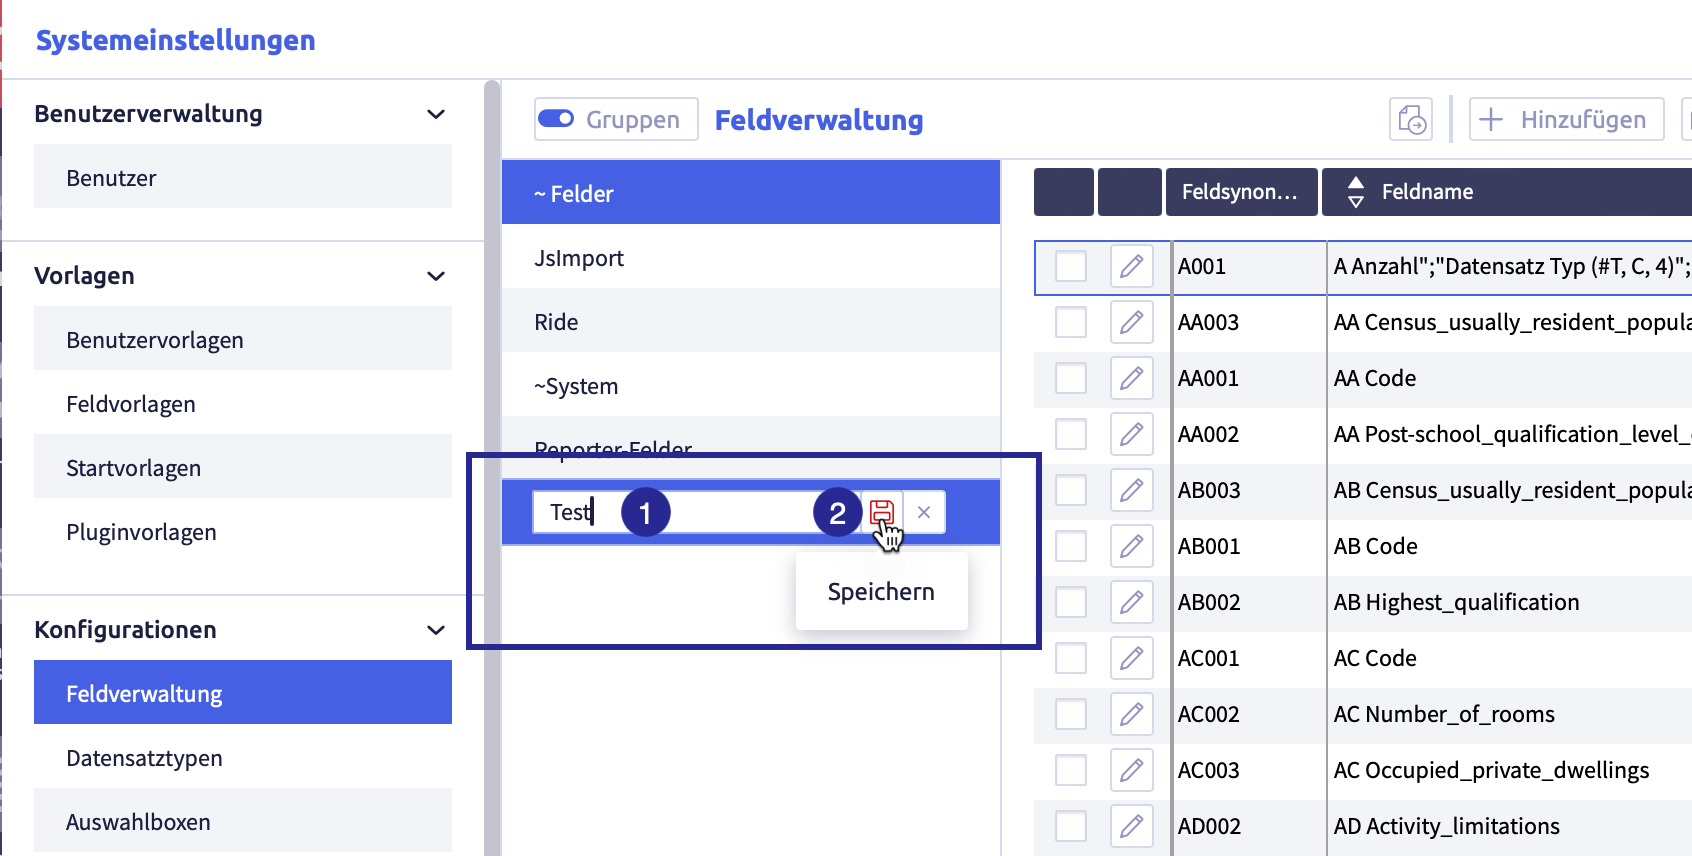
A new row will be added:
-
enter the name of the group
-
click the button Save

The list with the group names will be updated, the group has been sorted alphabetically.
Rename a group
-
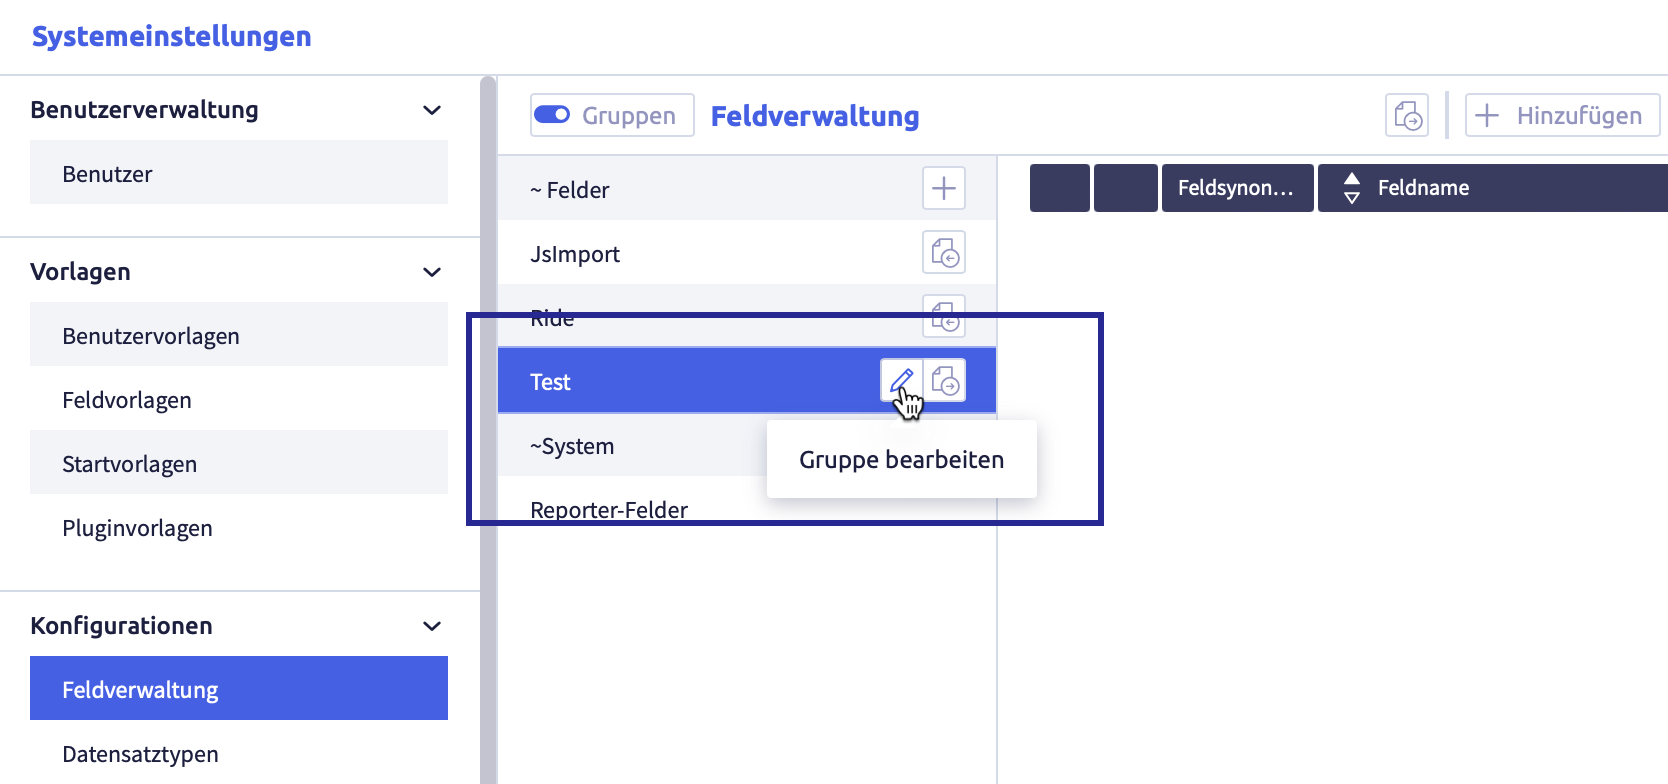
click the group you want to edit
The button Edit
will appear.The image shows the group that can be edited:
-
click the button Edit
The element can be edited or deleted.
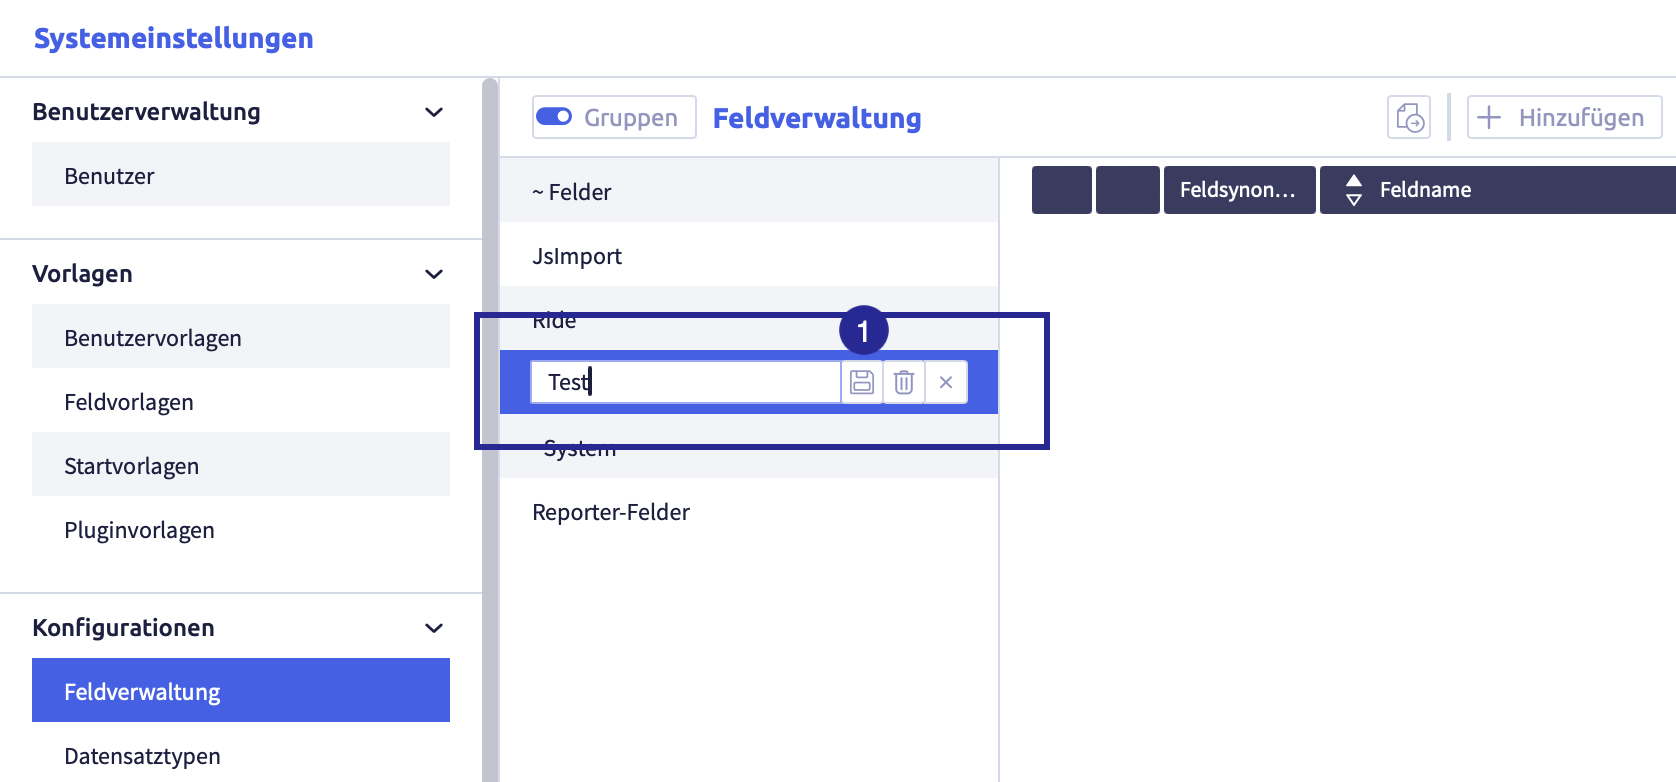
The image shows the edit possibilities of the group:
-
edit the group name
-
click the button Save
(or Cancel)The list with the group names will be updated, the group has been sorted alphabetically.
Delete a group
-
click the group you intend to edit
The button Edit
will appear.The image shows the group that can be edited:
-
click the button Edit
The element can be edited.
The image shows the edit possibilities of the group:
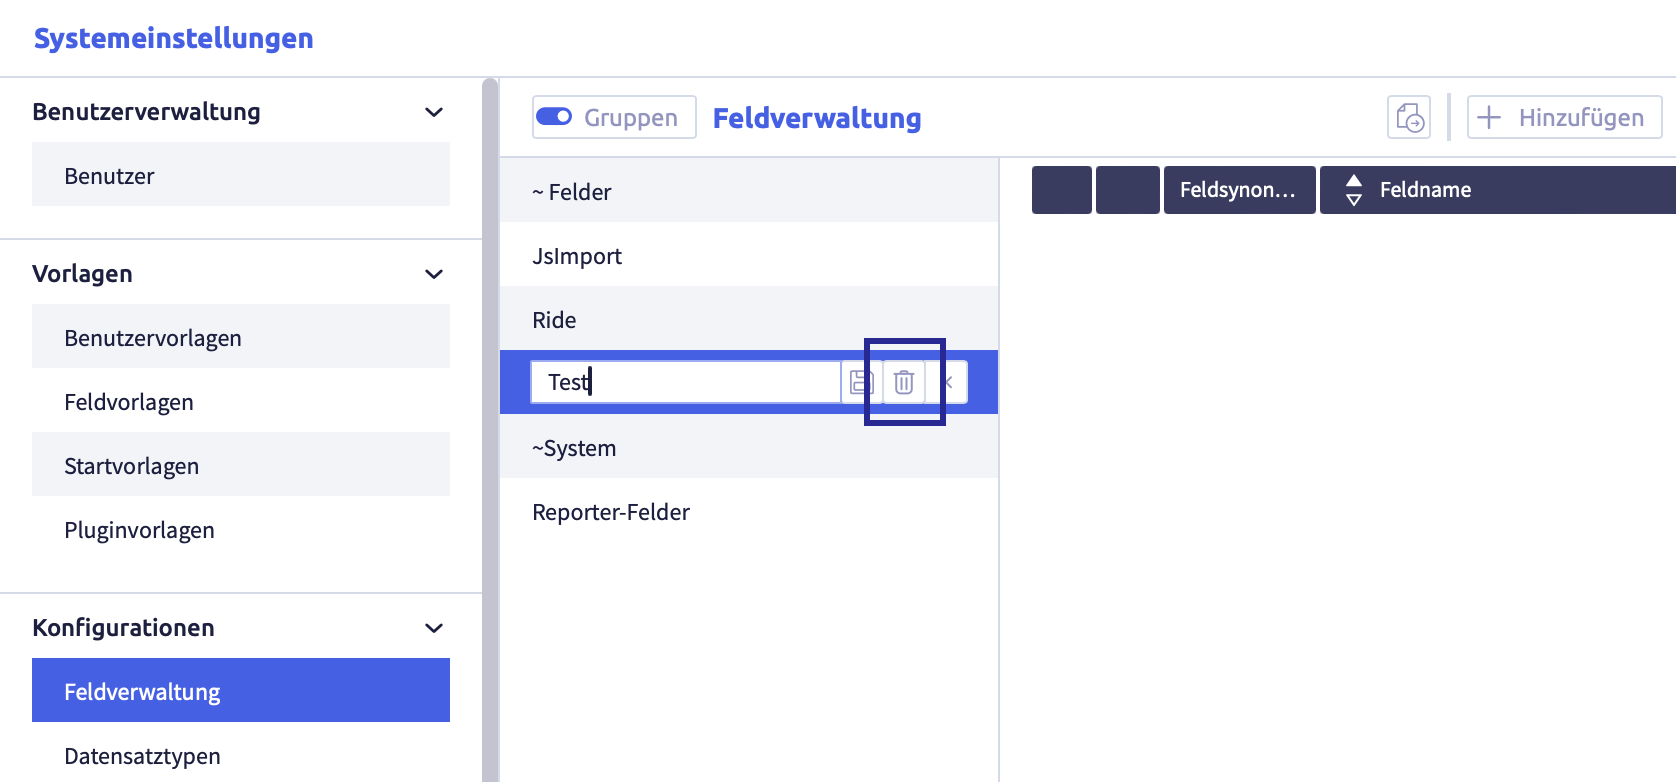
-
click the button Delete
The following confirmation window opens:
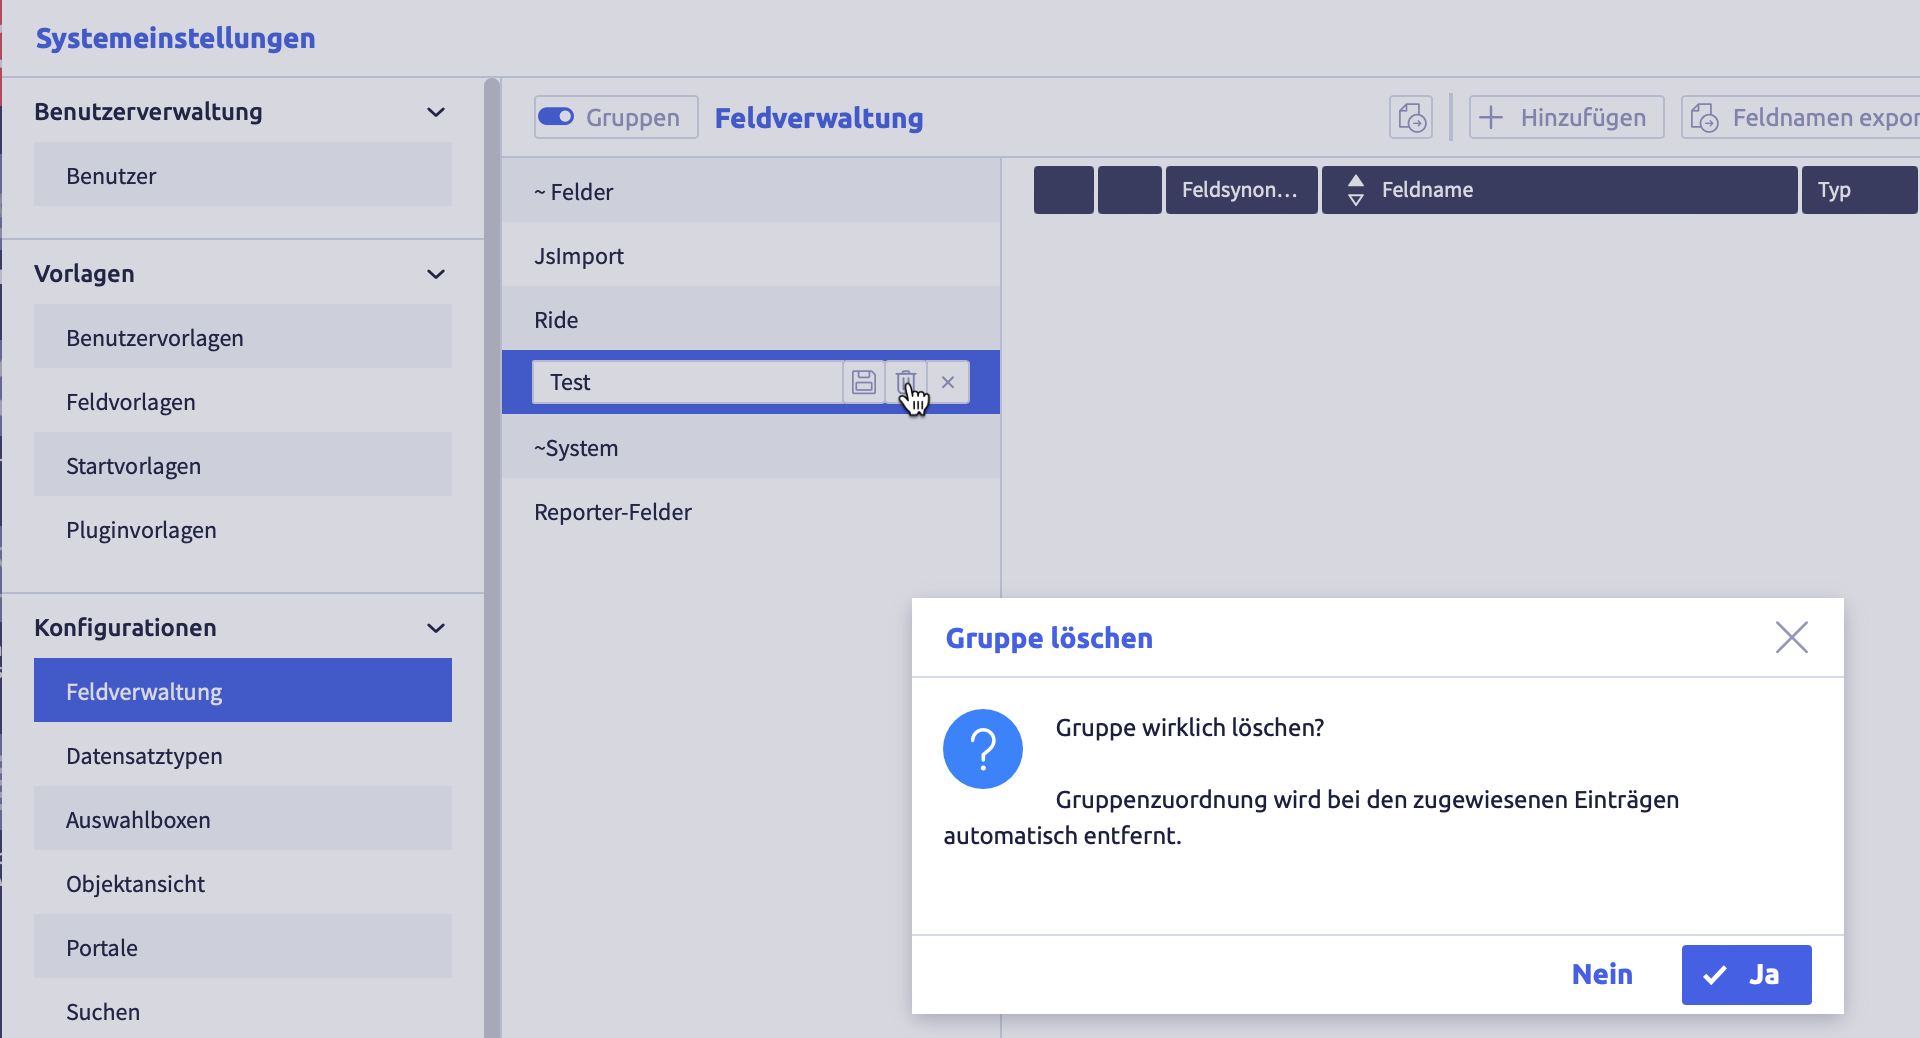
-
click the button Yes (or No)
The group will be deleted and the list of groups will be updated.
Links of elements to this group are automatically deleted.
Add elements to a group
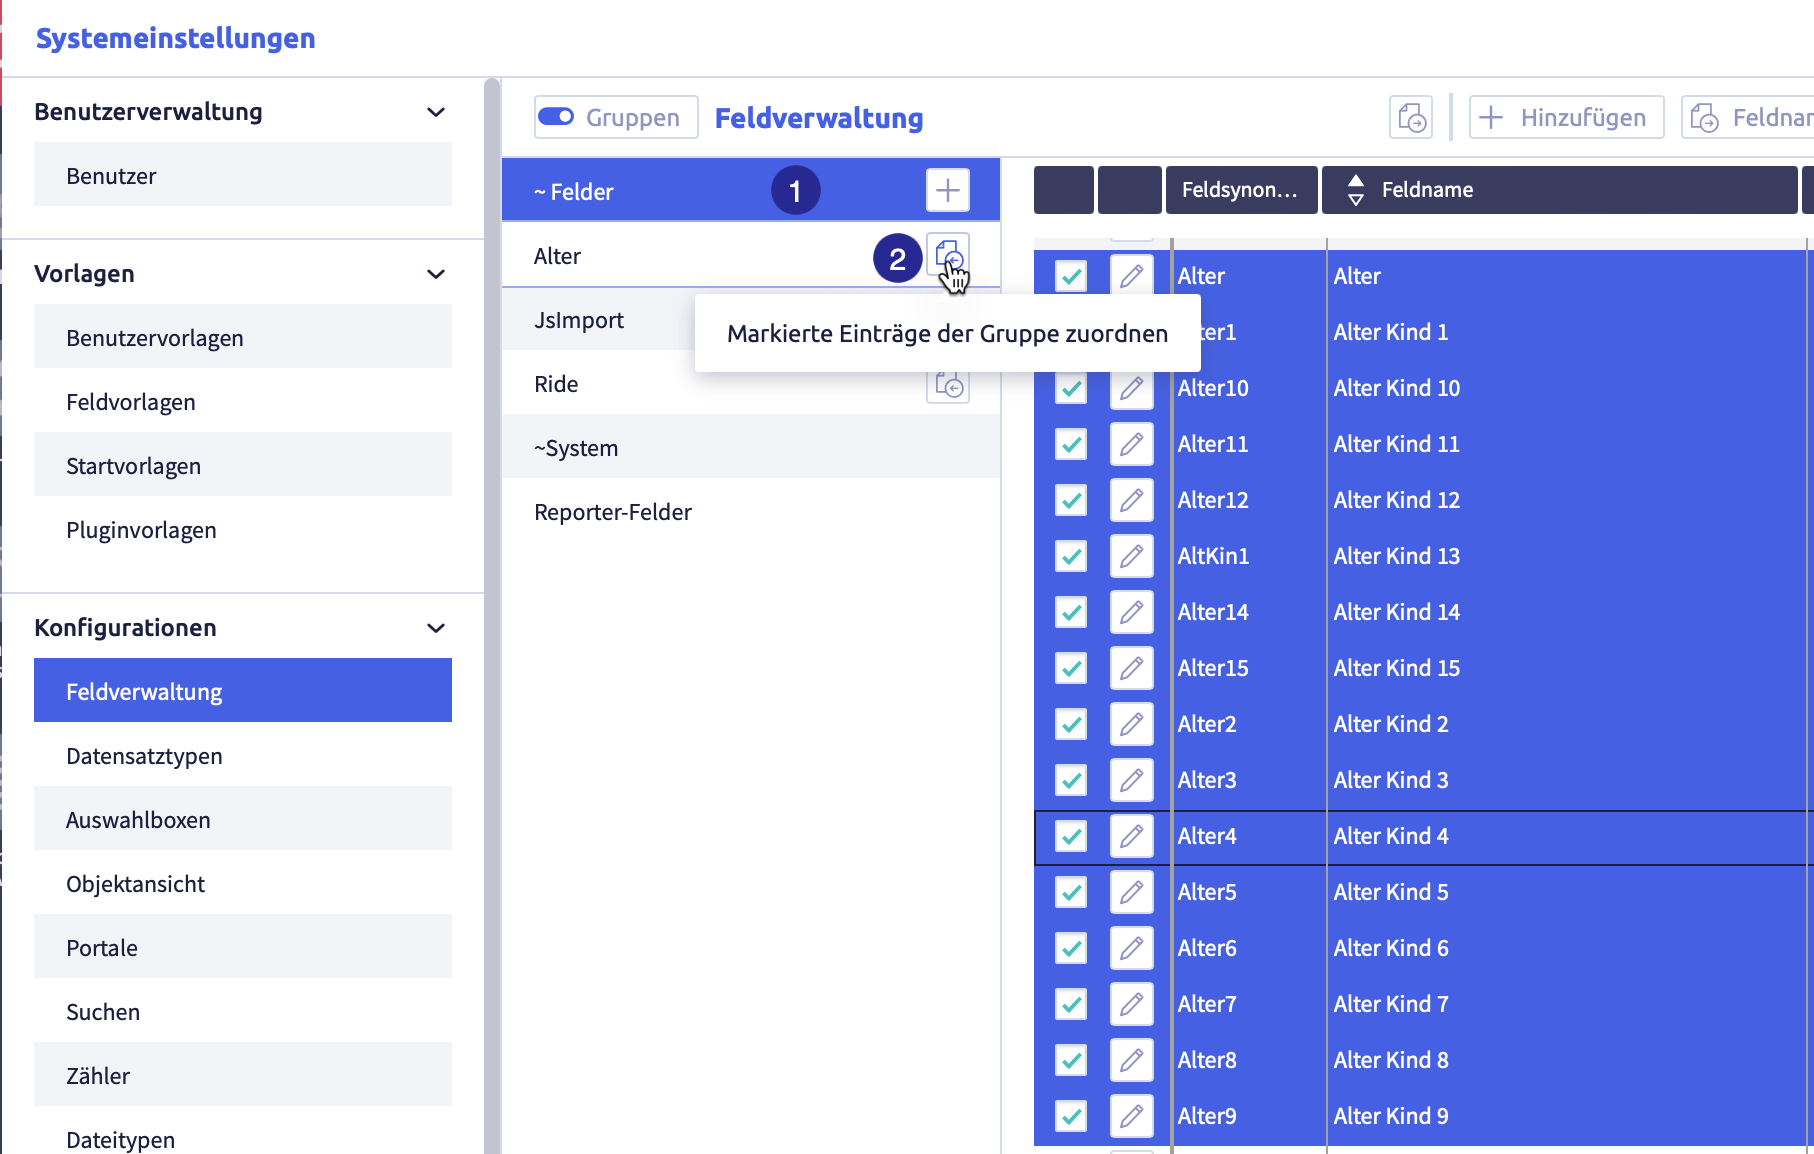
(1) selected group with selected elements you want to add to another group, (2) button Assign selected entries to the group
-
select a group from which you want to add elements to another group
-
select all the elements you want to add to the group
-
click the button Assign selected items to group
of the new groupThe elements are added to the group.
An element can belong to several groups.
Remove elements from a group
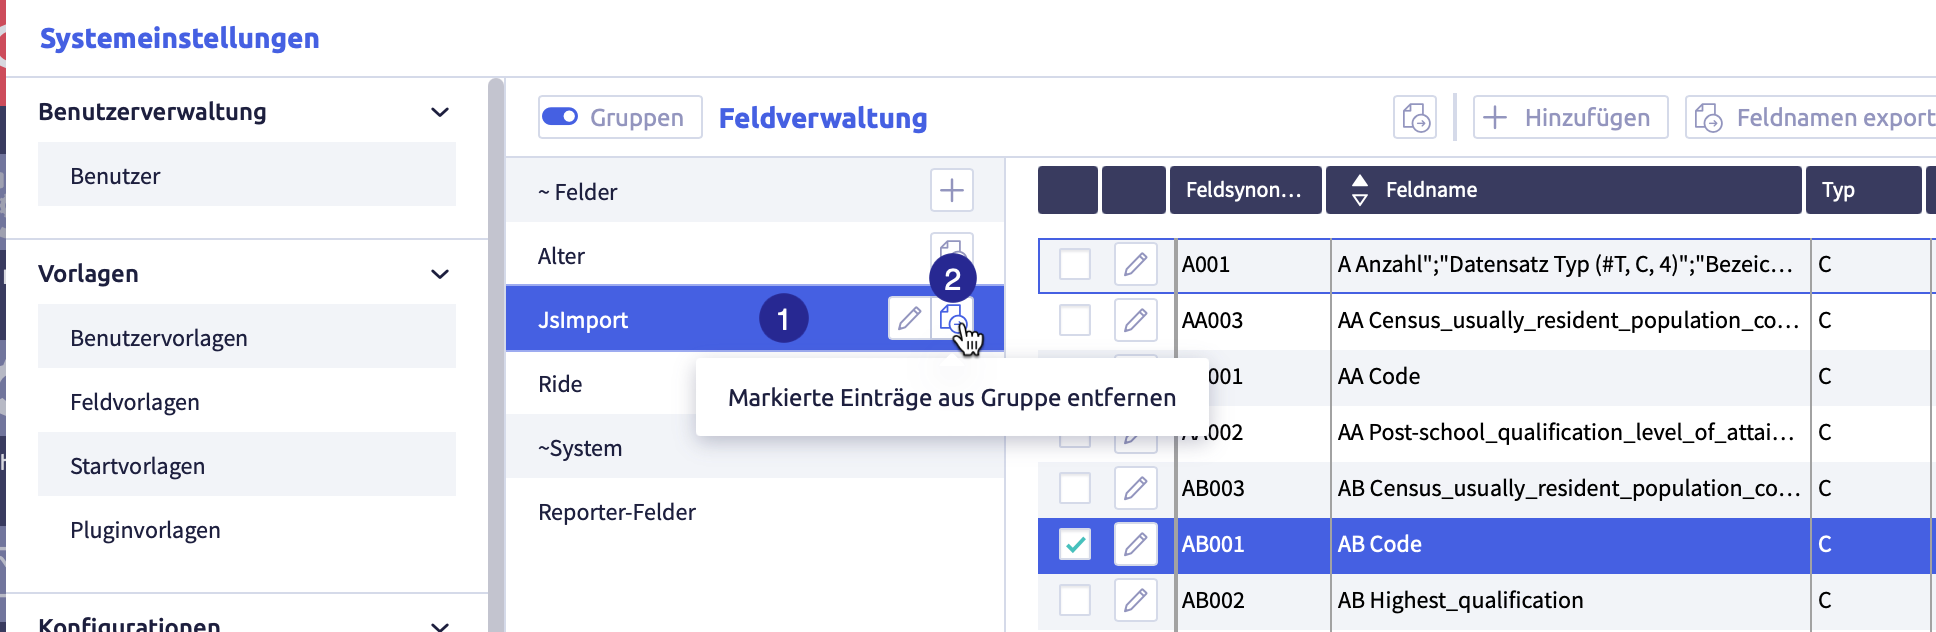
(1) selected group with selected elements to be removed from the group, (2) button Remove selected entries from group
-
click the group from which you want to remove elements
-
select all the elements you want to remove from the group
-
click the button Remove selected items from group
of the groupThe elements will be removed from the group.
Export and import user templates
You can export and import the following user templates:
Each export will only be carried out for selected rows in the list of user templates.
Image with buttons for export and import

The image shows the export and import buttons: (1) checkbox to select row, (2) button Export selected data as CSV file
Export selected data as CSV file
Image with buttons for export and import
The image shows the export and import buttons: (1) checkbox to select row, (2) button Export selected data as CSV file
-
select the rows you want to export
-
click the button Export selected data as CSV
The CSV file will be downloaded and saved in the download folder (or the folder that was set for this in the browser).
The file name will be generated automatically and is called #UserTemplates.csv.
A list with the following information will be exported:
| Column | Meaning | Note |
|---|---|---|
| template name | name of the user template | |
| portals (all) | all defined portal configurations | Y(es) or N(o) |
| search (all) | all defined searches | Y(es) or N(o) |
| selection right | options: 0=no access permissions to selections 1=loading selections 2=edit your own selections 3=edit all selections |
|
| list rights | edit lists | options: 0=no access permissions to list definitions (representation of default lists only) 1=loading list definitions (no list editing) 2=limited (private and user groups) list definitions: creation and editing 3=creating and editing public and restricted list definitions |
| deleting right | deleting records | possible options: 0=no deleting right 1=deleting right for own records 2=general deleting right |
| glob-search | global search across all fields | Y(es) or N(o) |
| wildcard-glob-search | wildcard global search across all fields | Y(es) or N(o) |
| group | name of the group (s) of the user template | |
| search configurations | assigned search | multiple searches possible |
| search configurations-groups | all searches from the assigned search groups | multiple groups possible |
| portal configurations | assigned portal | multiple portals possible |
| portal configurations-groups | multiple groups possible | |
| object view | assigned object view | multiple object views possible |
| object view-groups | multiple groups possible |
Export selected templates
This allows you to import user templates exported in this way back into a CortexEngine.
Image with buttons for export and import
The image shows the export and import buttons: (1) checkbox to select row, (2) button Export selected data as CSV file
-
select the rows you want to export
-
click the button Export selected
The following window opens:

A .tar file is downloaded and saved in the download folder (or the folder that was set for this in the browser).
The file name is generated automatically.
Import templates
Exported templates from another CortexEngine can be imported into the current CortexEngine using the Import button.
Image with buttons for export and import
The image shows the export and import buttons: (1) checkbox to select row, (2) button Export selected data as CSV file
-
click the button Import
The following window opens:
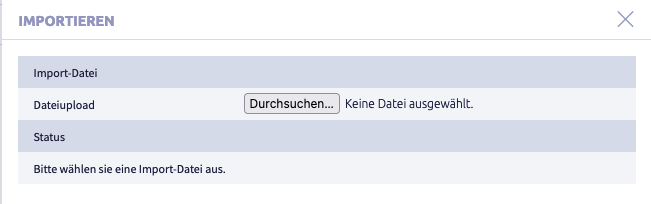
-
click the button Select file
A window with a file folder opens.
-
select a file
The following formats are suitable for import:
- .tar
- .tar.gz
- #Vus.ctxexp
-
click the button Import
The following window opens (example: importing a .tar file):

-
click the buttonClose
The list with all user templates will be displayed again.