List definitions
Lists are one of the main functions in a CortexEngine:
- display of results and content ( using the standard list function) e.g. search result using a simple list with rows and columns
-
substructured display
- sublists
- calculated contents (JavaScript in lists, pivot display)
-
basis for displaying data in a dashboard
The following factors depend on the configuration of a list:
- simple representations
- advanced functions, e.g. JavaScript in lists, pivot display, selection via list definition
The following operations are possible for list definitions:
- add
- edit
- delete
- as a template for new list definitions
- organize into groups
- export and import
- add sublists
- adopt orphaned lists
Often, list definitions are created and edited directly using the list view for the record type overview or a record. Columns can be assigned directly from a record.

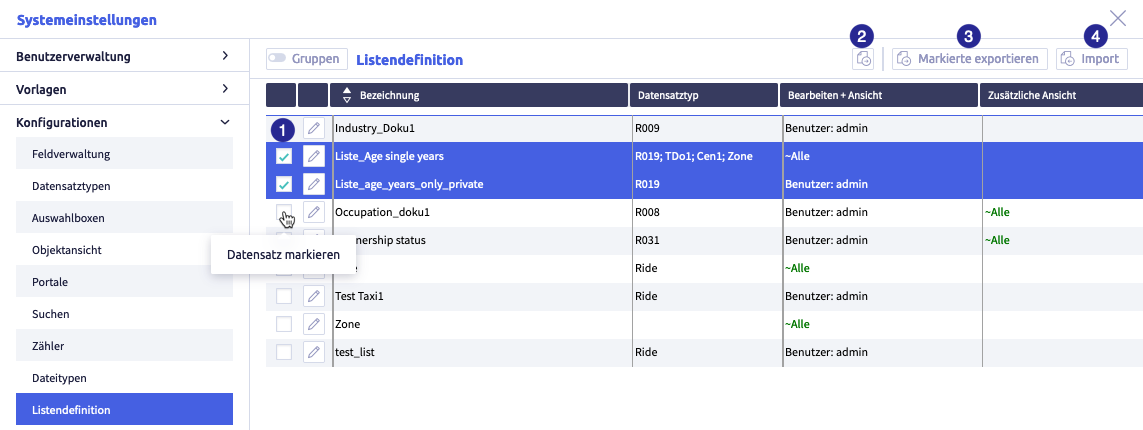
The image shows the list definition: (1) navigation, (2) button Groups, (3) button Edit
, (4) list with all list definitions, (5) buttons with export and import options
The button Edit ![]() will open the list editor to edit the list definition.
will open the list editor to edit the list definition.
If the function Groups is active, you can organize list definitions into groups for simplified administration.
Warning
- Changes in system settings often only take effect when a restart is carried out after closing the system settings (menu item under the button with the user name at the top right, see also introduction).
- If another user with admin rights is currently editing this system setting, the red icon lock
 appears in the header and a warning message appears with the name of the currently active user.
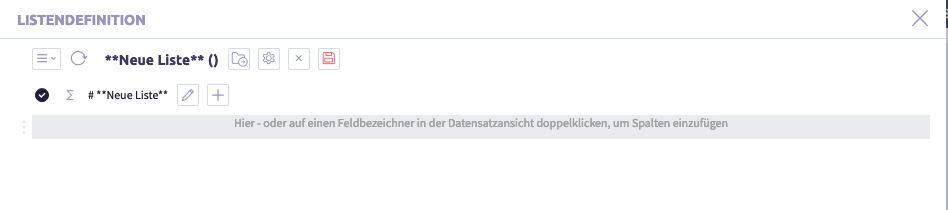
List editor (in system settings)
The list editor will open when you edit list definitions:

The image shows the list editor: (1) selection menu
, (2) button Refresh records
, (3) button Load list definition
, (4) button Edit
to close the list editor, (6) button Set sublist
, (7) button Determine number of different column entries
, (8) layout area of the list definition with column headers
The following table explains all elements of the list editor:
| Name | Meaning | Note |
|---|---|---|
| button Selection menu | ||
| button Reload records | not relevant in the editor | |
| button Load list definition | select another list definition | |
| button Edit | edit the existing list definition | |
| button Cancel |
close editor | |
| button Set sublist | add sublist(s) to list definition | |
| button Determine number of different column entries | not relevant in the editor | |
| layout area of the list definition | shows the columns that are displayed in the list |
List view
The list view shows the results of a selection.
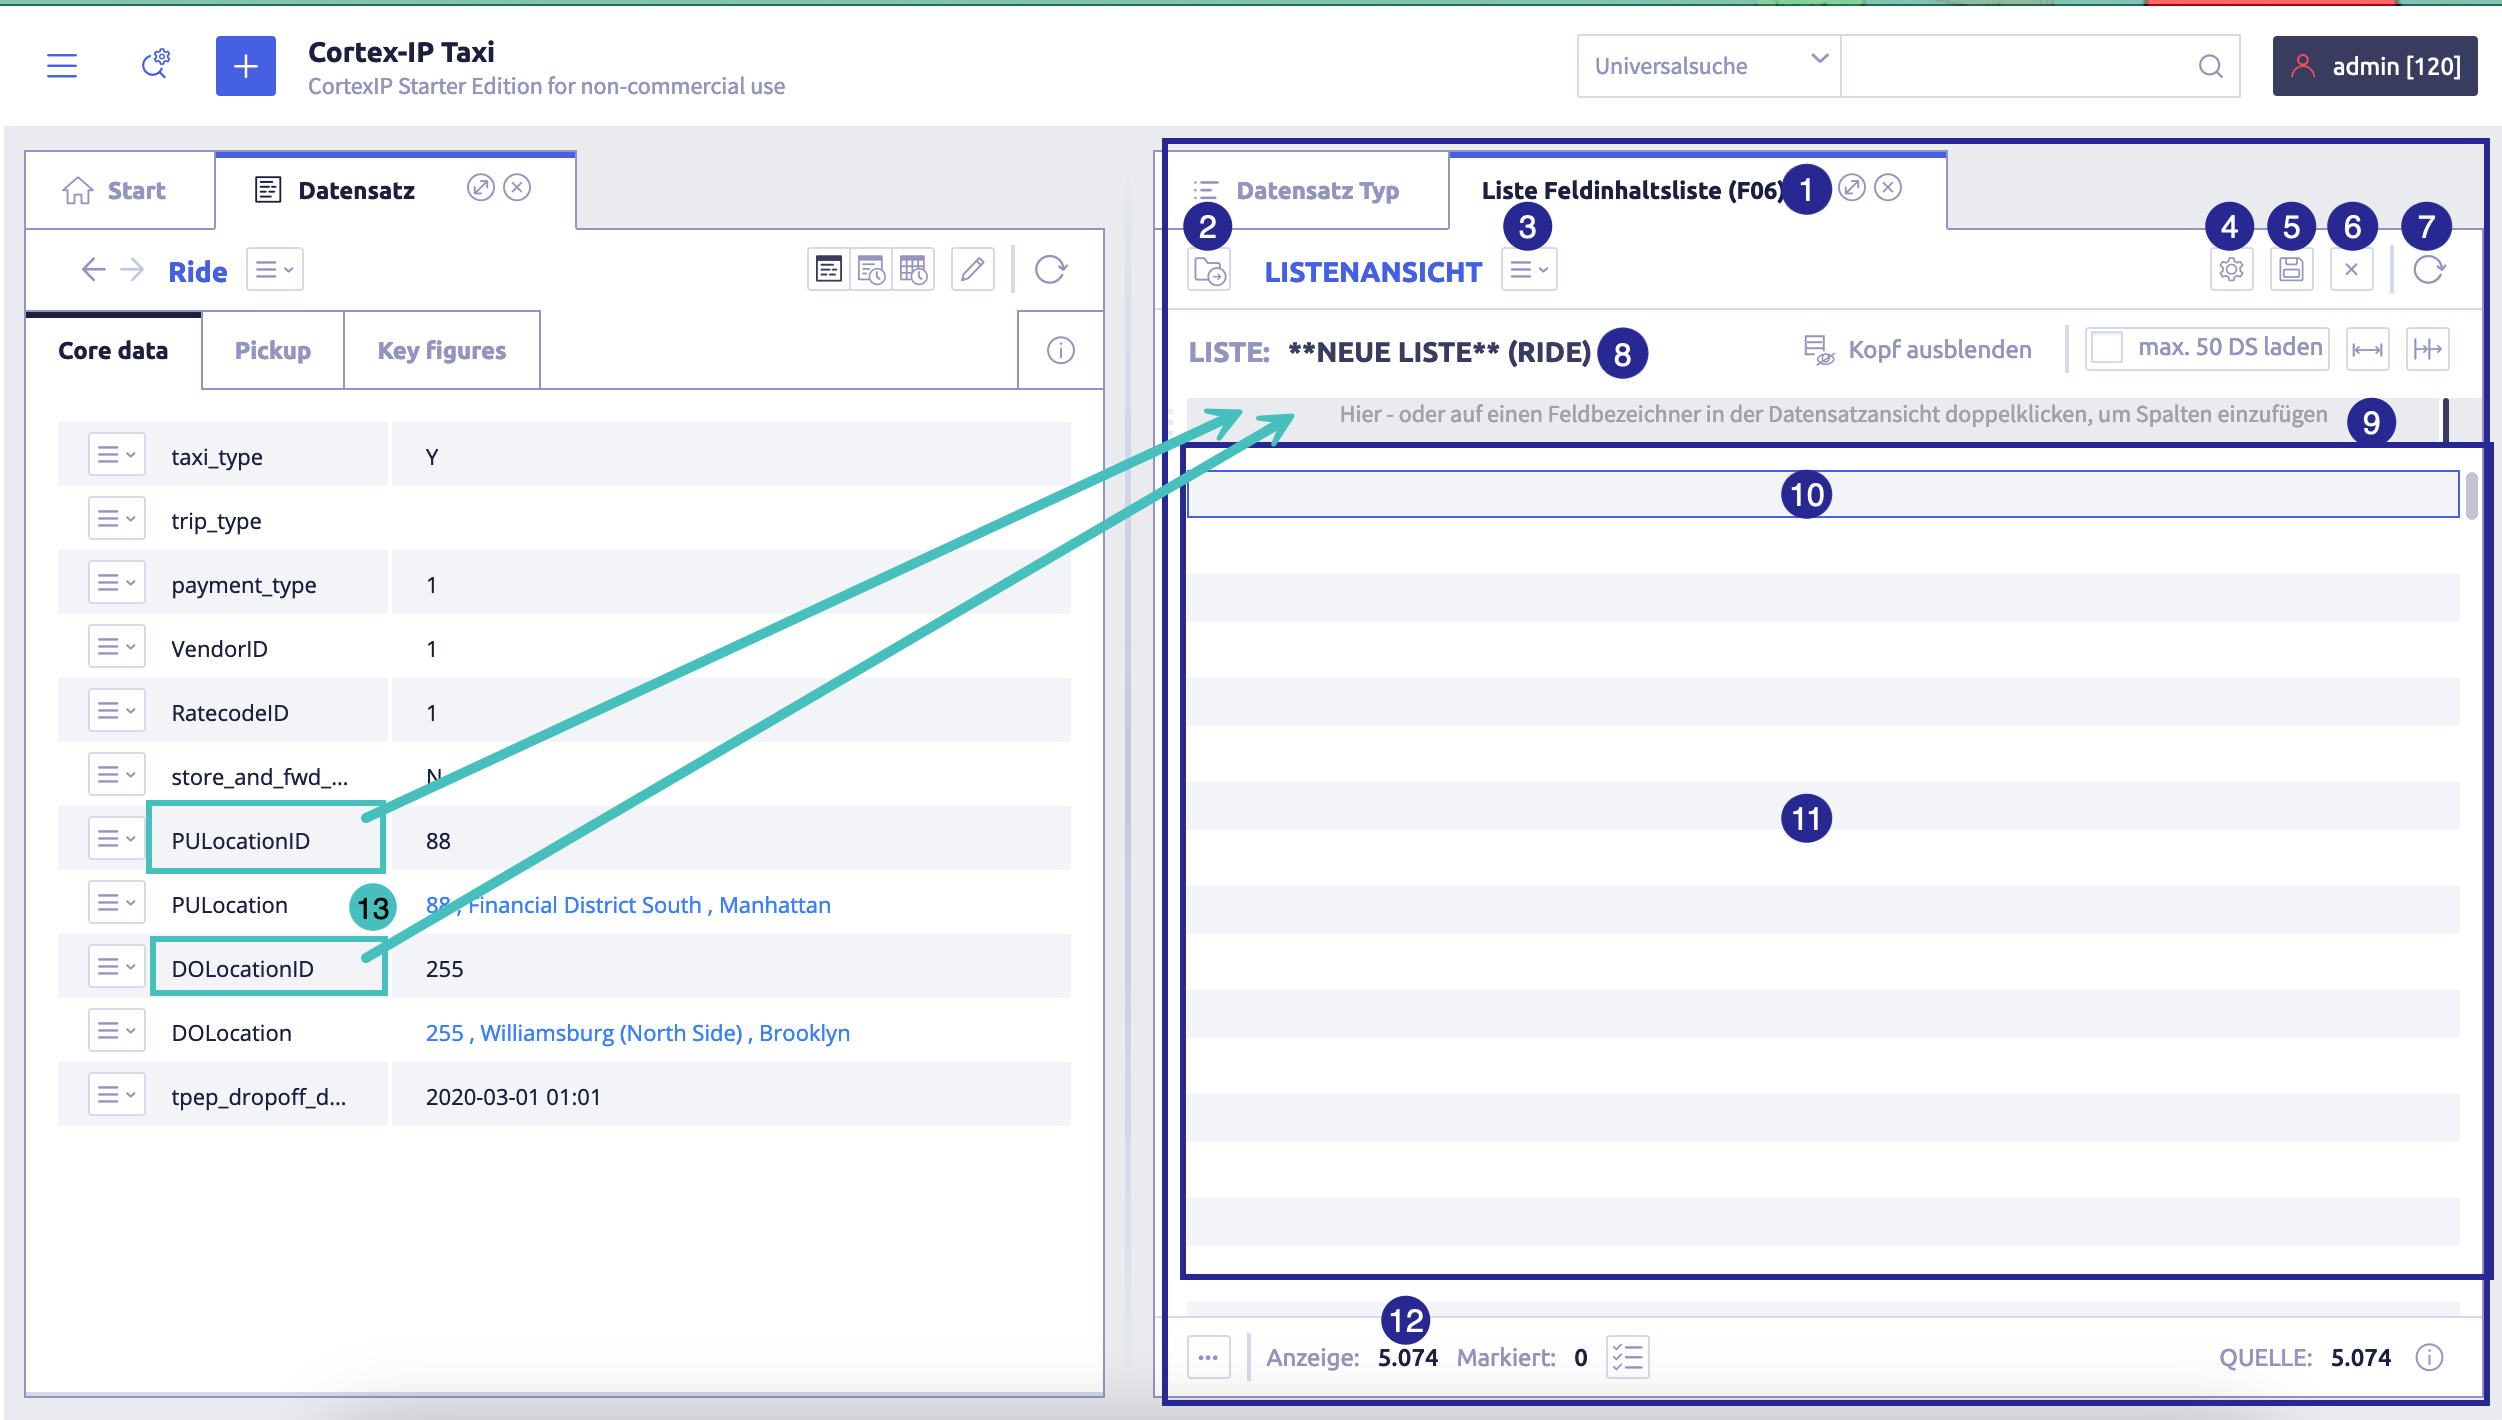
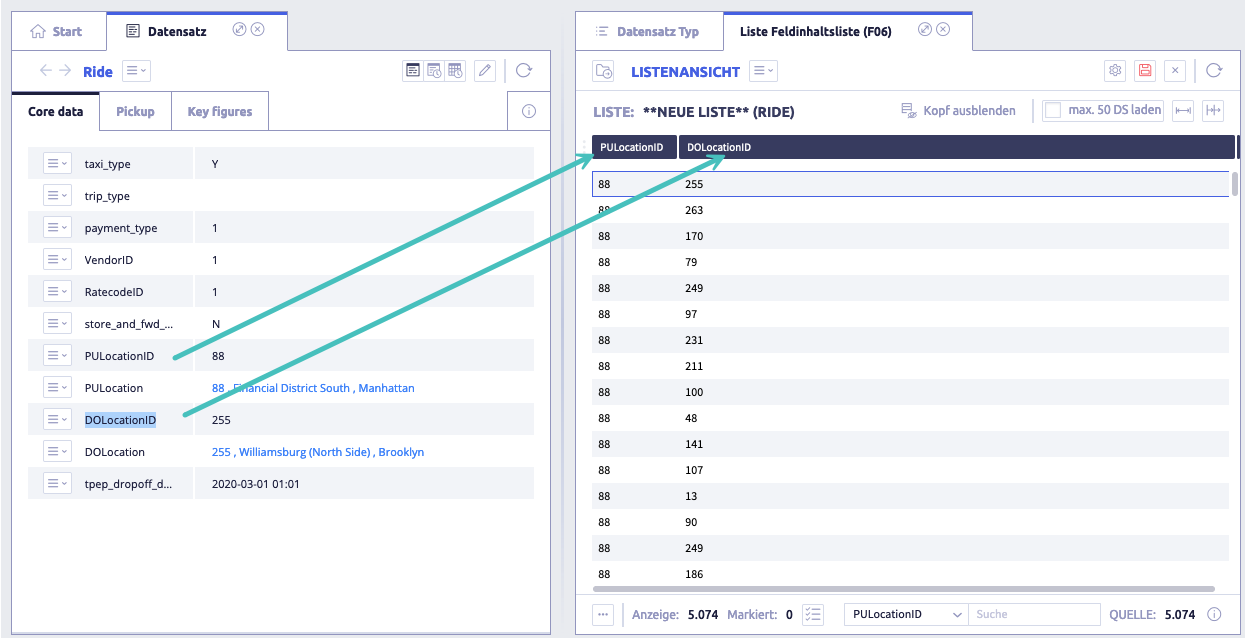
The image shows the list view for the record type Ride: (1) synonym of the field, (2) button Load list definition
, (5) button Save
, (6) button Cancel
Selection menu
The selection menu is available in the list editor and in the list view.
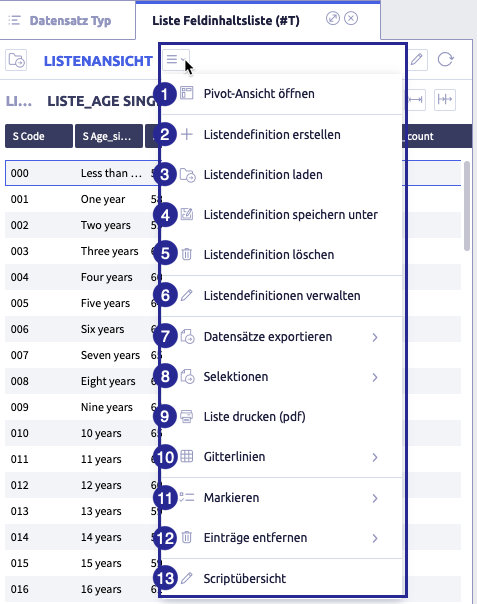
The image shows the selection menu of the list view: (1) open pivot view
, (2) create list definition
, (3) load list definition
, (5) delete list definition
, (6) manage list definitions
, (8) selections
, (10) grid lines
, (11) select
, (12) remove entries
Table with all elements of the selection menu
| Name | Meaning | Note |
|---|---|---|
| Open pivot view | only available in list view | |
| Create list definition | add a new list definition | |
| load list definition | load an existing list definition | |
| Save list definition as | ||
| Delete list definition | ||
| Manage list definitions | ||
| export records | possible options: export all or selected records as CSV or XML file; not relevant in the editor | |
| Selections | create extract from a list | possible options: - load selection - save selection - delete selection - edit selections not relevant in the editor |
| print list | not relevant in the editor | |
| grid lines | list view with grid | possible options: - create grid lines - remove all grid lines |
| select | select list entries | possible options: - select all - invert selections - deselect not relevant in the editor |
| remove entries | selected list entries are temporarily removed from this list view | not relevant in the editor |
| script overview | shows available scripts | not relevant in the list definition editor |
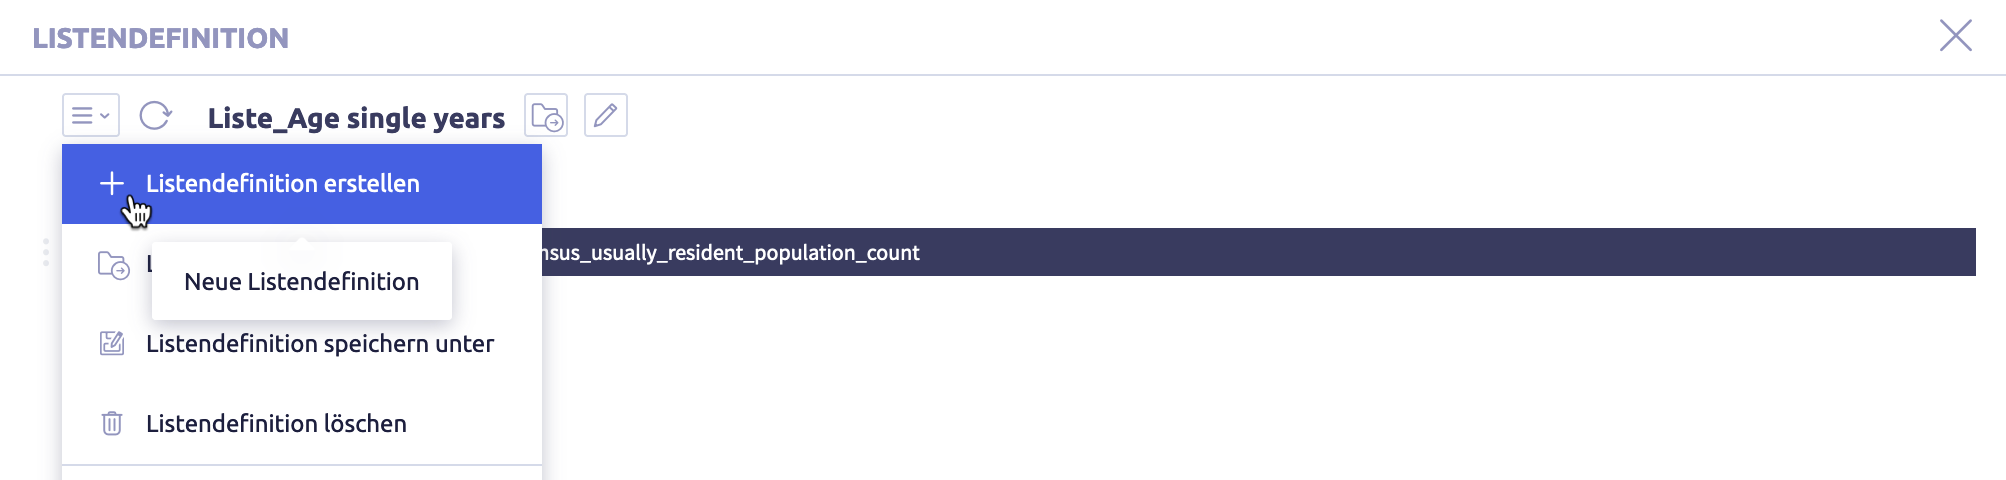
Add a list definition
List definitions can be created using
We recommend to create and edit list definitions directly using record type overview or a record.
Add a list definition using a record type overview
-
click the the hamburger menu on the left in the header of the user area
A selection opens.
-
select Record type overview

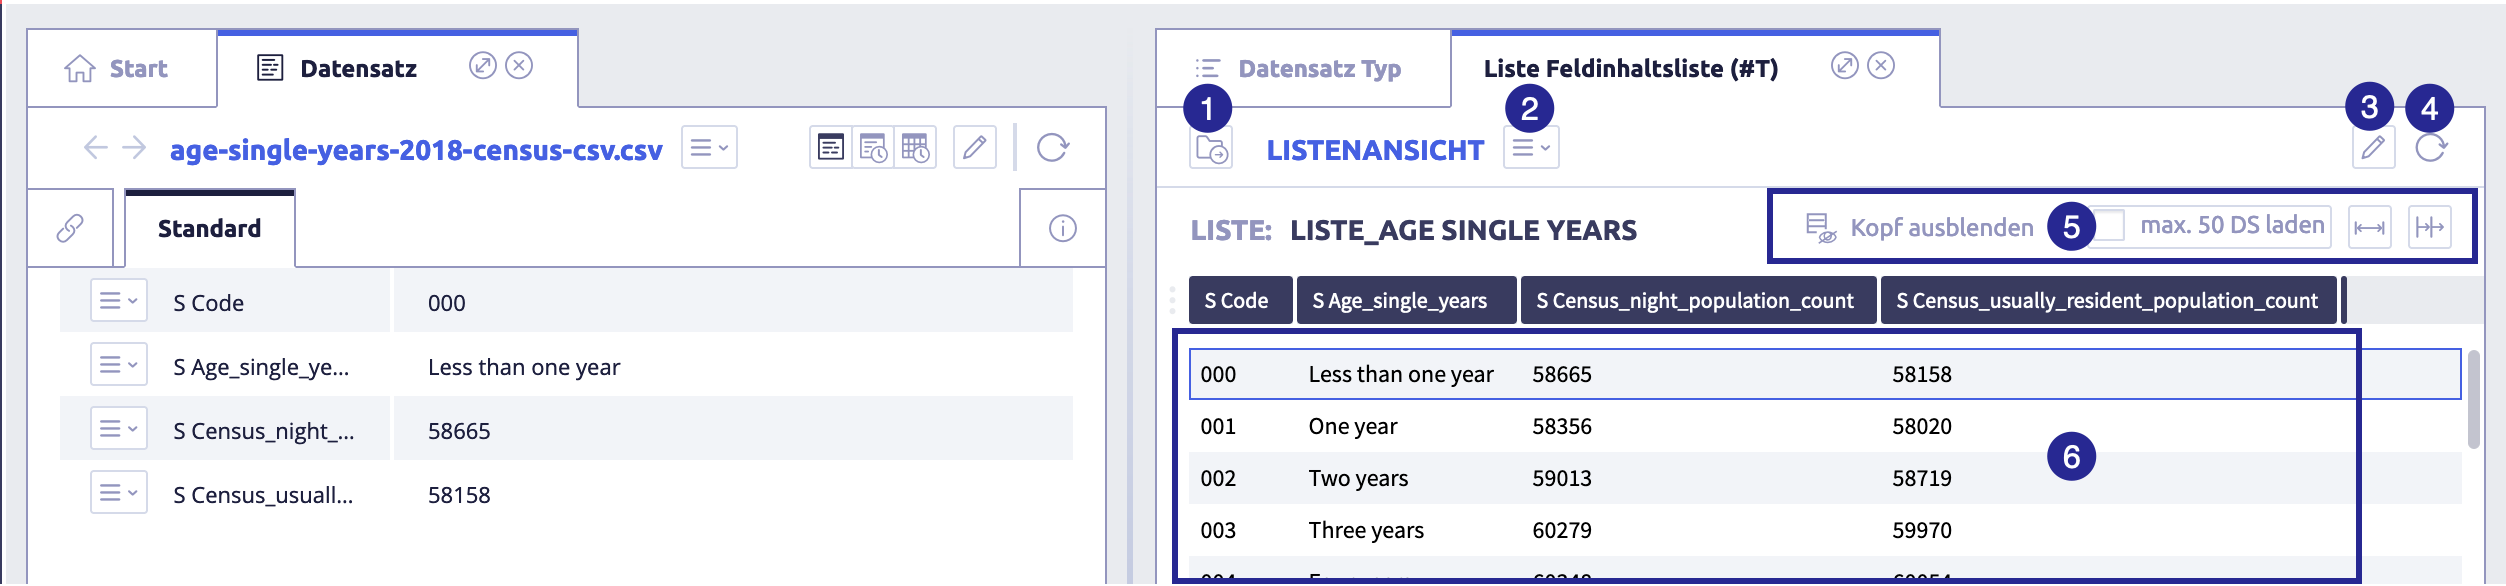
The image shows the start page of the Uniplex with the currently open selection (1).
The list with all record types that contain at least one record will be displayed.
-
click on a record type
The row of the record type will be displayed in blue and the first record will be displayed on the left:

The image on the right shows the active record type Ride with an open record (left): (1) first record of the record type out of 1,000,000 records, (2) selection menu
-
select List view in the selection menu
The list view opens on the right:
The image shows the list view for the record type Ride: (1) synonym of the field, (2) button Load list definition
, (3) selection menu , (4) Settings list definition , (5) button Save , (6) button Cancel , (7) button Reload records , (8) name of the list definition assigned by the system, (9) gray area for manually adding columns, (10) currently selected record, (11) list that already contains data on the occurrence of the field (recognizable by the rows), (12) number of displayed list rows, (13) add columns to the list by double-click -
double-click the field names in the record you want to display as a column in the new list
These columns will be added:
Tips
-
To edit a column, click the column header and select Edit column.
For information on editing columns, see Add columns to list definition.
-
To delete a column, click the column header and select Delete column.
Warning: The column will be deleted immediately.
-
-
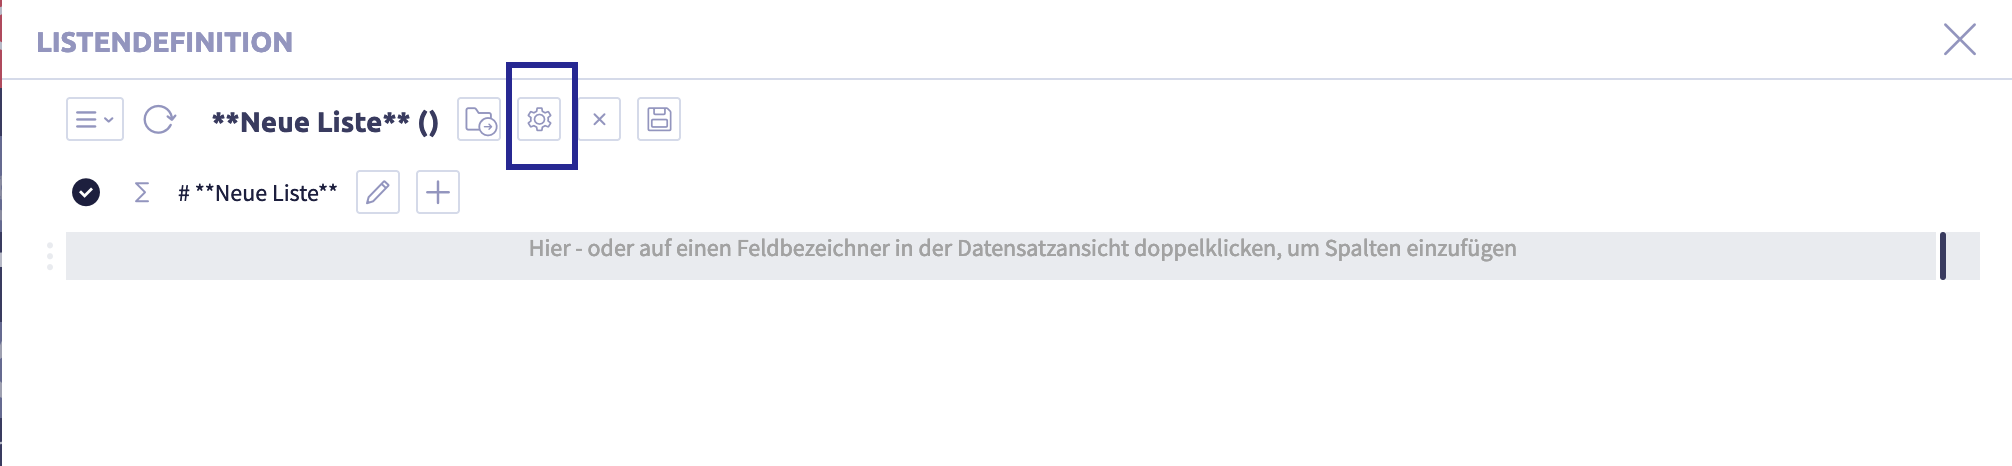
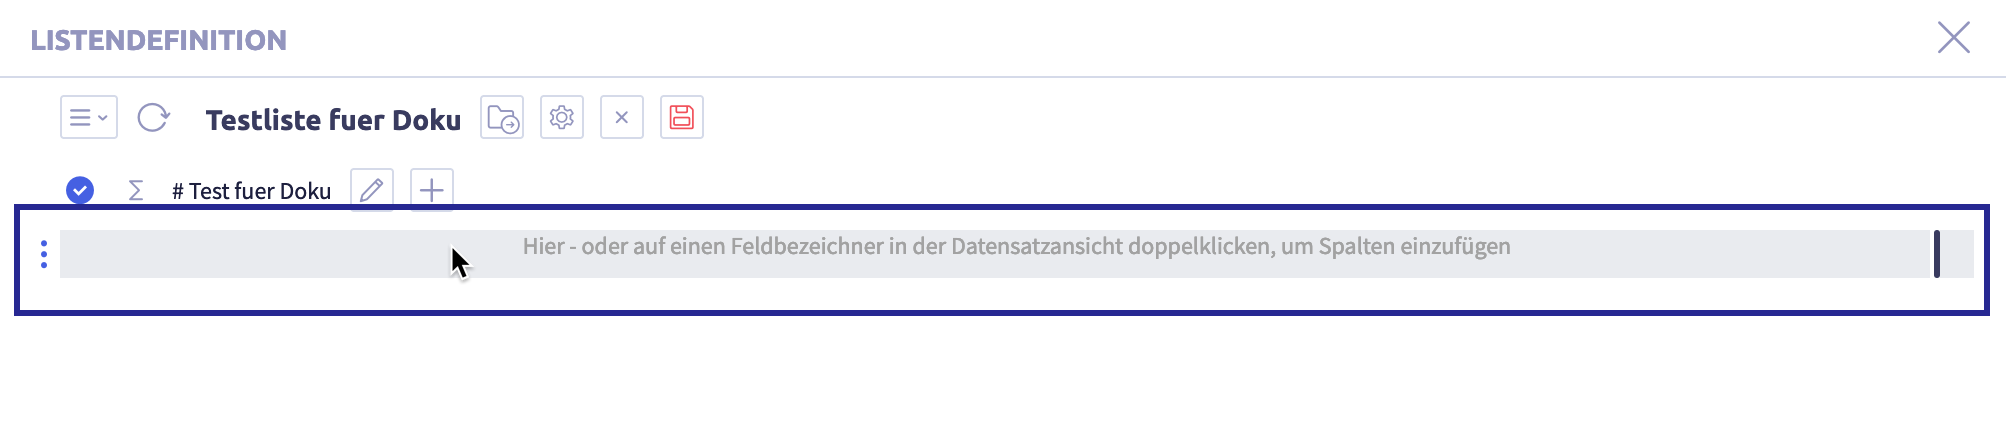
click the button List definition settings
The following window opens:

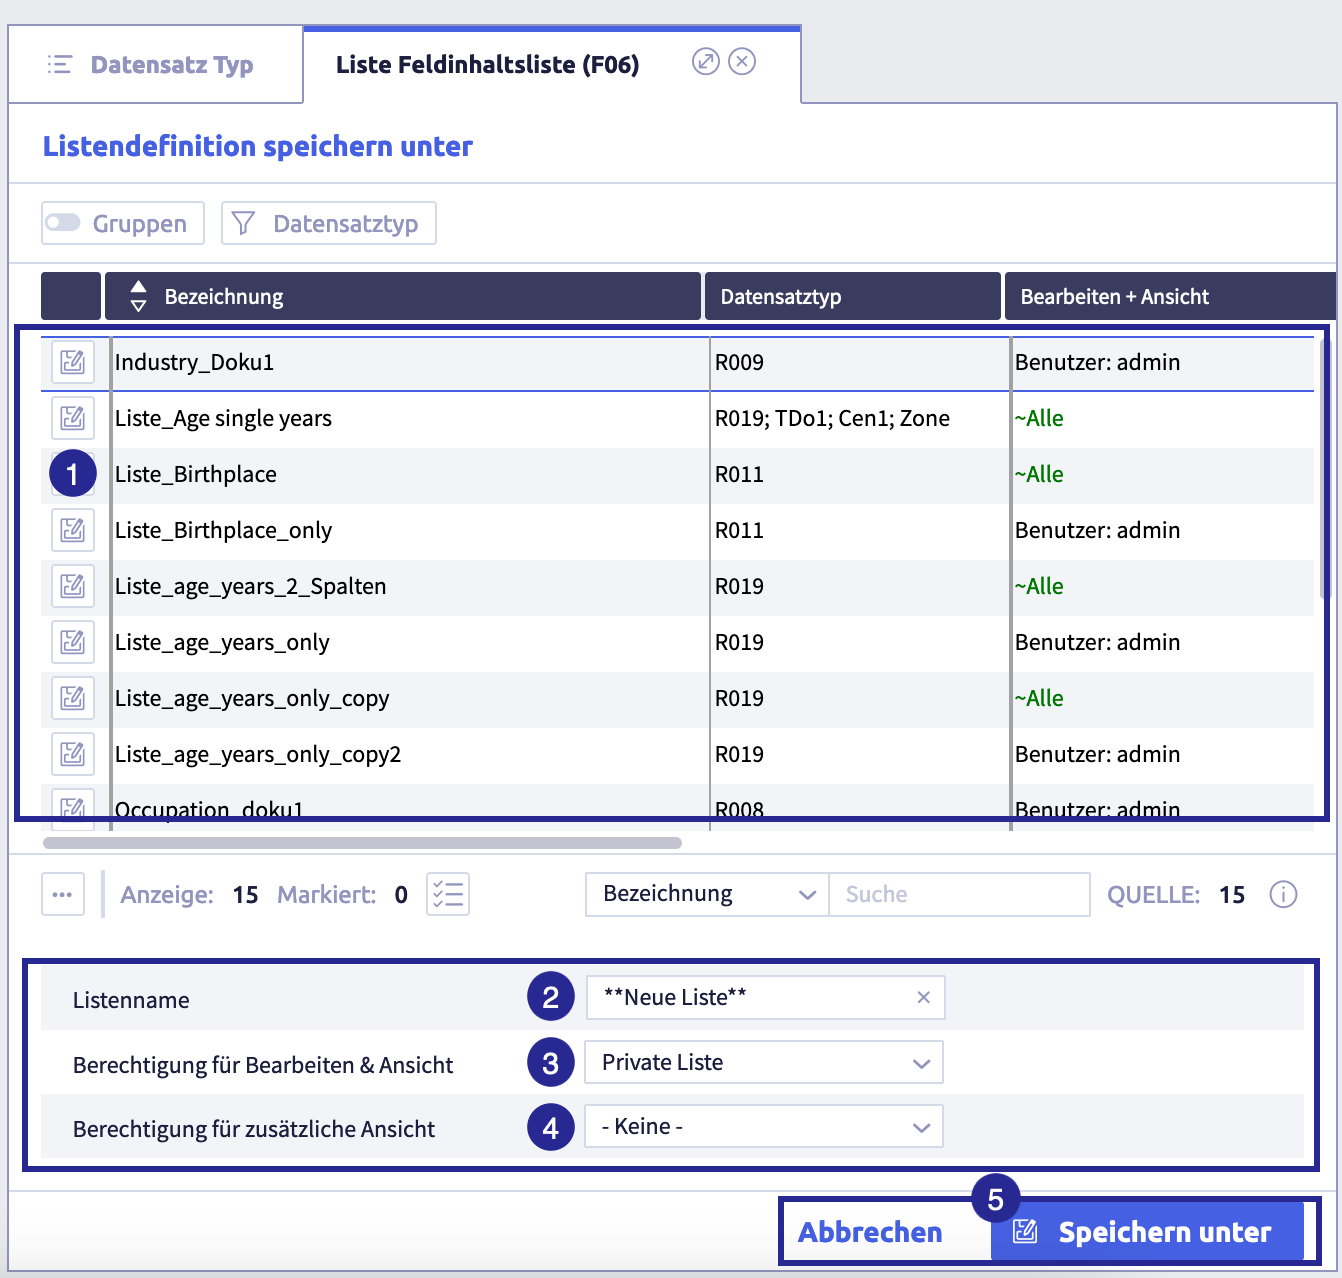
The image shows the setting options for list definitions: (1) field List name, (2) button Select list group, (3) selection Permissions, (4) use of the list in record types, (5) buttons for Cancel and Save to close the settings
-
enter a list name in the field List name
-
if required, select a List group
There must already be a group for organizing the list definitions.
-
if required, change the selection Permissions for edit & view
Overview of permissions for edit & view
Permission Meaning private list only the user who created the list definition can view (use) and edit it user group only defined users can see (use) and edit the list definition public (All) everyone can see (use) and edit the list definition The default setting is Private list.
Depending on the selected permission, a further selection Additional view may appear.
-
if required, change the selection Additional view
The selection appears with the permissions Private list and User group
Overview of permissions for additional view
Additional view Meaning none no additional permissions to view (use) the list definition user group only defined users can see (use) the list definition public (all) all can see (use) the list definition The default setting is none.
-
assign record types under Use list for the following record type
Tips
- The current record type is assigned automatically, it does not have to be selected here.
- You can add , remove and take over
 (take over record types from current data).
- click the button Add
- select a record type from the list
- assign further record types if required
-
click the button Ok (or Cancel) to close the settings
The list view in edit mode will appear again.
-
click the button Save list definition
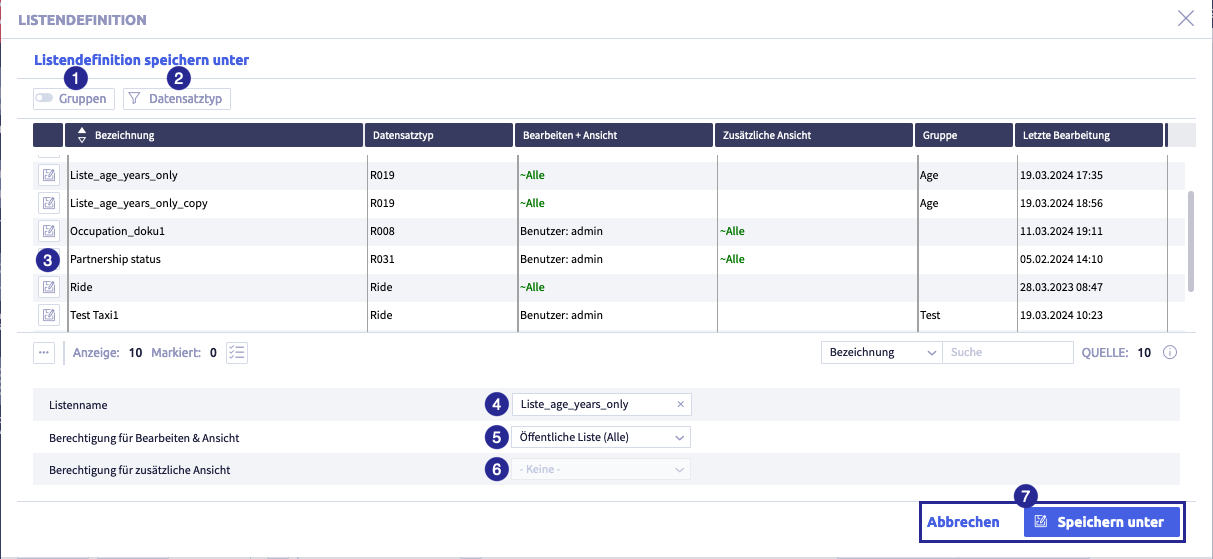
(or Cancel editing ) to end the editing of the list definitionThe following window opens:
(1) save new list under the name of an existing list, (2) field List name, (3) selection Edit and view permission, (4) selection Additional view permission, (5) buttons for Cancel and Save as
-
check the details for list name and the permissions and correct them if required
-
click the button Save as
(or Cancel)The list view will be displayed again. It now contains the name of the list definition.
If no further record type is to be assigned when creating a list definition, skip the settings and enter the information on saving. The current record type will be linked automatically.
Add a list definition using an open record
-
select Record type overview
The list with all record types that contain at least one record will be displayed.
-
click on a record type
The row of the record type will turn blue and the first record will be displayed on the left:
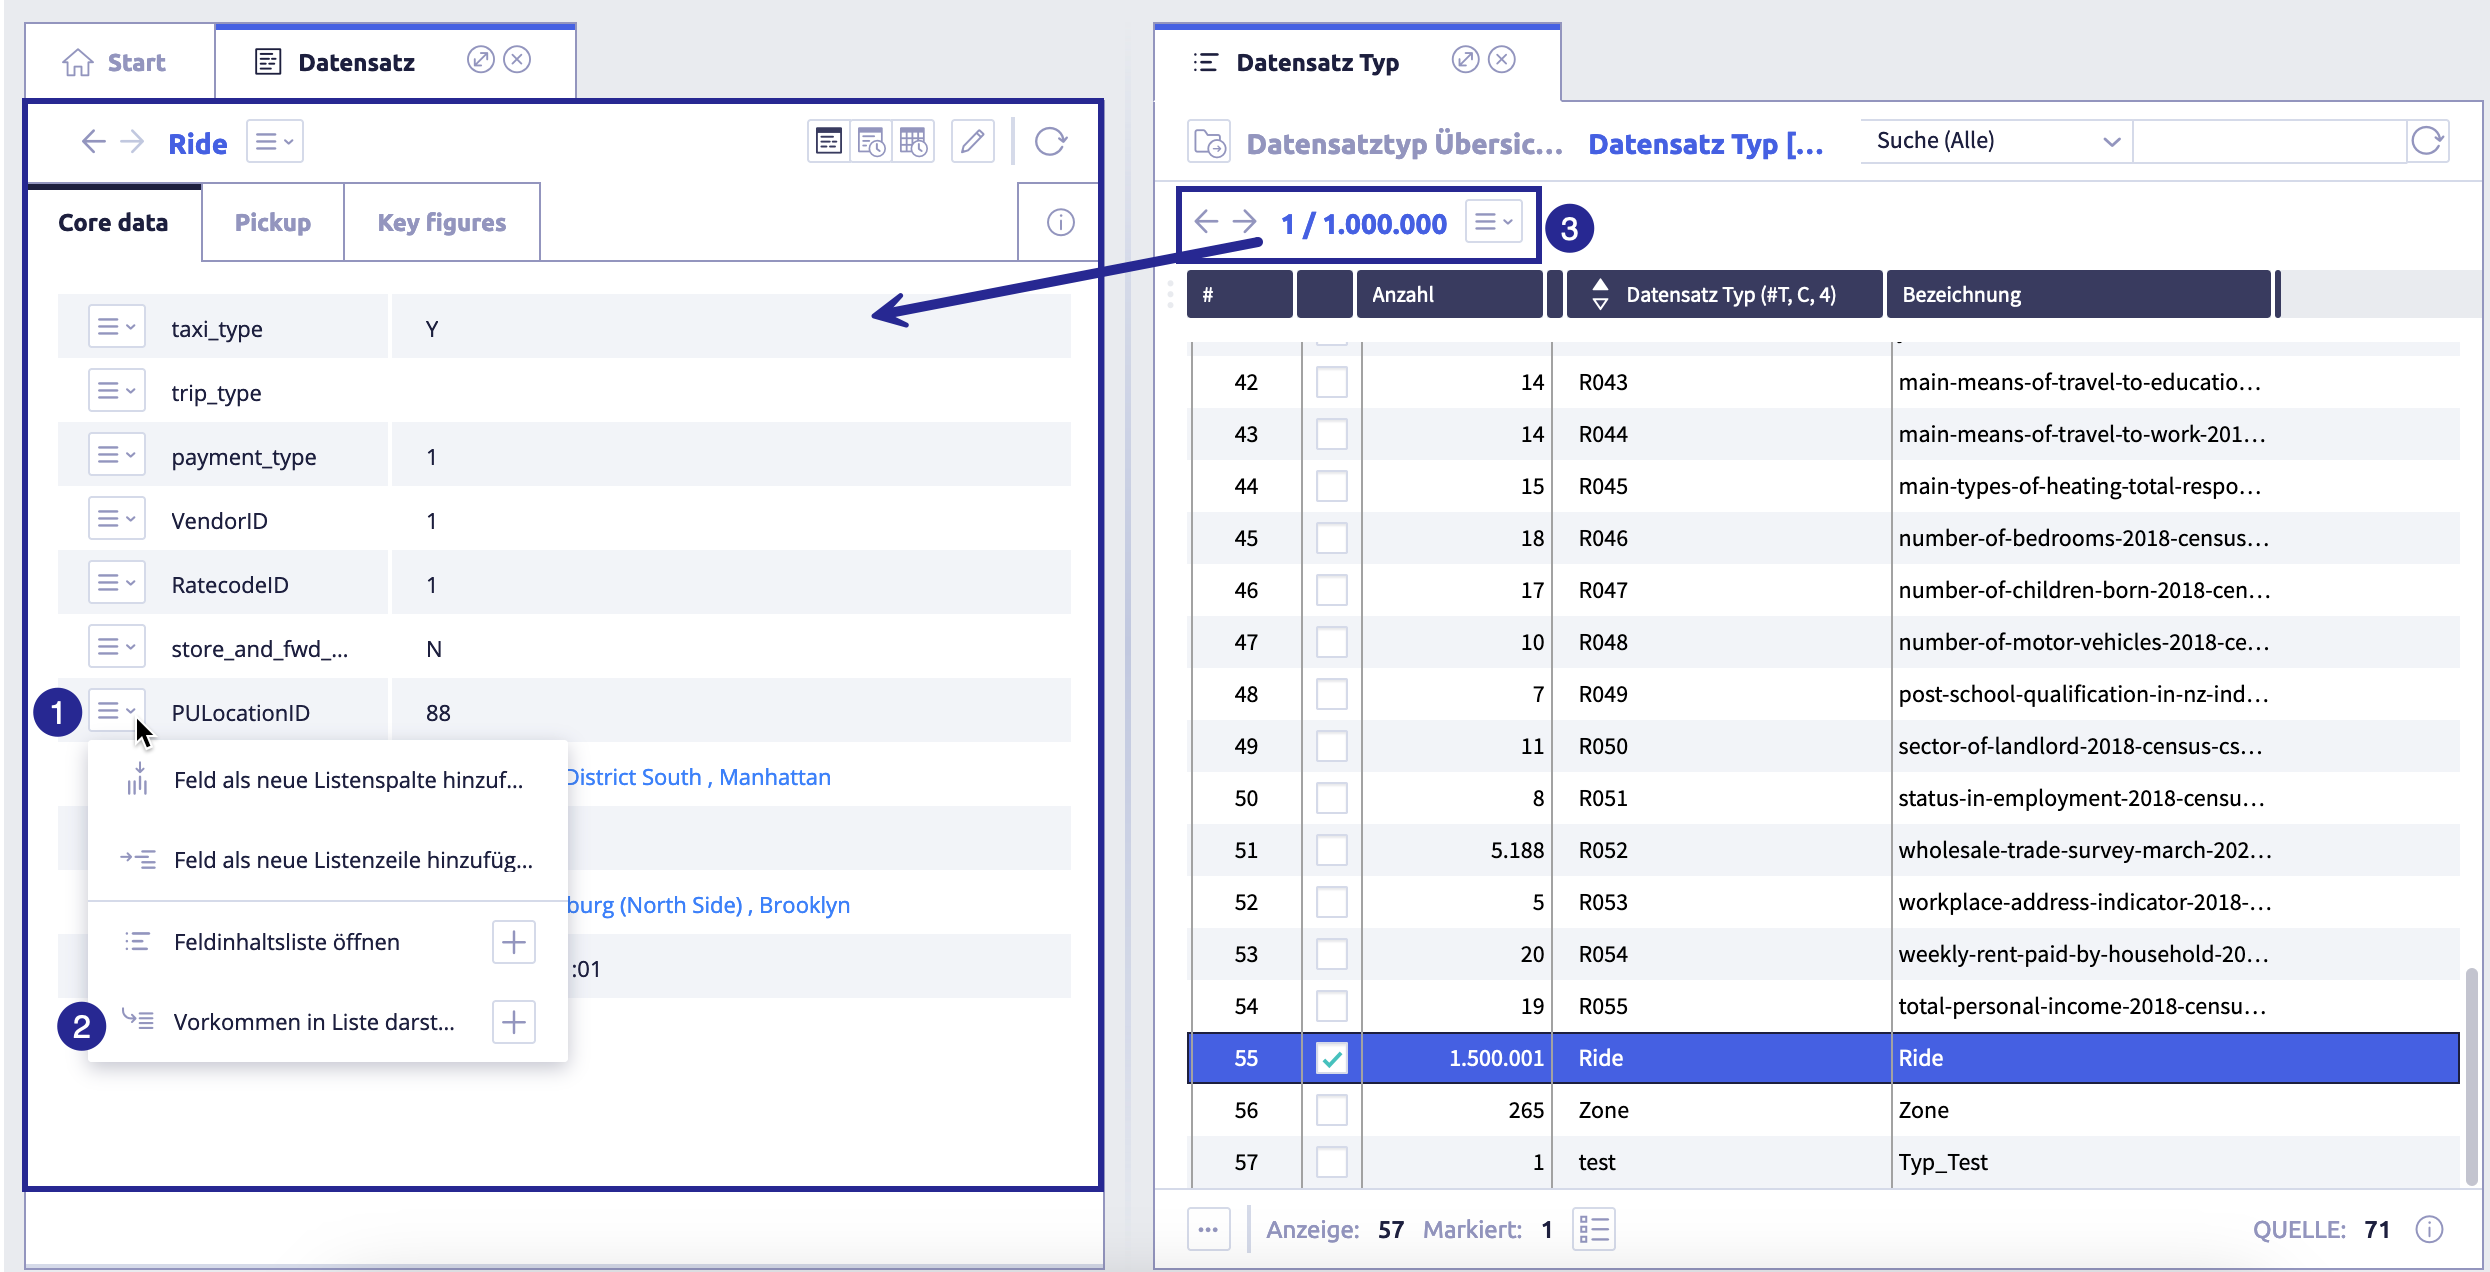
The image on the right shows the active record type Ride with an open record (left): (1) selection Field, (2) selection Display occurrence in list, (3) information on the current record, here the first record of 1,000,000
-
click on the selection on the left of a field
-
click the button Display occurrence in list
The list view opens on the right:
The image shows the list view for the record type Ride: (1) synonym of the field, (2) button Load list definition
, (3) selection menu , (4) Settings list definition , (5) button Save , (6) button Cancel , (7) button Reload records , (8) name of the list definition assigned by the system, (9) gray area for manually adding columns, (10) currently selected record, (11) list that already contains data on the occurrence of the field (recognizable by the rows), (12) number of displayed list rows, (13) add columns to the list by double-click -
double-click the field names in the record you want to display as a column in the new list
These columns will be added:
Tips
-
To edit a column, click the column header and select Edit column.
For information on editing columns, see Add columns to the list definition.
-
To delete a column, click the column header and select Delete column.
Warning: The column will be deleted immediately.
-
-
click the button Settings list definitions
The following window opens:
The image shows the setting options for list definitions: (1) field List name, (2) button Select list group, (3) selection Permissions, (4) use of the list in record types, (5) buttons for Cancel and Save to close the settings
-
enter a list name in the field List name
-
if required, select a list group
There must already be a group for organizing the list definitions.
-
if required, change the selection Permissions for edit & view
Overview of permissions for edit & view
Permission Meaning private list only the user who created the list definition can view (use) and edit it user group only defined users can see (use) and edit the list definition public (All) everyone can see (use) and edit the list definition The default setting is Private list.
Depending on the selected permission, a further selection Additional view may appear.
-
if required, change the selection Additional view
The selection appears with the permissions Private list and User group
Overview of permissions for additional view
Additional view Meaning none no additional permissions to view (use) the list definition user group only defined users can see (use) the list definition public (all) all can see (use) the list definition The default setting is none.
-
assign record types under Use list for the following record type
Tips
- The current record type is assigned automatically, it does not have to be selected here.
- You can add , remove and take over (take over record types from current data).
- click the button Add
- select a record type from the list
- assign further record types if required
-
click the button Ok (or Cancel) to close the settings
The list view in edit mode will appear again.
-
click the button Save list definition
(or Cancel editing ) to end the editing of the list definitionThe following window opens:
(1) save new list under the name of an existing list, (2) field List name, (3) selection Edit and view permission, (4) selection Additional view permission, (5) buttons for Cancel and Save as
-
check the details for list name and the permissions and correct them if required
-
click the button Save as
(or Cancel)The list view will be displayed again. It now contains the name of the list definition.
If no further record type is to be assigned when creating a list definition, skip the settings and enter the information on saving. The current record type will be linked automatically.
Add a list definition using system settings
Important
A list definition must already exist in order to add further list definitions via the system settings.
Add a list definition and edit settings
-
click the button Edit
of any list definitionThe list editor opens.
-
click the selection
The following window opens:
-
click the button Settings list definitions
The following window opens:
The image shows the setting options for list definitions: (1) field List name, (2) button Select list group, (3) selection Permissions, (4) use of the list in record types, (5) buttons for Cancel and Save to close the settings
-
enter a list name in the field List name
-
if required, select a List group
There must already be a group for organizing the list definitions.
-
if required, change the selection Permissions for edit & view
Overview of permissions for edit & view
Permission Meaning private list only the user who created the list definition can view (use) and edit it user group only defined users can see (use) and edit the list definition public (All) everyone can see (use) and edit the list definition The default setting is Private list.
Depending on the selected permission, a further selection Additional view may appear.
-
if required, change the selection Additional view
The selection appears with the permissions Private list and User group
Overview of permissions for additional view
Additional view Meaning none no additional permissions to view (use) the list definition user group only defined users can see (use) the list definition public (all) all can see (use) the list definition The default setting is none.
-
assign record types under Use list for the following record type
Tips
- The current record type is assigned automatically, it does not have to be selected here.
- You can add , remove and take over (take over record types from current data).
- click the button Add
- select a record type from the list
- assign further record types if required
-
click the button Ok (or Cancel) to close the settings
The following window opens:
-
click the button Save list definition
(or Cancel editing ) to end the editing of the list definitionThe list editor will be displayed again without the additional buttons
-
follow the instructions from step 2 in Add columns to the list definition
-
click the button Cancel
to close the editor.The list with the list definitions will be displayed again.
Add columns to the list definition
-
click the button Edit
of the list definition to which columns are addedThe list editor opens.
-
click the gray area to add column(s) to the list definition
The following window opens:

The image shows settings using the example of one field: (1) field for column identifier (field names), (2) selection Column type, (3) button Field selection, (4) selection History information, (5) date selection, (6) field Column position, (7) pretext and suffix as fixed text for values in the list view, (8) selection Vertical column row, (9) checkbox Fix column, (10) checkbox Hide column, (11) checkbox Hide row if content exists, (12) button Create script, (13) selection Field type, (14) checkbox Adjust style, (15) footer with buttons for Delete column
, Cancel and OK to close settingsTable with all elements in the dialog Edit column
Name Meaning Note field Column identifier (meaningful) name to identify the column usually the field name selection Column type choices are Field / Parameter field / Fixed text / Function the default setting is Field button Field selection / text input field / button Function selection depending on preselection under (2) selection History information choices are History information (today) / History information (relative date) only available for selection (2) Field for Field with field content for history information; default is today selection Date only available for selection (2) Field field Column position pixel specification of the position of the left column margin can be used to position columns, especially for multi-line lists with sublists fields Pretext and Suffix fixed text that supplements the values displayed in the list view, e.g. currency specification as suffix example: numerical value receives dimension as pretext or suffix selection Vertical column line number of column lines. The choices are none / 1 / 2 / 3. default setting is none checkbox Lock column useful for wide lists: when scrolling horizontally through a list, the selected column on the left is locked, while all columns further to the right are scrolled exactly one column can be locked (including all columns to the left of the locked column). When editing another column, the fixed column is displayed. Setting the checkmark overwrites the previous selection. checkbox Hide column column is hidden, content can still be used for further processing (e.g. pivot or JavaScript). checkbox Hide row with content button Create script selection Field type field type influences the display of values in the list view field type; default is Character (C), example: if only numbers are saved in a text field, no calculations can be performed. In addition, the sorting may be different than for a field type Floating point number checkbox Adjust style additional font options (type, size, alignment, color, etc.) footer with buttons Delete column, Cancel, Ok delete column / all changes are discarded or applied -
if required, adjust the field Column name
The column name will be transferred from the field name.
-
select the Column type
Tips
The following column types are available:
- field
- parameter field
- fixed text
- function
The default setting is Field.
Depending on the selection, next to the selection appears a different element (button, field or selection).
-
next to the Column type, click the button or the selection to select an element (field or function) or enter text in the input field
This element depends on the selection you previously made for the column type.
The following features are available
- select record
- start record view
- start object view
- start selected object view
- start selected list
- info icon
- open recent view
- row number
- search text in record view
-
select a History information and, if required, a date
Tips
- This element is only available for Field.
- For history information (relative date), a date field will be provided in the list header for entering your own reference date.
-
if required, edit the Column position
Tips
- A value will be assigned automatically when the column is created.
- The value of the column position allows the exact positioning of the left column margin in pixels. The smallest value is 0. For multiline lists, i.e. lists with sublists, columns can be arranged exactly one below the other.
-
if required, enter a Pretext and/or suffix
The fixed text supplements the value displayed in the list view, e.g. a numerical value is given a dimension by the fixed text.
-
select the number of Vertical column lines
By default, the setting is none.
-
activate the checkboxes as required
Name Meaning Note checkbox Lock column When scrolling horizontally through a list, the selected column on the left will be fixed, while all columns further to the right will be scrolled. Exactly one column can be fixed (including all columns to the left of the fixed column). When editing another column, the fixed column will be displayed. Checking the box will overwrite the previous selection. Hide column Column will be hidden, content can still be used for further processing (e.g. pivot or JavaScript). checkbox Hide row if content exists -
if required, enter a Script
-
if required, select a different field type
Tips
- The field type influences the display of the values in the list view.
- The default setting is Character (C).
- Example: if only numbers are saved in a text field, no calculations can be performed. In addition, the sorting may be different than for a numeric field type.
-
if required, activate the checkbox Adjust style and edit as needed
The following window opens:
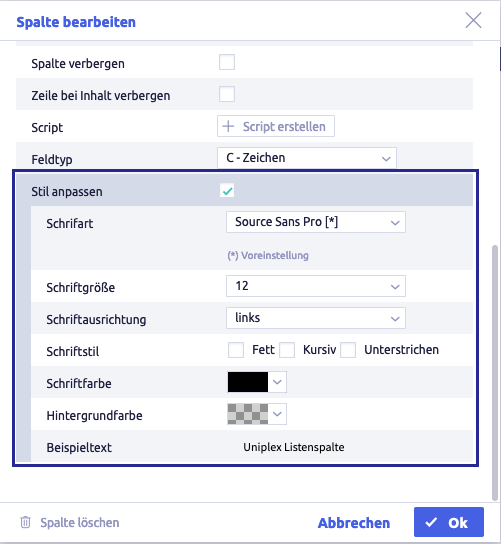
-
click the button Ok (oder Cancel), to close the settings of the column
-
if required, add further columns
-
click the button Save list definition
(oder End editing ) to end the editing of the listThe list editor will be displayed again without the additional buttons.
-
if you want to edit a column:
- if required, click the button Edit of the list definition
- click the corresponding column
- edit the column settings as required
- click the button Save list definition (oder Cancel )
- if required, click the button Edit
-
if you want to delete a column:
- if required, click the button Edit of the list definition
- click the corresponding column
-
click the button Delete column in the footer
Warning
The column will be deleted directly.
-
click the button Save list definition
(or Cancel )
- if required, click the button Edit
-
click the button Cancel
to close the editorThe list with the list definitions will be displayed again.
Edit a list definition
Tip
You can only edit the list definitions that you have created and/or for which you have the permission Edit & view (see Edit & view column in the list of all list definitions under system settings).
If you do not have the permission Edit & view, you can create the list definition to be edited as a new template in the system settings.
There are several ways to edit list definitions:
- Open the list definition in the list editor in system settings.
- Load list definition in the list view using the record type Overview.
The editing of list definitions can be divided into:
- edit list definition settings
- edit the layout of the list definition incl. editing columns
- add a sublist
- adopt orphaned lists
Edit list definition settings
-
load a list definition using the list view (in the record type overview) or open a list definition in the list editor (in system settings)
The image shows the list view: (1) button Load list definition
, (2) selection , (3) button Edit , (4) button Reload records , (5) layout options for the list, (6) list with entries -
click the button Edit
Additional buttons will appear:

The image shows the list view: (1) button Settings list definition
, (2) button Save list definition , (3) button Cancel editing , (4) editable column, (5) gray area where a new column can be addedTips
- The buttons Settings list definition , Save list definition , and Cancel editing are also available in the list editor, although they are arranged slightly differently.
- Only the column headers are visible in the list editor.
- The result display in the list view depends on the source record type. In order for values to be displayed in the list view, the currently selected record type must therefore be linked to the list definition, among other things.
- Editing the columns is explained in layout of the list definition from step 3 onwards.
- The buttons Settings list definition
-
click the button Settings list definition
The following window opens:
The image shows the setting options for list definitions: (1) field List name, (2) button Select list group, (3) selection Permissions, (4) use of the list in record types, (5) buttons for Cancel and Save to close the settings
-
if required, edit the field List name
-
if required, select a List group
There must already be a group for organizing the list definitions.
-
if required, change the selection (3) Permissions for edit & view
Overview of permissions for edit & view
Permission Meaning private list only the user who created the list definition can view (use) and edit it user group only defined users can see (use) and edit the list definition public (All) everyone can see (use) and edit the list definition The default setting is Private list.
Depending on the selected permission, a further selection Additional view may appear.
-
if required, change the selection Additional view
The selection appears with the permissions Private list and User group
Overview of permissions for additional view
Additional view Meaning none no additional permissions to view (use) the list definition user group only defined users can see (use) the list definition public (all) all can see (use) the list definition The default setting is none.
-
if required, change the assigned record types under Use list for the following record type
You can add
, delete and import (transfer record types from current data) record types. -
click the buttons Ok (or Cancel) to close the settings
-
click the button Save list definition
(oder Cancel ) to end the editing of the listThe list editor or list view will be displayed again without the additional buttons.
-
list editor only: click the button Cancel
top right to close the editorThe list with the list definitions will be displayed again.
Edit the layout of the list definition
-
click the button Edit
of the list definition to be editedThe list editor opens.
-
click the button Edit
Additional buttons will appear:
The image shows the list editor: (1) button Load list definition
, (2) button Settings list definition , (3) button Cancel editing , (4) button Save list definition , (5) column, (6) gray area in which a new column can be added -
click on a column for editing
The following window opens:
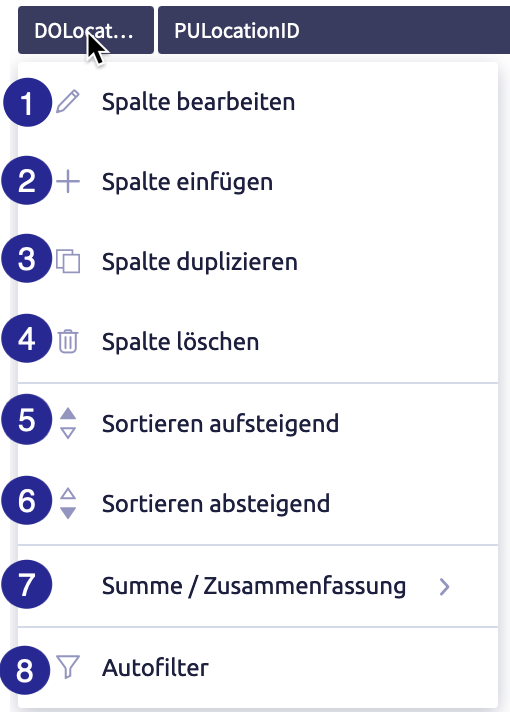
(1) edit column
, (2) insert column , (3) duplicate column  , (4) delete column , (5) sort ascending
  , (6) sort descending
  , (7) sum/summary, (8) auto filter
Table with all elements in the column header
Name Meaning Note edit column define column display for the list view editing depends on the permission of the user account insert column insert a column to the left of the current column only available if the list view is being edited duplicate column only available if the list view is being edited delete column only available if the list view is being edited sort ascending sort list by this column in ascending order sort descending sort list by this column in ascending order extended sort ascending sort the list already sorted by at least one column by this additional column in ascending order (within the rows with the same field content in the already sorted column) if the list is sorted by more than one column, a number is displayed in the column headers (1 for the first sort, 2 for the extended sort etc.) advanced sort descending sort the list of this additional column already sorted by at least one column in descending order (within the rows with the same field content in the already sorted column) if the list is sorted by more than one column, a number is displayed in the column headers (1 for the first sort, 2 for the extended sort, etc.) remove sorting the column is no longer taken into account for sorting Sum / Summary summary for all field types, sum for numeric field types possible options:
- Summary
- Summary marked
- Summary unmarked
not relevant in the editorAuto filter filter list to reduce number of rows not relevant in editor -
click on Edit column
The image shows settings using the example of one field: (1) field for column identifier (field names), (2) selection Column type, (3) button Field selection, (4) selection History information, (5) date selection, (6) field Column position, (7) pretext and suffix as fixed text for values in the list view, (8) selection Vertical column row, (9) checkbox Fix column, (10) checkbox Hide column, (11) checkbox Hide row if content exists, (12) button Create script, (13) selection Field type, (14) checkbox Adjust style, (15) footer with buttons for Delete column
, Cancel and OK to close settingsTable with all elements in the dialog Edit column
Name Meaning Note field Column identifier (meaningful) name to identify the column usually the field name selection Column type choices are Field / Parameter field / Fixed text / Function the default setting is Field button Field selection / text input field / button Function selection depending on preselection under (2) selection History information choices are History information (today) / History information (relative date) only available for selection (2) Field for Field with field content for history information; default is today selection Date only available for selection (2) Field field Column position pixel specification of the position of the left column margin can be used to position columns, especially for multi-line lists with sublists fields Pretext and Suffix fixed text that supplements the values displayed in the list view, e.g. currency specification as suffix example: numerical value receives dimension as pretext or suffix selection Vertical column line number of column lines. The choices are none / 1 / 2 / 3. default setting is none checkbox Lock column useful for wide lists: when scrolling horizontally through a list, the selected column on the left is locked, while all columns further to the right are scrolled exactly one column can be locked (including all columns to the left of the locked column). When editing another column, the fixed column is displayed. Setting the checkmark overwrites the previous selection. checkbox Hide column column is hidden, content can still be used for further processing (e.g. pivot or JavaScript). checkbox Hide row with content button Create script selection Field type field type influences the display of values in the list view field type; default is Character (C), example: if only numbers are saved in a text field, no calculations can be performed. In addition, the sorting may be different than for a field type Floating point number checkbox Adjust style additional font options (type, size, alignment, color, etc.) footer with buttons Delete column, Cancel, Ok delete column / all changes are discarded or applied -
edit entries and settings as required
-
if required, add further columns to the list
Options for adding columns
- recommendation for editing using list view: click on a field name in the record
-
click the header of a column and select Insert column
The new column will be inserted to the right of the column that was used to open the menu.
-
click the gray area
The new column will be inserted on the very right.
-
click the button Save list definition
(oder End editing ) to end the editing of the listThe list editor or list view will be displayed again without the additional buttons.
-
list editor only: click the button Cancel
top right to close the editorThe list with the list definitions will be displayed again.
Add a sublist
Sublists can display additional information in the list view. For example, a list of invoices may contain sublists that display the respective items for each invoice. Lists and sublists can contain sublists.
There are several ways to add sublists to list definitions:
- Open the list definition in the list editor in system settings.
- Load list definition in the list view using the record type overview.
A list definition must already exist in order to create sublists.
-
open the list definition in system settings or load the definition in the list view to which you want to add a sublist
-
list view only: click the button Row options
 to the left of the first column
The following window opens:
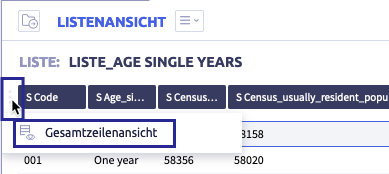
click on Total row view
-
click the button Edit
The following window opens:
-
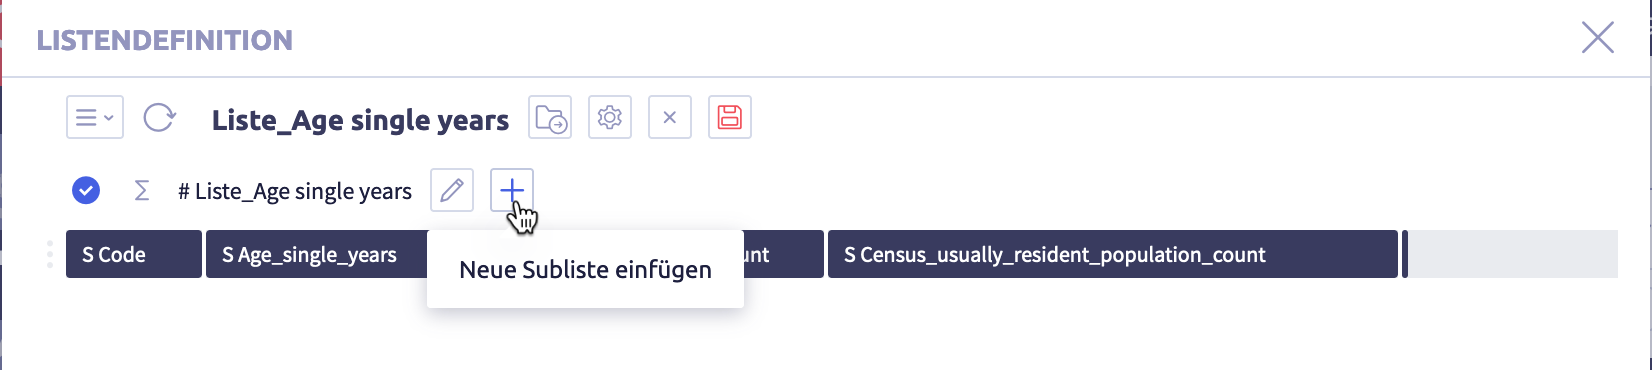
click the button Add new sublist
The following window opens:
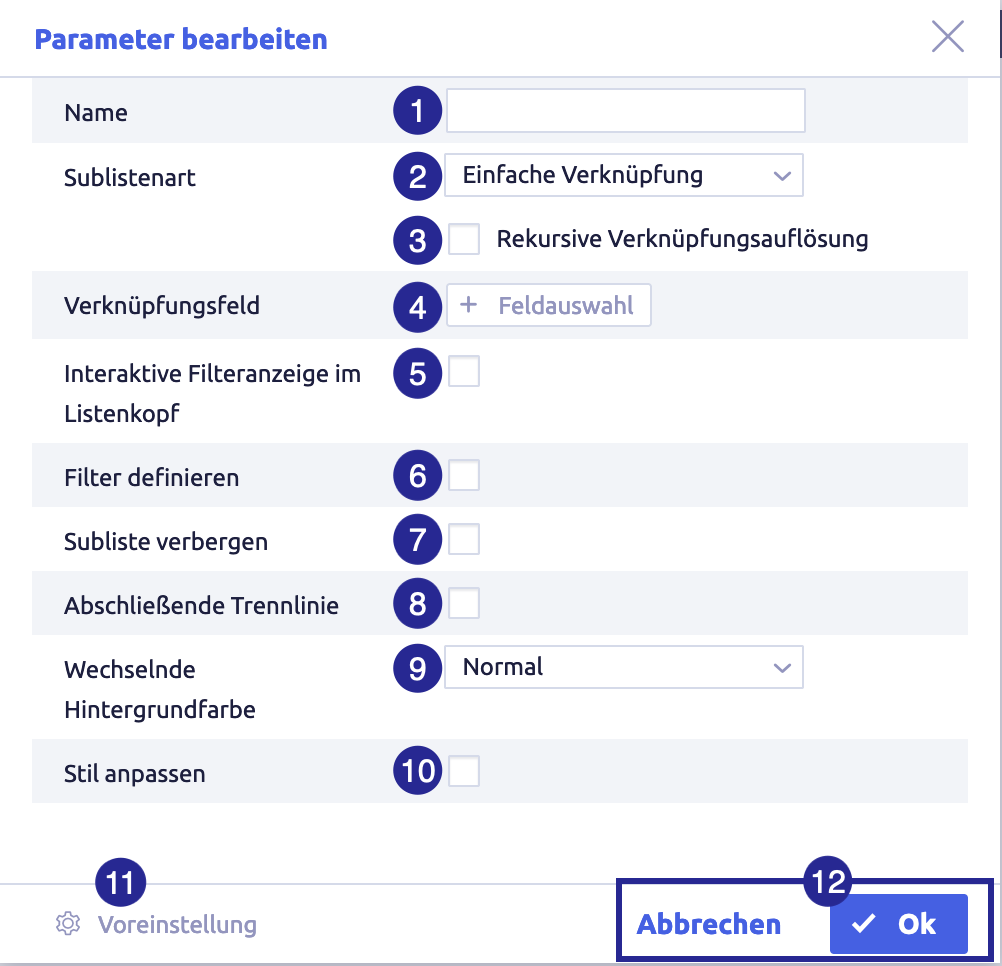
The image shows the sublist parameters using the example of the sublist type Simple link: (1) field Sublist name, (2) selection Sublist type, (3) checkbox Recursive link resolution, (4) button Field selection for link field, (5) checkbox Interactive filter display in list header, (6) checkbox Define filter, (7) checkbox Hide sublist, (8) checkbox Close separator, (9) selection Alternating background color, (10) checkbox Customize style, (11) button Preset, (12) buttons Cancel and Ok to close the parameters
Table with sublist parameters
Name Meaning Note field Name name of the sublist selection Sublist type determines where the information that supplements a row of the list view is obtained from possible sublists: link, history information, repeating group, reporter field source, content-independent display checkbox Recursive link resolution only for Simple link and Parent link linking field depending on the sublist type, the button Field selection or input fields appear checkbox Interactive filter display in list header not available for Repeating groups, History information, History info (interval), Content-based display checkbox Define filter not available for Repeating groups, History information, History info (interval), Content-based display checkbox Hide sublist layout customization for the list view checkbox Final separator layout customization for the list view not available for Content-dependent display choice Alternating background color layout customization for the list view not available for the sublist type Content-based display; normal, per record and per row are available checkbox Adjust style button Default resets the style of the sublist buttons Cancel / Ok all changes are accepted or discarded -
enter a sublist name in the field Name
-
select the Sublist type
Table with all sublist types
Name Meaning Note simple link where does this record refer to? parent link which other record refers here? field-content link records that have the same field content are displayed e.g. status completed repeating groups all iterations are displayed history information all field contents of a history field are displayed history info (interval) field content of a history field at specified times, e.g. every first day of the month depending on the field content, the style of the row can be defined, certain fields of the record can be shown or hidden e.g. status completed colors row green, status open colors row yellow reporter field source new sublist based on a reporter field -
if required, activate the checkbox Recursive link resolution
Tips
The checkbox is only available for the sublist types Simple link and Parent link.
Recursion means: records refer to other records of the same type, e.g. Person refers to Person, which refers to another person.
If the checkbox is activated, you will be able to search in both directions.
-
edit the row below Sublist type
Depending on the sublist type, the Field selection button or input fields will appear.
-
if required, activate checkboxes
Overview of the checkboxes for sublists
Depending on the sublist type selected, not all checkboxes may be displayed.
Name Meaning Note checkbox Interactive filter display in the list header not available for Repeating groups, History information, History info (interval), Content-based display checkbox Define filter not available for Repeating groups, History information, History info (interval), Content-based display checkbox Hide sublist checkbox Final separator not available for Content-based display -
if required, change the selection Alternating background color
Tips
The selection is not available for the sublist type Content-based display.
The following options are available:
- normal (default)
- per record
- per row
-
if required, activate the checkbox Customize style and edit as needed
The following options open:
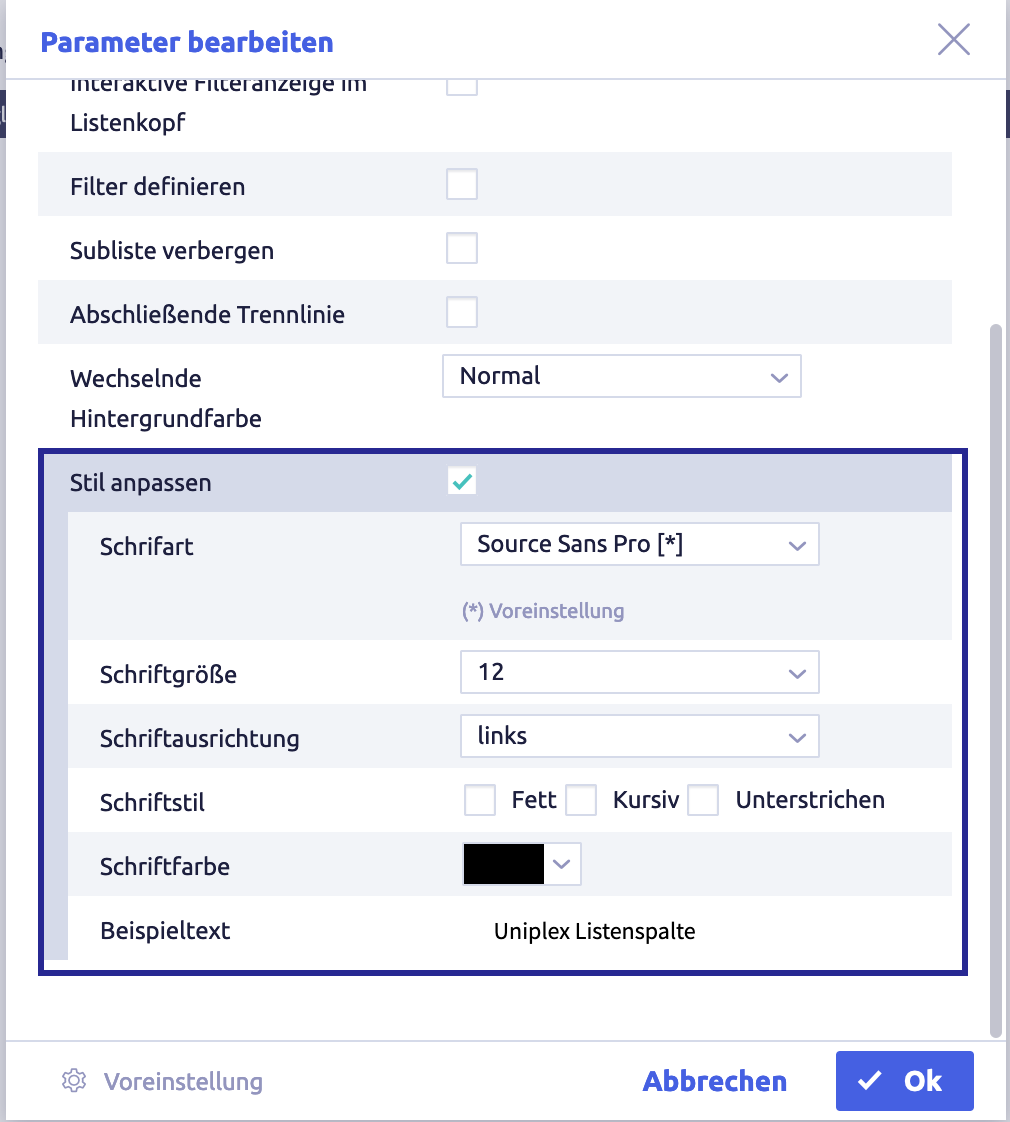
To reset the style, remove the tick from the checkbox or click the button Default setting.
-
click the button Ok (oder Cancel) to close the parameter
The following window opens:

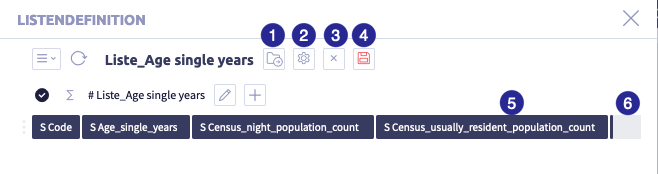
The image shows a list definition with sublist: (1) button Set list parameters
, (2) button Insert new sublist , (3) button Set sublist parameters , (4) button Delete sublist , (5) button Insert new sublist -
follow the instructions from step 2 in Add columns to list definition to add column(s) to the sublist
-
if required, add further sublists (to the list or a sublist)
-
click the button Save list definition
(or Cancel editing ) to end the editing of the list definitionThe list editor or list view will be shown again.
-
list editor only: click the button Cancel
to close the editorThe list with the list definitions will be displayed again.
Edit a sublist
Sublists may be edited in the list definition, in the list editor in system settings or in the list view by selecting record type overview.
-
open the list definition in system settings or load the definition in the list view in which you want to edit a sublist
-
list view only: click the button Row options
to the left of the first columnThe following window opens:
click on Total row view
-
click the button Edit
The following window opens:
The image shows a list definition with sublist: (1) button Set list parameters
, (2) button Insert new sublist , (3) button Set sublist parameters , (4) button Delete sublist , (5) button Insert new sublist -
edit the sublist as desired
- edit the columns (follow the instructions from step 3 in editing the layout of the list definition)
- if required, add further sublists (to the list or to the sublist)
- if required, delete a sublist
-
if required, edit the parameters
Table with sublist parameters
Name Meaning Note field Name name of the sublist selection Sublist type determines where the information that supplements a row of the list view is obtained from possible sublists: link, history information, repeating group, reporter field source, content-independent display checkbox Recursive link resolution only for Simple link and Parent link linking field depending on the sublist type, the button Field selection or input fields appear checkbox Interactive filter display in list header not available for Repeating groups, History information, History info (interval), Content-based display checkbox Define filter not available for Repeating groups, History information, History info (interval), Content-based display checkbox Hide sublist layout customization for the list view checkbox Final separator layout customization for the list view not available for Content-dependent display choice Alternating background color layout customization for the list view not available for the sublist type Content-based display; normal, per record and per row are available checkbox Adjust style button Default resets the style of the sublist buttons Cancel / Ok all changes are accepted or discarded Table with all sublist types
Name Meaning Note simple link where does this record refer to? parent link which other record refers here? field-content link records that have the same field content are displayed e.g. status completed repeating groups all iterations are displayed history information all field contents of a history field are displayed history info (interval) field content of a history field at specified times, e.g. every first day of the month depending on the field content, the style of the row can be defined, certain fields of the record can be shown or hidden e.g. status completed colors row green, status open colors row yellow reporter field source new sublist based on a reporter field
-
click the button Save list definition
(or Cancel editing ) to end the editing of the list definitionThe list editor or list view will be displayed again.
-
list editor only: click the button Cancel
to close the editorThe list with the list definitions will be displayed again.
Adopt orphaned list definitions
A list definition with the permission Private list under Edit & view can become orphaned if the user or group with this permission has been deleted. This orphaned definition can no longer be edited. It is therefore possible for a user with admin permissions who is currently logged in to adopt all list definitions that are orphaned at this time.
Orphaned list definitions are edited in the system settings.
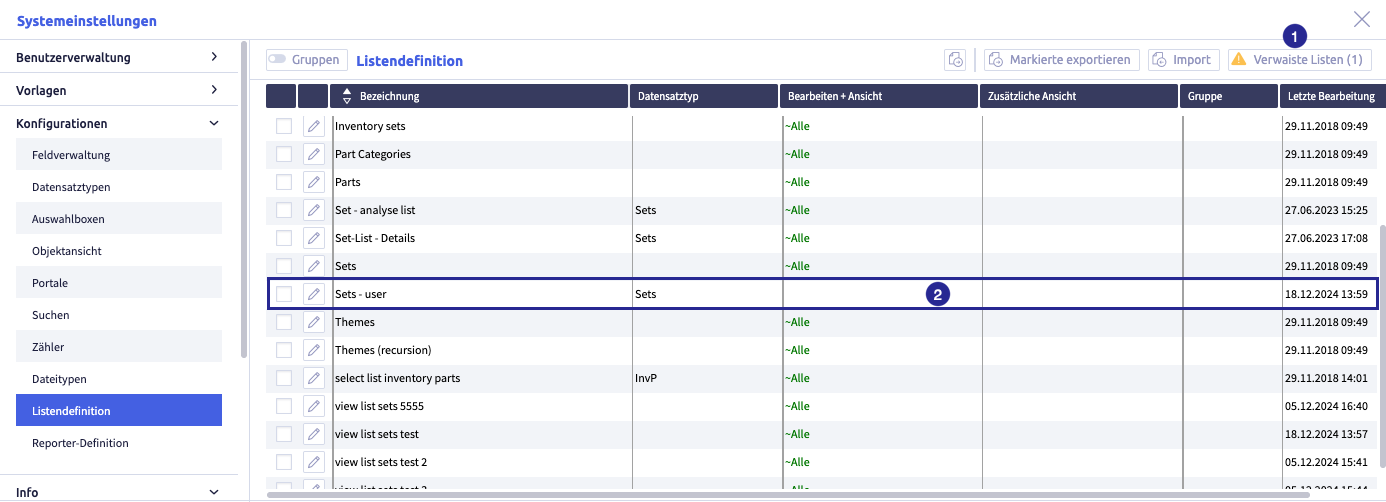
The image shows the list with list definitions in the system settings: (1) button Orphaned lists with warning and number of currently orphaned lists, (2) row with an orphaned list definition (recognizable by the empty Edit & view column)
-
open the system settings for list definitions
-
click the button Orphaned lists at the top right
tip "" The button will only be displayed if there are orphaned lists.
The following window opens:
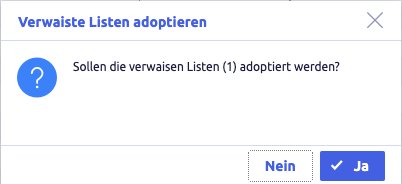
-
click the button Yes (or No)
The list with the list definitions will be displayed again.
A confirmation message appears for a few seconds:

Tips
- All orphaned definitions are adopted.
- The adopted definitions still have the permission Private list under Edit & view.
- The Edit & view column contains the user name of the user who has adopted the definition (in the screenshot User: Admin).
-
if required, edit the list definition
Delete a list definition
Sublists may be edited and deleted in the list definition, in the list editor in system settings or in the list view by selecting record type overview.
-
open the list definition in system settings or load the definition in the list view you want to delete
-
click the button Selection
The following selection opens
-
click on Delete list definitions
A confirmation window opens:
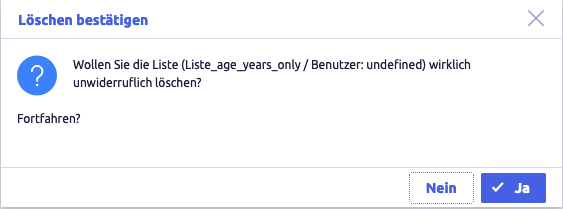
-
click the button Yes (or on the button No or the button Cancel
top right if you want to cancel)The following window opens:
-
click the button End editing
-
lists editor only: click the button Cancel
to close the editorThe list with the list definitions will be displayed again.
Create a new list definition as a template
An existing list definition may be used as a new list definition with the same settings and links by selecting Save list definition as.
-
open the list definition in system settings or load the definition in the list view you want to create as a new template
-
click the button Selection
The following selection opens
-
click on Save list definition as
The following window opens:
(1) toggle to display groups with list definitions, (2) button List definitions for current data
, (3) button Save as , (4) field List name, (5) selection Edit & view permission, (6) selection Permission for additional view, (7) buttons for Cancel and Save as to close the windowTips
- The toggle Groups and the button Filter pre-filters the list.
- The button Filter restricts the list to the definitions that use the current record type.
- The toggle Groups and the button Filter
-
edit the field List name
-
if required, edit the selection Edit & view permission
The following options are available:
- public list (all)
- private list
- user group(s), if user groups were created
-
if required, edit the selection Permission for additional view
This selection is available for Private list only in selection Edit and view permission
-
click the button Save as
(oder Cancel) to close the windowThe list editor or list view for the new list will be displayed.
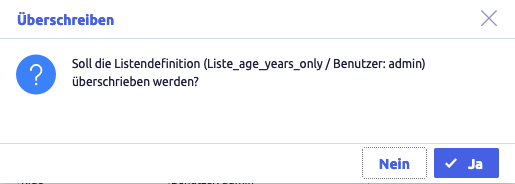
Warning
If you have not assigned a new list name, the following warning opens
Organize list definitions into groups
If the function Groups is active, the record types can be organized into groups for simplified management.
The following actions are possible:
- create groups
- rename groups
- delete groups
- add elements to a group
- remove elements from a group
Note
The actions are shown using the example Field management.
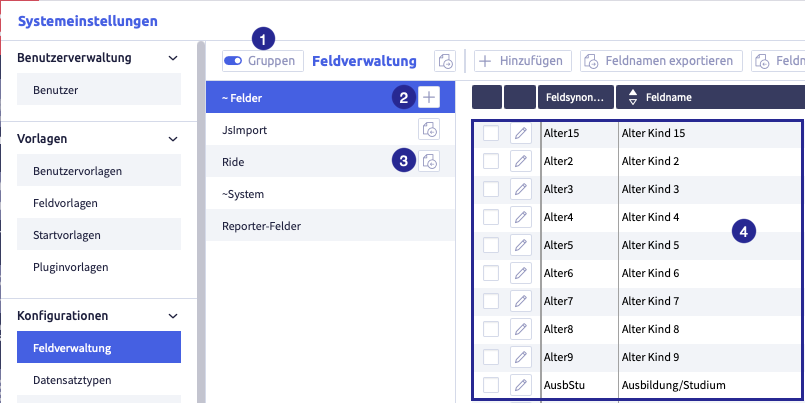
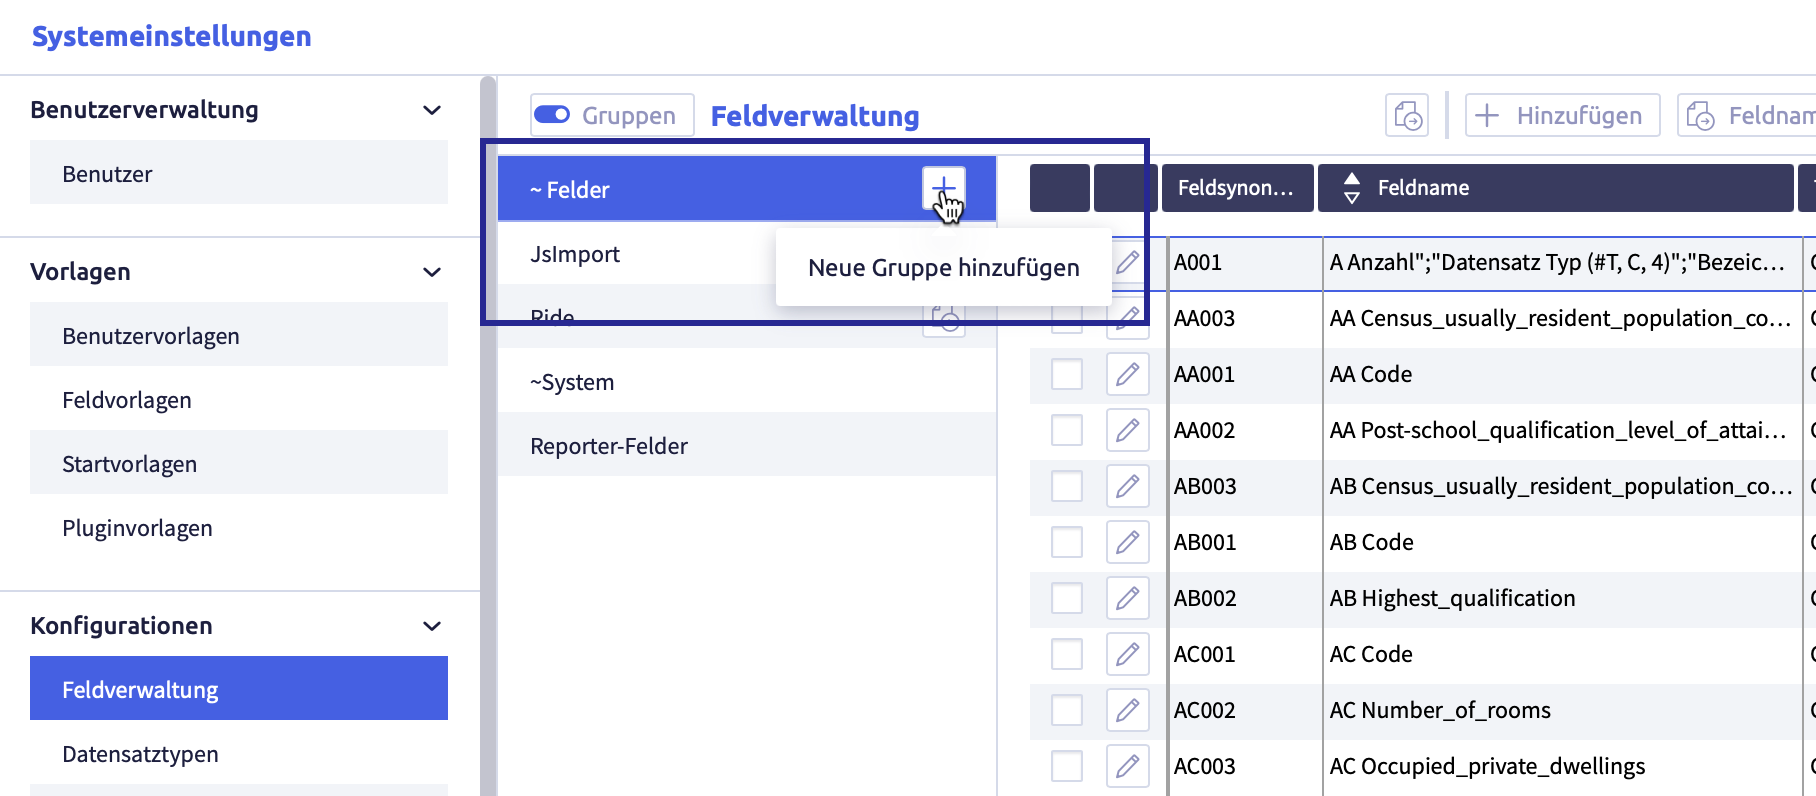
The image shows the field administration with active groups: (1) button Activate groups, (2) button Add group
Create a group
The image shows the field administration with active groups
Create user-defined groups
-
click the button Add group
A new row will be added:
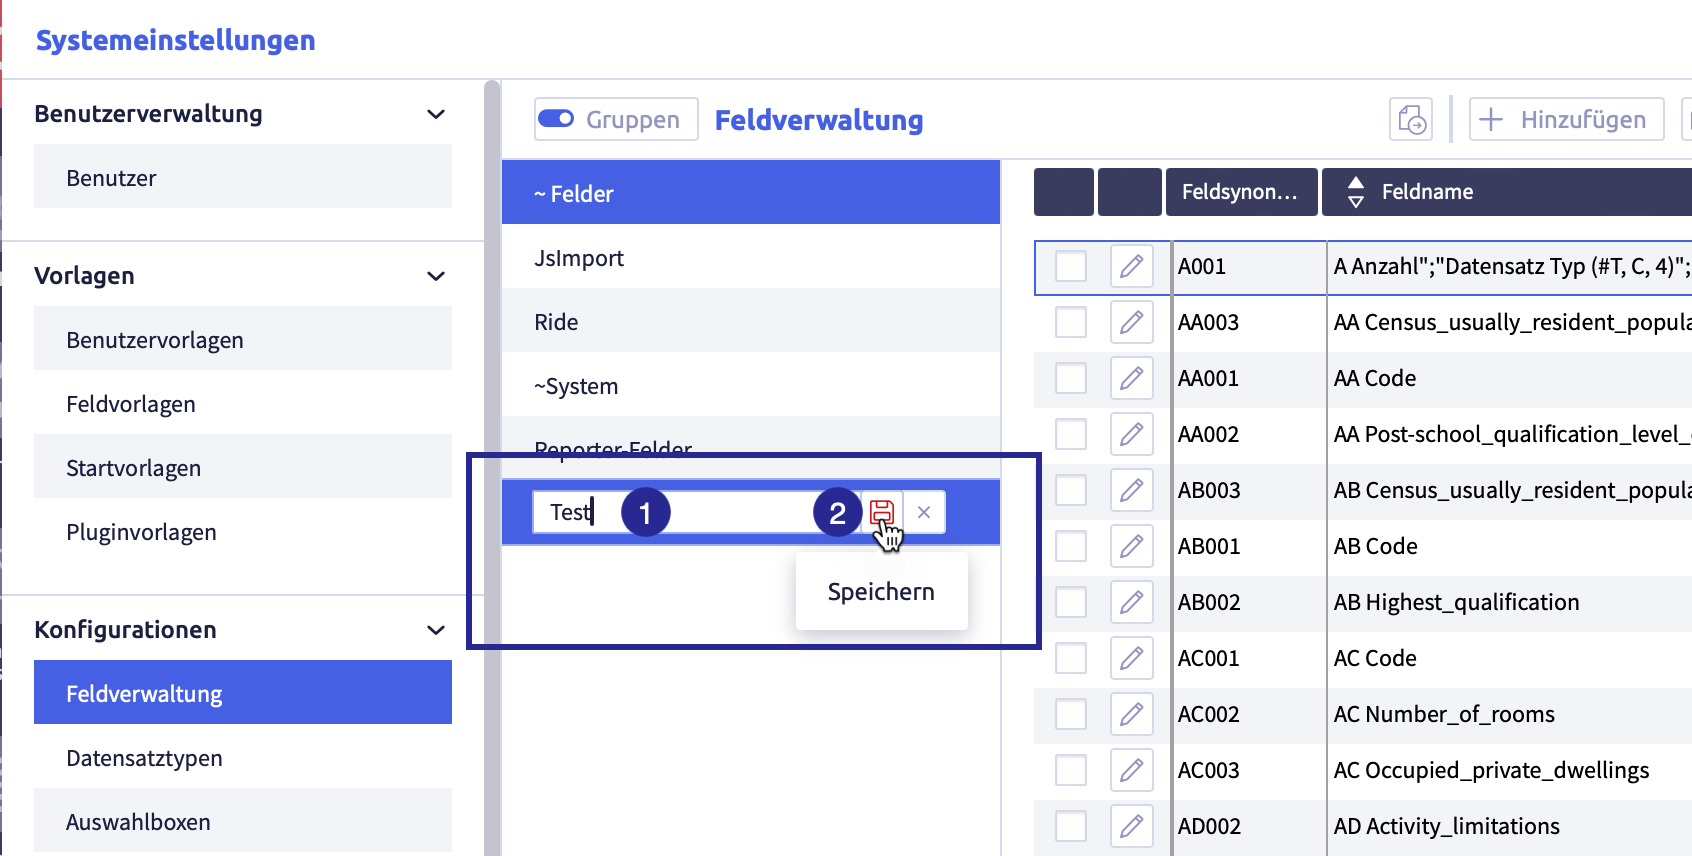
-
enter the name of the group
-
click the button Save
The list with the group names will be updated, the group has been sorted alphabetically.
Rename a group
-
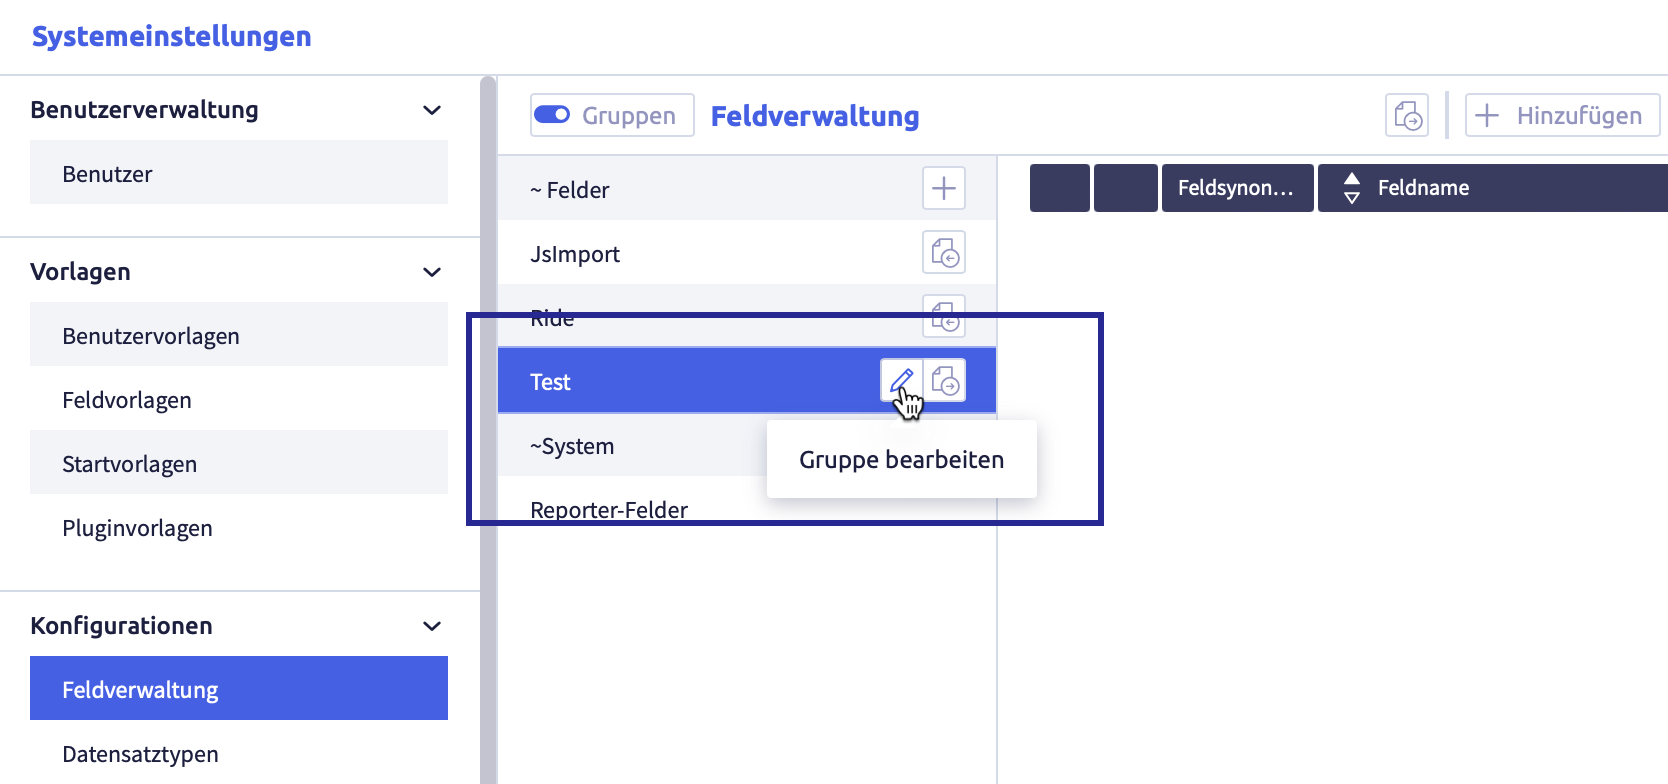
click the group you want to edit
The button Edit
will appear.The image shows the group that can be edited:
-
click the button Edit
The element can be edited or deleted.
The image shows the edit possibilities of the group:
-
edit the group name
-
click the button Save
(or Cancel)The list with the group names will be updated, the group has been sorted alphabetically.
Delete a group
-
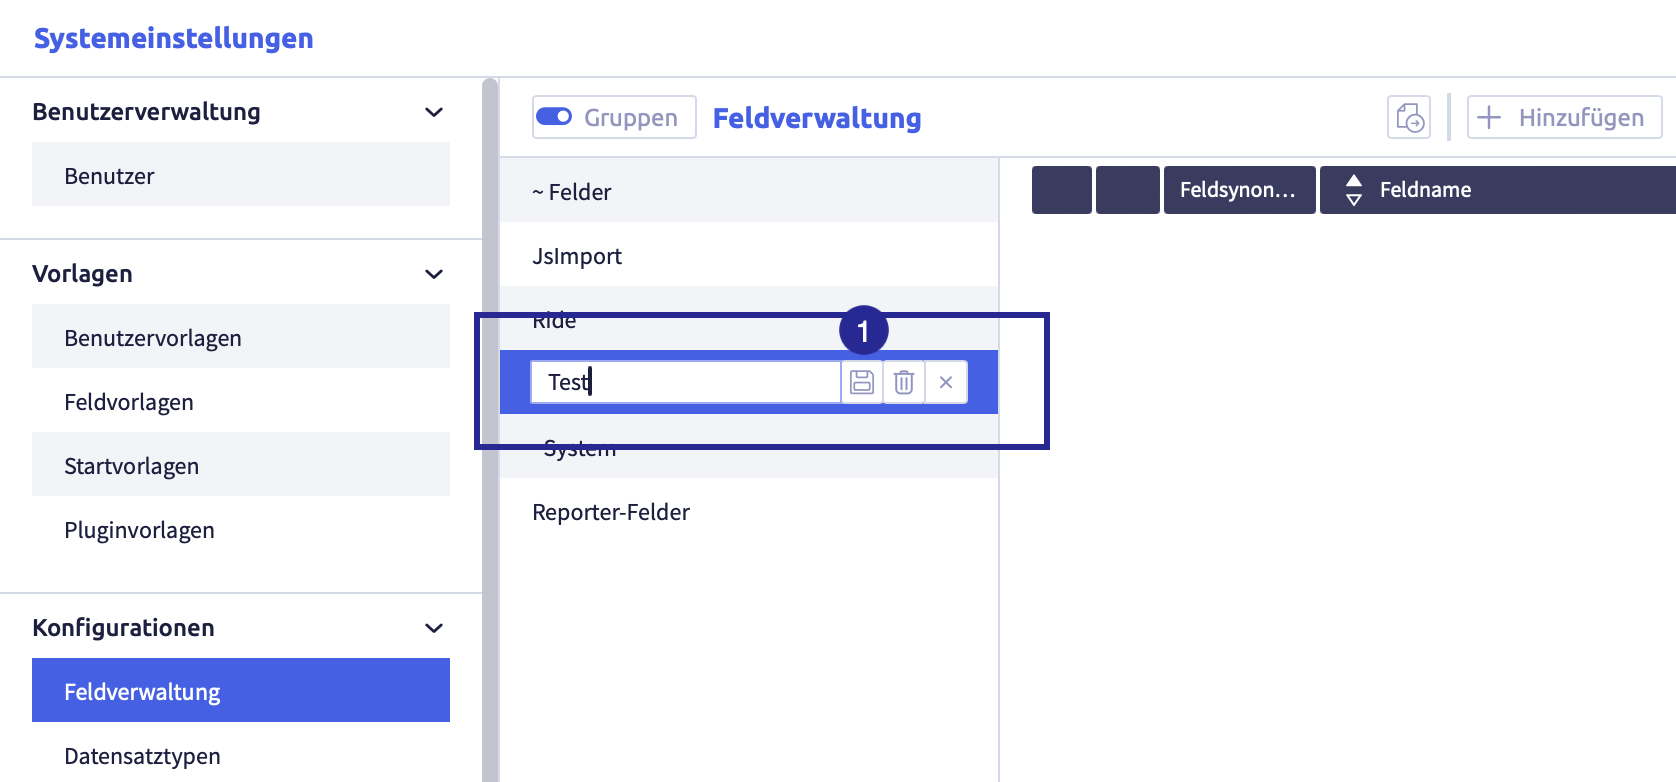
click the group you intend to edit
The button Edit
will appear.The image shows the group that can be edited:
-
click the button Edit
The element can be edited.
The image shows the edit possibilities of the group:
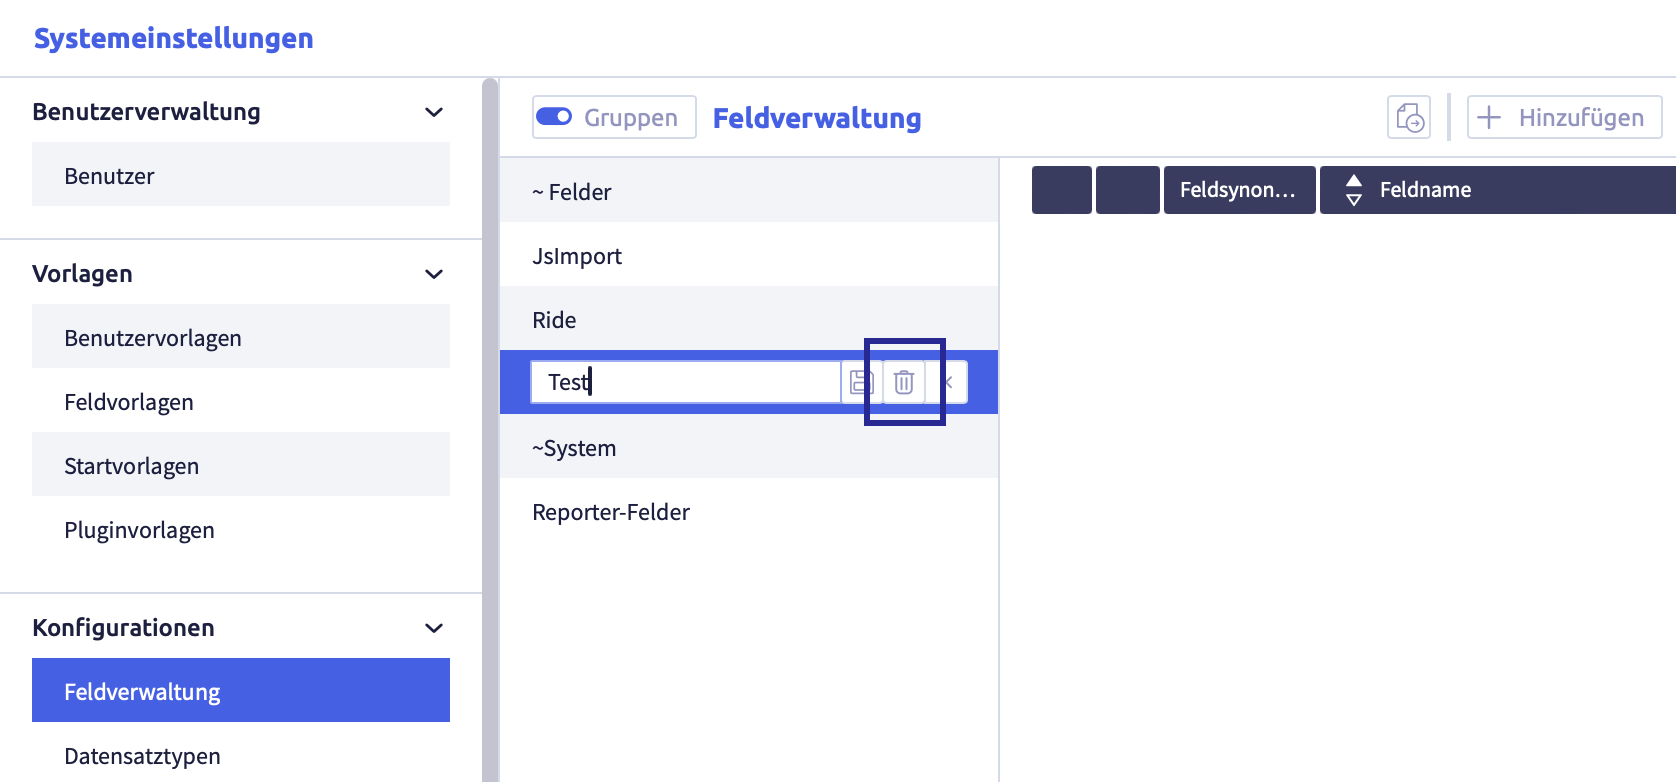
-
click the button Delete
The following confirmation window opens:
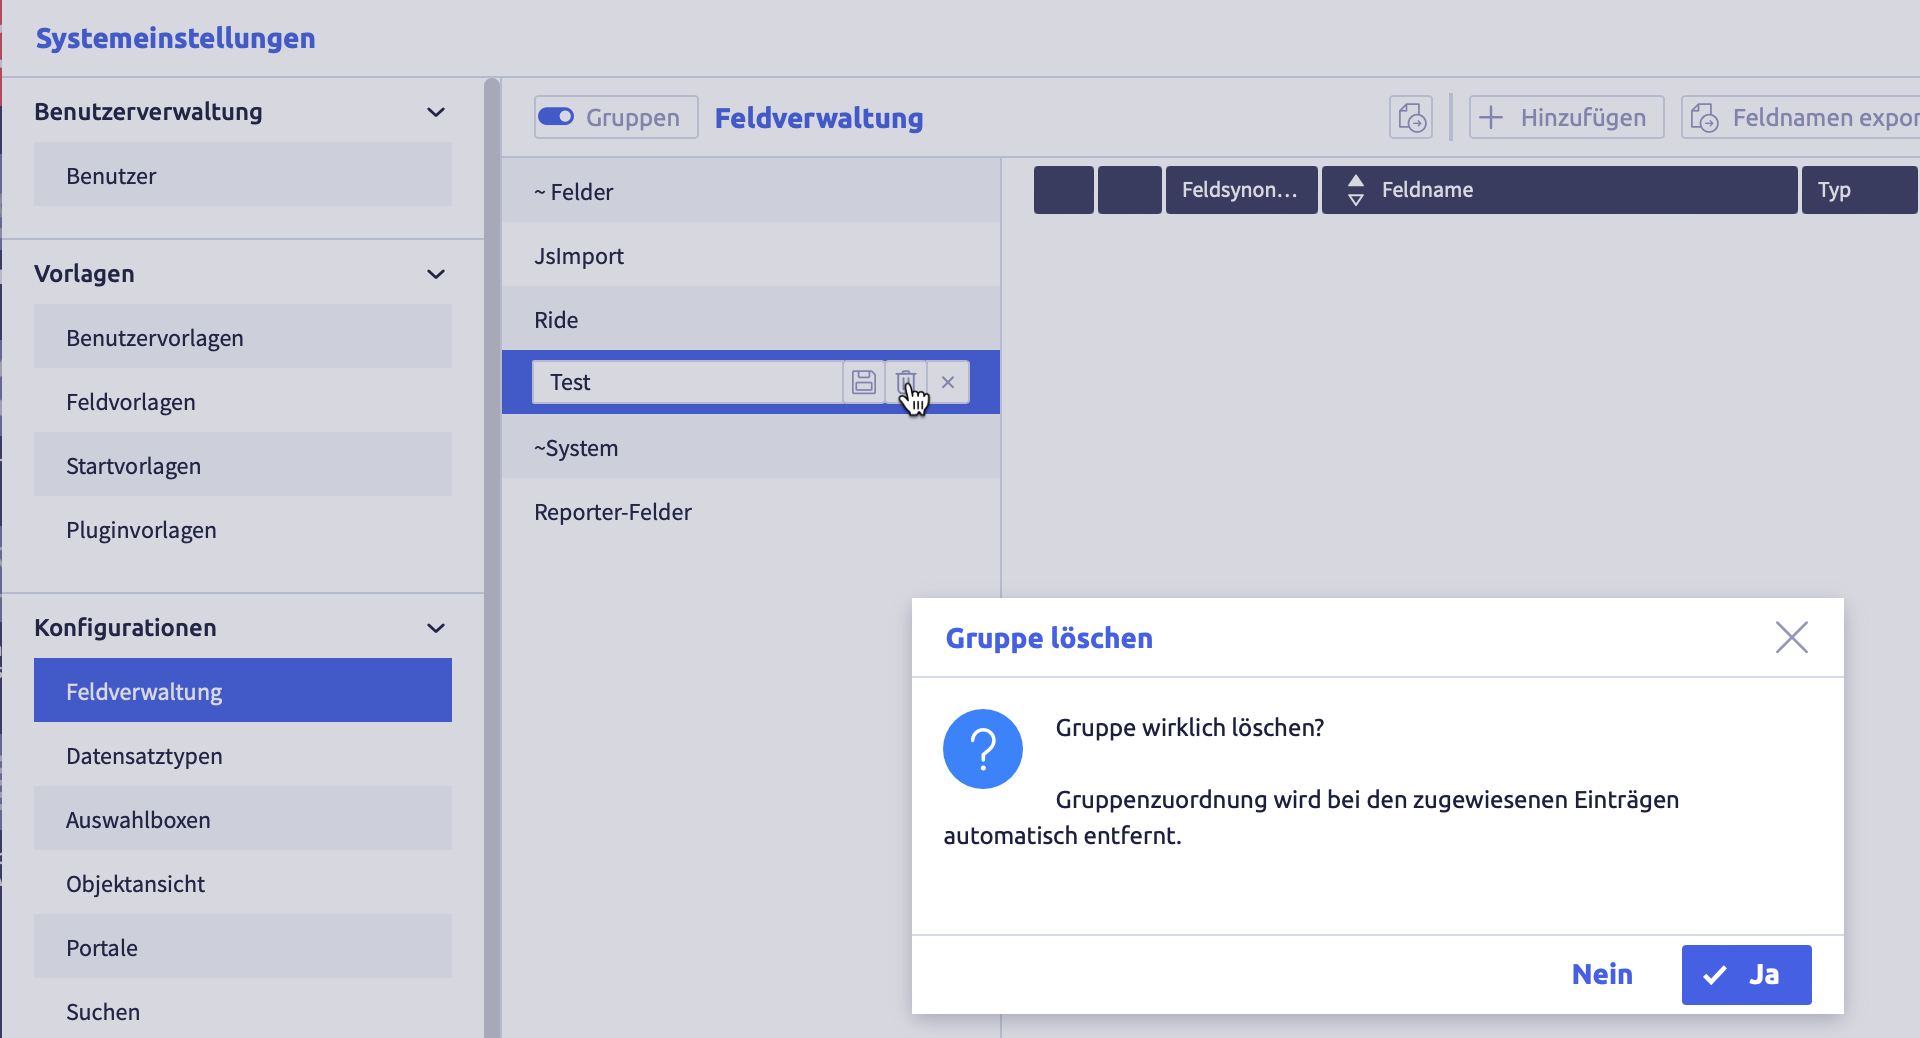
-
click the button Yes (or No)
The group will be deleted and the list of groups will be updated.
Links of elements to this group are automatically deleted.
Add elements to a group
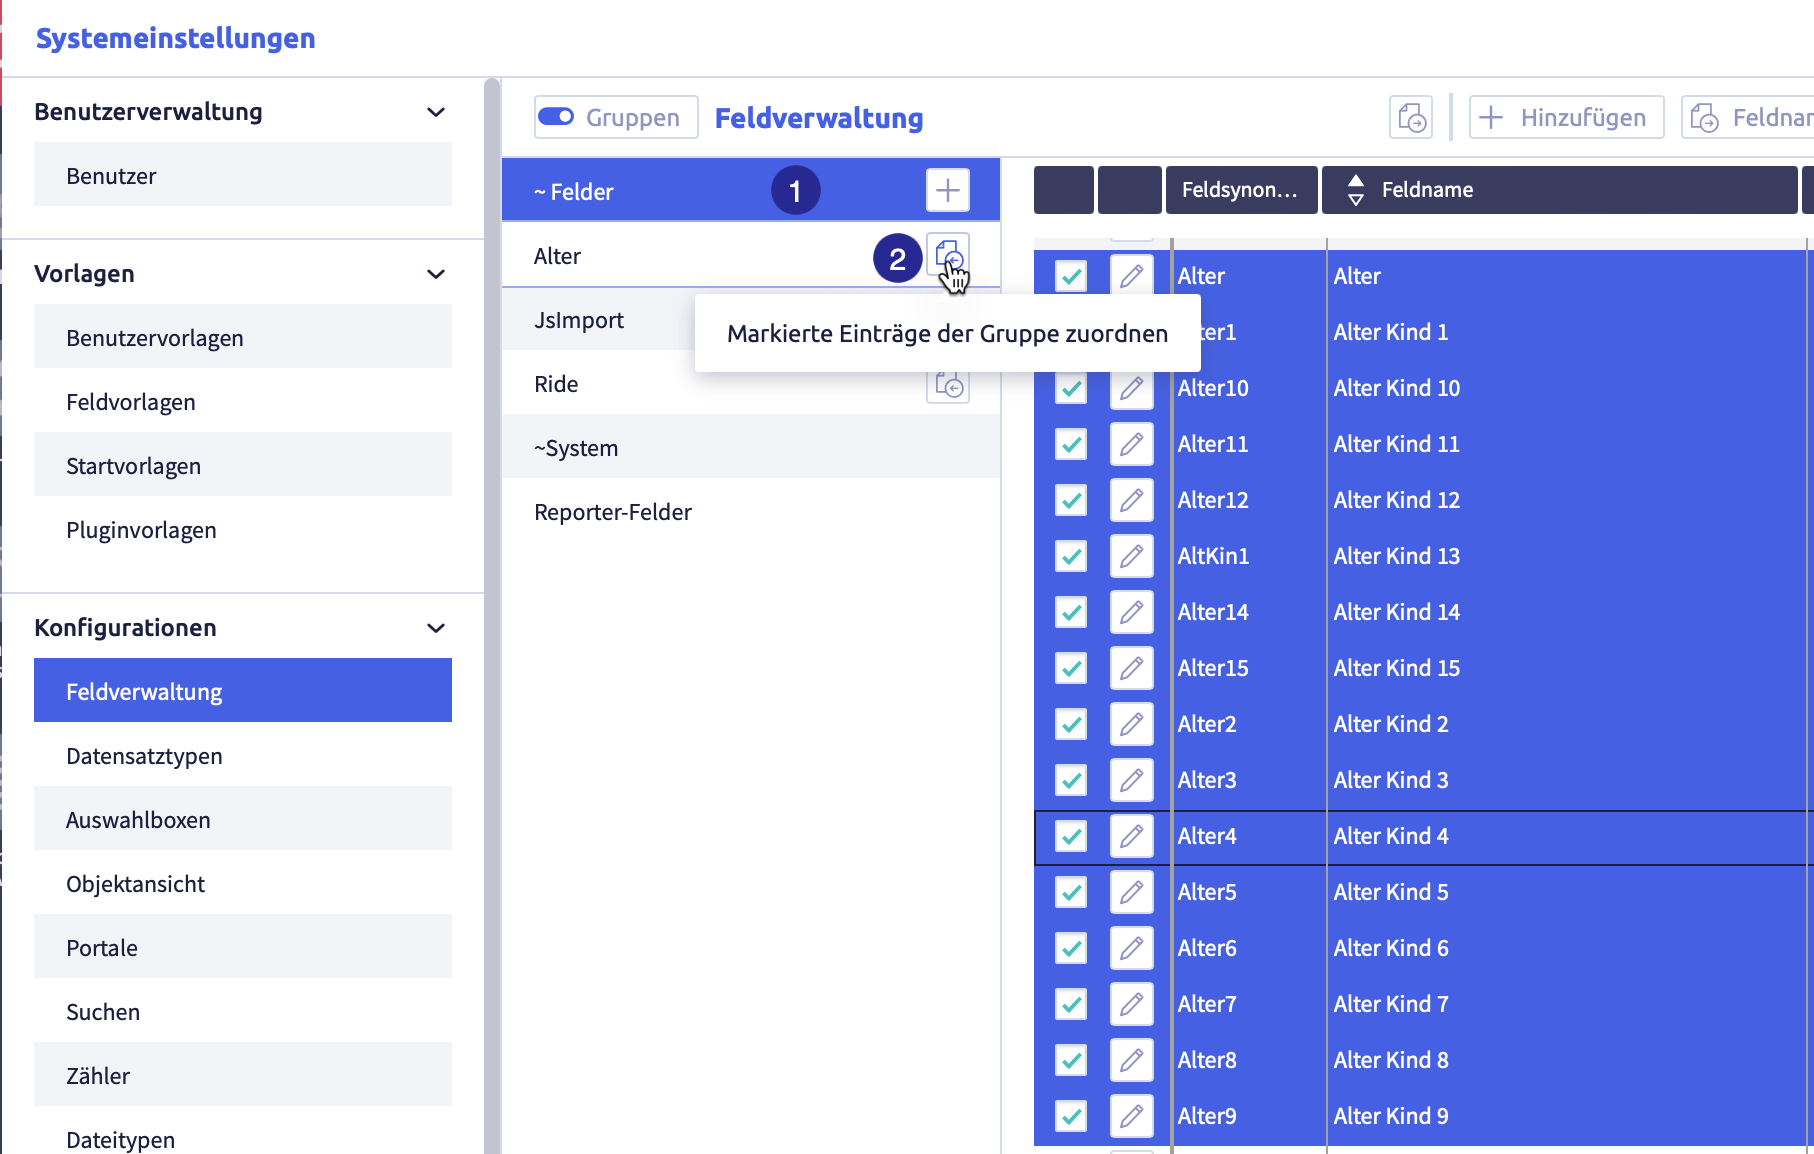
(1) selected group with selected elements you want to add to another group, (2) button Assign selected entries to the group
-
select a group from which you want to add elements to another group
-
select all the elements you want to add to the group
-
click the button Assign selected items to group
of the new groupThe elements are added to the group.
An element can belong to several groups.
Remove elements from a group
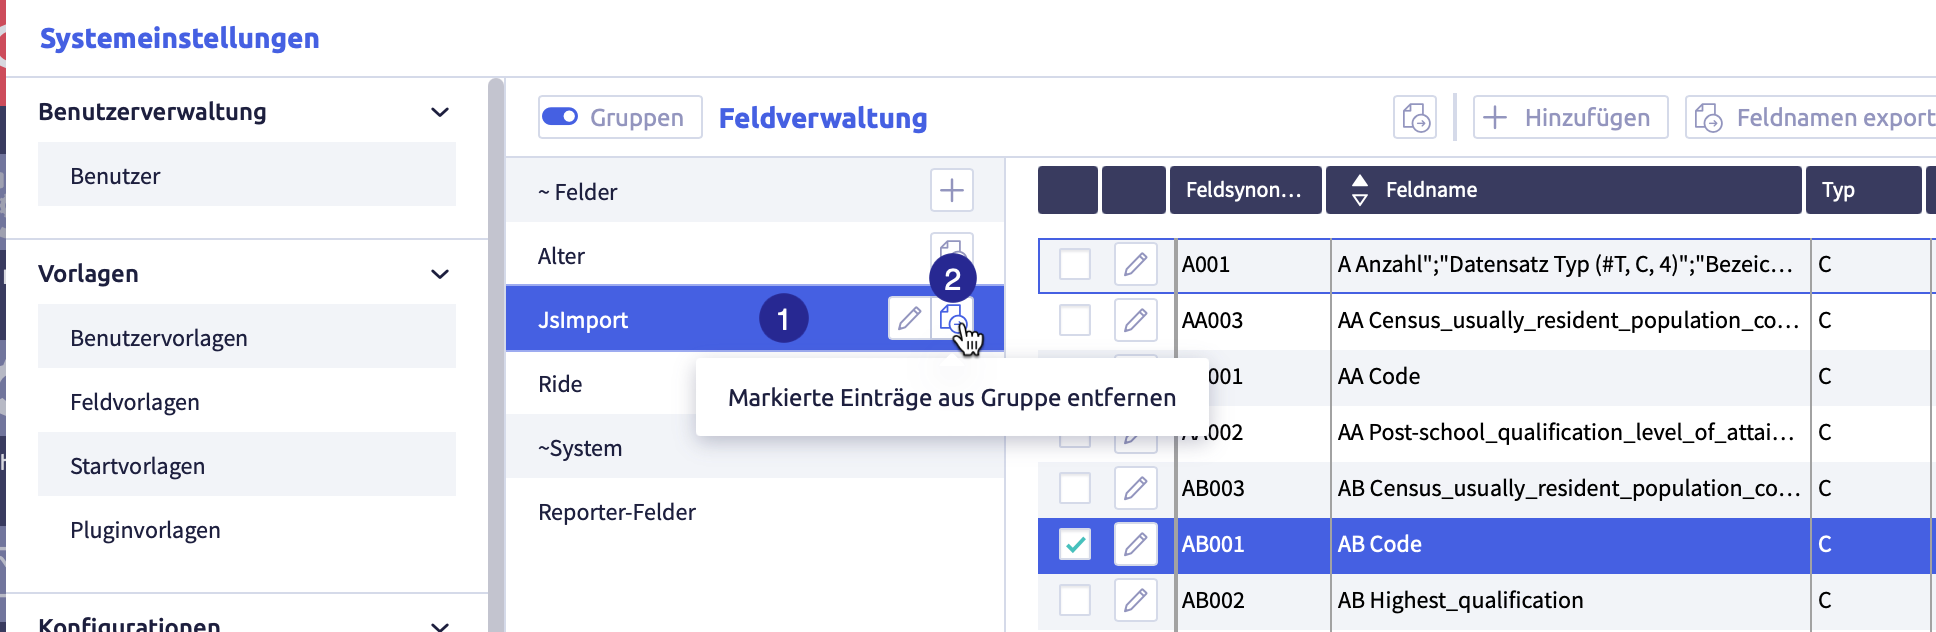
(1) selected group with selected elements to be removed from the group, (2) button Remove selected entries from group
-
click the group from which you want to remove elements
-
select all the elements you want to remove from the group
-
click the button Remove selected items from group
of the groupThe elements will be removed from the group.
Export and import list definitions
The following exports and imports are possible for list definitions:
Each export will be carried out for selected rows in the list of list definitions only.
Image with buttons for export and import
The image shows the export and import buttons: (1) checkbox to select row, (2) button Export selected data as CSV
Export selected data as CSV file
Image with buttons for export and import
The image shows the export and import buttons: (1) checkbox to select row, (2) button Export selected data as CSV
-
select the rows you want to export
-
click the button Export selected data as CSV file
The CSV file will be downloaded and saved in the download folder (or the folder that was set for it in the browser).
The file name will be generated automatically and will be called #List definitions.csv.
A list with the following information will be exported:
| Column | Meaning | Note |
|---|---|---|
| name | name of the list definition | |
| record type | record types using this list definition | |
| edit & view | permissions for who is allowed to edit the list definition and who is allowed to view the configuration | selection between Private list, User group (a group with users) and Public (all) |
| additional view | adds Edit & view if a restriction has been set, i.e. Public (all) is not active | selection between None (default), User group (a group with users) and Public (all) |
| group | name of the group(s) of the list definition | |
| last edit | time of last edit |
Export selected definitions
This export includes
- list name
- names of the column headers of the lists
List definitions exported that way can be imported back into a CortexEngine.
Image with buttons for export and import
The image shows the export and import buttons: (1) checkbox to select row, (2) button Export selected data as CSV
-
select the rows you want to export
-
click the button Export selected
The following window opens:

A .tar file will be downloaded and saved in the download folder (or the folder that was set for this in the browser).
The file name will be generated automatically.
Import definitions
Exported definitions from another CortexEngine can be imported into the current CortexEngine using the Import button.
Image with buttons for export and import
The image shows the export and import buttons: (1) checkbox to select row, (2) button Export selected data as CSV
-
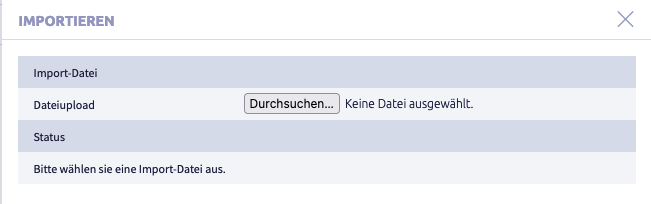
click the button Import
The following window opens:
-
click the button Select file
A window with a file folder opens.
-
select a file
The following formats are suitable for import:
- .tar
- .tar.gz
- #Lst.ctxexp
-
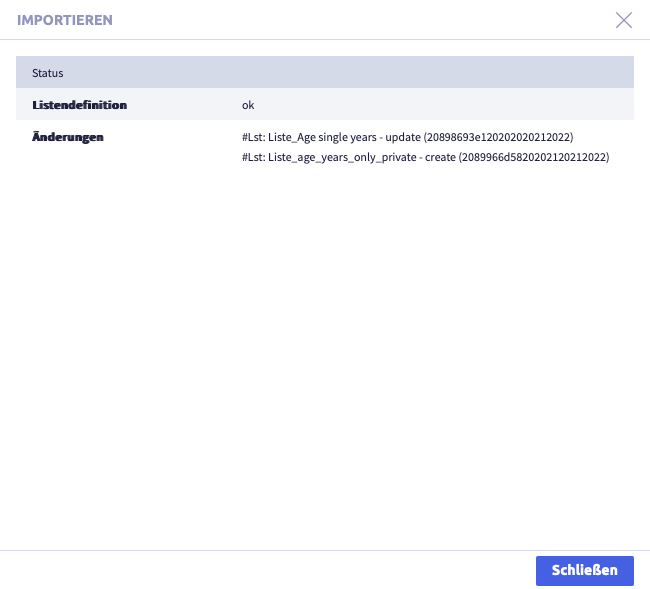
click the button Import
The following window opens:
-
click the button Close
The list in List definition will be displayed again.